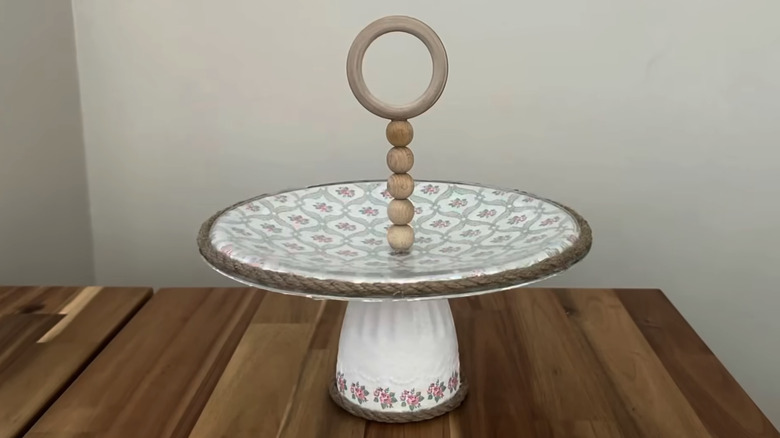
Upcycle An Old Pot Lid And A Cup Into A Countertop Storage Solution
When something breaks, especially if it has glass components, it's easy to want to toss it straight into the trash. However, even cracked items can be repurposed and given new life with some craftiness. In fact, there are quite a few crafty and creative ways to repurpose broken glass in your home and garden. For example, if you have an extra pot lid, whether its matching pot broke or the lid itself has a crack, you may not want to use it for cooking, but you can turn it into an adorable countertop storage solution, as YouTuber Evrim Taşer Yılmaz demonstrates. With a drinking glass and a pot lid, you can create an adorable stand that looks similar to a cake stand and can be tailored to fit perfectly in your kitchen. The weight of the glass makes the final result feel more high-end than similar plastic items, and you might even have most or all of the materials you'll need.
For this DIY project, the main materials are the pot lid and the glass cup. A broken drinking glass with intricate details or sentimental value is perfect for this, but a bowl could work well, too, especially if you want a shorter stand. Additionally, you'll need glass glue or epoxy, depending on the glass' damage, along with a screwdriver, sandpaper, and cleaning materials. The decorative elements are an important part of transforming the lid and cup into what looks like an actual piece of functional kitchen decor. Decoupage with patterned or solid colored paper, wooden beads, twine, ribbon, paint, and more can all be incorporated to disguise the base materials.
How to create your DIY storage tray
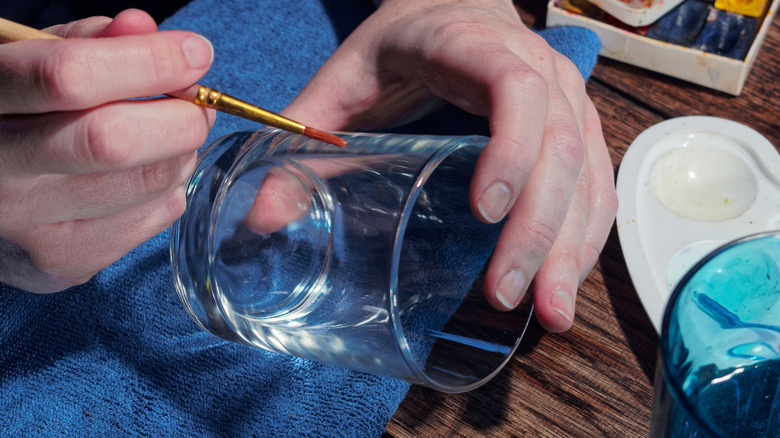
The first step for this project is repairing the glass. While you may decoupage or paint over the glass surfaces, it is still important to fill in any cracks so that the result looks smooth and is durable. For items with hairline cracks or clean breaks, glass glue is a good option. It will stick glass back together, but it does not fill in gaps. If there are any missing pieces or chips in the glass, then epoxy is a better solution. To use it, clean the glass thoroughly with soap and water. Be sure to rinse and allow the glass to dry completely. Apply glue in thin layers, carefully removing any excess as you go. Avoid getting it on your skin, and make sure the glue is cured completely before moving on in the DIY process.
From there, use the screwdriver to remove the handle or knob from the lid. Clean away any debris to prep the glass for decor. At this point, you can decoupage or paint the glass lid. Keep in mind that the lid will sit like a bowl for this DIY, not right side up in the way the lid would otherwise be used. To hide the hole in the center of the lid, you can add a tall center handle to your stand. Decorate the cup to your preference, then turn it upside down and use glass glue to secure the inverted pot lid on top. Add trim or details to finalize the look, and ensure that everything has time to cure completely before using the stand for storage.
Decorating the glass stand
If you like a vintage, cottagecore look, then using wooden beads, twine trim, and cute floral decoupage is a great starting point. For the tall center handle, thread wooden beads on a dowel or wire and secure them using a screw through the hole and bottom bead. Alternatively, it can be secured with glue, especially if you don't plan to transport the stand frequently. Napkins and decorative paper are ideal for decoupage, or you can reuse a plastic bag to create stunning floral designs for your glass surfaces. Wooden beads, twine trim, and floral patterns leave you with an adorable result, but it is not the only way to style this.
For a more modern look, opt for a solid paint color, or try leaving the glass transparent. If you are painting, be sure to use a paint specifically designed for use on glass so that it doesn't rub off over time. There are metallic, matte, stone, and all kinds of other finishes and colors. Swap the twine with ribbon, glass beads, faux pearls, or any other material you can glue on as trim. If you don't want a handle, cover the lid's hole by filling and painting over it, or gluing a bead there.
Once your hard work is done, avoid submerging the stand, and do not set food directly on the stand unless you used a food-grade paint or a food-safe sealant. Instead, only place packaged food items on it or set a napkin down first. Then, if needed, keep kitchen counters clutter-free with even more decorative solutions.