Say Good-Bye To Kitchen Counter Clutter & Meet The Dollar Tree DIY That Saves Space

We may receive a commission on purchases made from links.
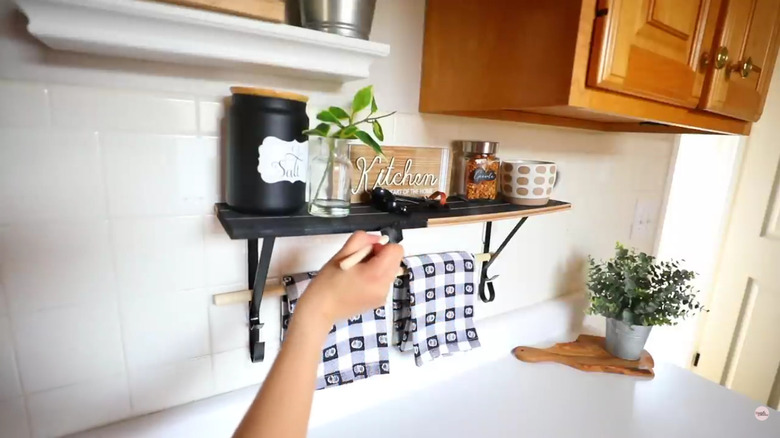
Dollar Tree space-saving DIYs often offer great solutions for the clutter problems brought on by tiny living. Take the floating shelf that YouTuber Bargain Bethany created from a pair of plant hangers, a few craft boards, and some Command strips. This knick-knack perch is only as long as the boards that make up the shelf, and making this DIY is a solid tool in the fight against clutter on your kitchen countertop. The Dollar Tree mini shelf can be made small enough to fit into tight spaces that go unused or underused, like the area between the fridge and the stove. Once finished, the shelf becomes a repository for hot pads, spices, and other small kitchen items. Since most of the materials for this project come from the discount store, you'll still have pocket money leftover to treat yourself to a coffee afterwards.
You'll need Garden Collection Black Metal Hanging Plant Brackets for this Dollar Tree DIY. They're L-Shaped with curlicues attached to the bars of the "L." The finished shelf rests on the longer side of the L's bars. You can try another design if you find one, but keep the basic L-shape; the shelf needs it for support. The project additionally calls for wood glue, clamps, and two or three Crafter's Square MDF Wood Plank Boards. Also, get a package of Crafters Square Wood Dowels, heavy-duty Command strips, and some scissors. To give the DIY some color, have stain or paint, brushes, and a pencil on-hand, too.
Constructing the Dollar Tree shelf
Prepare the spot on the wall for the brackets. If you're using the shelf for practical purposes, choose a spot with that in mind — next to the stove, for example. Mark the spot for the brackets on the wall with a pencil. Paint or stain the boards after that.
The Dollar Tree craft boards are thin. To give them substance, glue two or three of them together using wood glue. (The number of boards you stick together depends on how thick you'd like the shelf to be.) Clamp the boards together while the glue dries. It'll take about 30 minutes to an hour, depending on the glue. You could also buy stronger, more expensive boards. Look for items like onlytak Multifunction Unfinished Wood for the swap. A three-pack costs just over $15. They're longer than the planks from Dollar Tree. If you need a wider shelf or more than one unit, this is an option.
Next, ready the plant hanger. Under normal circumstances, you'd attach it to the wall with screws on the short side of the "L." For this, you'll stick the long side of the "L" on the wall, using something like Command Picture Hanging Strips. Use two of them on each bracket to reinforce the staying power of the strip. Trim off any parts of the adhesive that stick out over the edges of the brackets. Stick the two brackets on your spots on the wall. Place the wooden shelf on top of the brackets.
Ideas for styling the shelves
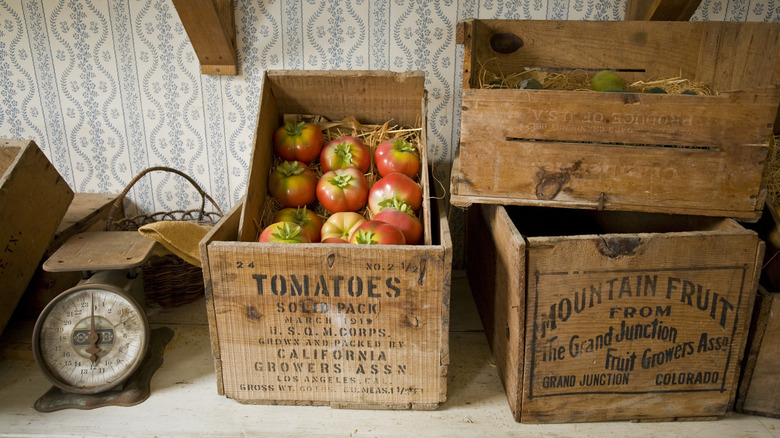
In the late 19th and early 20th centuries, fruit and vegetable manufacturers packaged their produce in plain wooden crates with pictures of their wares painted on the sides of the boxes. If you're into rustic decor styles in the kitchen, this vintage advertising motif could be a source of inspiration when it's time to style the shelf. Leave the shelf's wood unstained. Just add a protective coat of varnish. Then, paint a food-themed illustration on one side of the glued boards.
Or, do a modern twist on the idea. Leave your favorite food on display on the shelf to create a little kitchen couture. This approach integrates foods or ingredients you use often, like fancy tea tins or spice jars, into your decor. The advertising on the package — instead of your painted illustration — decorates the shelf. Further, small items like the tea will fit on the shelf without straining it. The setup also keeps them within reach while you're cooking. If this decorating hack's your thing, choose foods that sport handsome graphics on their packages and require no refrigeration.
Finally, slide a dowel or the handle from a Dollar Tree plunger in through the curled bars at the bottom of the plant hanger. This creates a place to store dishes and hand towels. Add small S-hooks to the dowel. Then hang hot pads on the hooks to finish your Dollar Tree shelf set-up.