

DIY An Edgy Concrete Planter With Five Easy To Find Items
We may receive a commission on purchases made from links.
If you've been looking at your garden plants and thinking that it's time to upgrade your planters, but you don't want to spend a fortune, making a DIY planter may be the right choice for you. According to Lowe's, DIYing affordable concrete planters is a beginner-friendly project that can be completed in a weekend with just a few easy-to-find items. Youtuber Amazing Craft DIY shows off an edgy concrete planter made with just five key items: cardboard, concrete, a bucket, wire, and sand.
In addition to having the basic supplies on hand, you will want to make sure you practice safe handling, which means you will want to make sure you only touch concrete with gloves and a mask. Rubber gloves from Amazon or a local hardware store work well for concrete projects. Look for a respirator mask to prevent inhalation of concrete dust. You should also use leveling tools, like a trowel. This YouTuber used cement for their product; however, concrete may be a better option for durability. The danger of confusing cement with concrete is that, ultimately, cement is not nearly as strong as concrete. When it comes to DIYing a concrete planter, you may want to opt for the stronger option, especially if you plan on adding a plant with strong roots.
Other tools you may need to build a concrete planter (and where to find them)

Most of the materials you need to complete this project are tools and supplies that every DIY should already own. Use cooking spray to coat the bucket for easy removal at the end. Amazing Craft DIY also keeps a level, a pen, a utility knife, and scissors on hand to help measure, mark, cut, and form the cardboard molds. The level ensures each cardboard mold is measured to the same exact size and angle, and the utility knife helps create precise cuts. You can use any super glue to hold the cardboard mold together, but this YouTuber uses 502 Super Glue with a precision applicator, which you can get from local supermarkets or Amazon.
You can purchase a 60 lb bag of Quikrete Concrete Mix from Home Depot for about $5. All-Purpose Sand is also available from Quikrete for use on concrete projects for under $4 for a 50 lb bag. A concrete trowel will help you level off the top of the molds and pack the sand down. For reinforcing wire, you can choose a thick gauge wire, such as an 18-gauge aluminum wire. You may also want to have wire cutters and pliers on hand for cutting and shaping your project. To finish off the project, you can use boiling water to help the planter release from the bucket and sandpaper to smooth off any rough edges. Of course, you'll also need your favorite plants to finish off the look!
Assembling a planter using cardboard, concrete, a bucket, wire, and sand
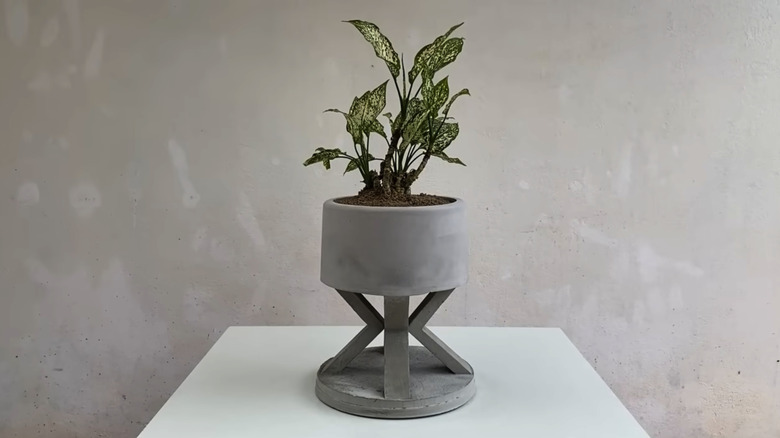
The process for assembling a concrete planter with angled legs for a base is simple, but requires precision and planning. First, you will mold the four angled pieces for the legs using cardboard. Then, use a bucket and some sand to form the planter.
To start, Amazing Craft DIY builds four identical V-shaped containers with open tops from cardboard. They add a hole to each side of the container and add reinforcing wire so it rests in the center of the mold. The reinforcing wire should extend a few inches out on either side. Then, the mold is filled with concrete and leveled off by shaking the container and smoothing the top with a trowel. When the legs have fully cured, bend the reinforcement wire so it points in the same direction as the angle.
From there, the final assembly begins. Place a stable cylinder in the center of a bucket, and fill it with sand about halfway up the bucket. Make sure the space between the sand and the bucket is thicker than 10 mm. Spray the sand with water to make it damp but not wet so it holds its form. Pack the sand well, and remove the cylinder. Add concrete until the sand is completely covered with a layer, and level it off. Use a tube to add a drainage hole in the center. Press the excess wire of the legs in, with the angles pointed facing each other on four sides of the pot. Fill in the empty space until the tips of the legs and the last of the reinforcing wire are left sticking out. Pack the sand and top it with a layer of concrete. Level it off, and leave it to cure.