

Turn Affordable IKEA Products Into A Spinning Side Table That Looks So Elegant
We may receive a commission on purchases made from links.
You want a fancy side table for your living room, but despite their small size and compact designs, many of these furniture pieces come with a hefty price tag. That high cost is often a reflection of quality, value, and superior craftsmanship. But the good news is, you don't have to settle for something that'll burn a hole in your pocket. Like sues.living on Instagram, you can combine two affordable IKEA products, turning them into a spinning side table that looks both store-bought and high-end. Plus, there's no need for pro-level woodworking skills to do it.
This is a simple, no-power tools DIY idea that only requires two IKEA SNUDDA Lazy Susans, one FNISS trash can, and adhesive glue. The SNUDDA Lazy Susans will become the spinning tabletop and the base, while the FNISS trash can forms the table's pedestal. It's hands down one of the most brilliant IKEA Lazy Susan hacks worth trying. One outstanding feature that both IKEA items have are good dimensions for a modern side table. The Lazy Susan, for instance, has a 15-inch diameter, which is both ideal for a tabletop while allowing a sufficient amount of overhang over the 11-inch diameter of the FNISS trash can, making your DIY look more like an intentional build than a make-do. Looking at the bin, other than its low $1.99 price tag, its minimalist clean lines blend in with other decor, making it an unobtrusive pedestal. It also has a solid plastic build, lightweight but hardy enough for everyday use.
How to DIY a spinning side table using affordable IKEA pieces
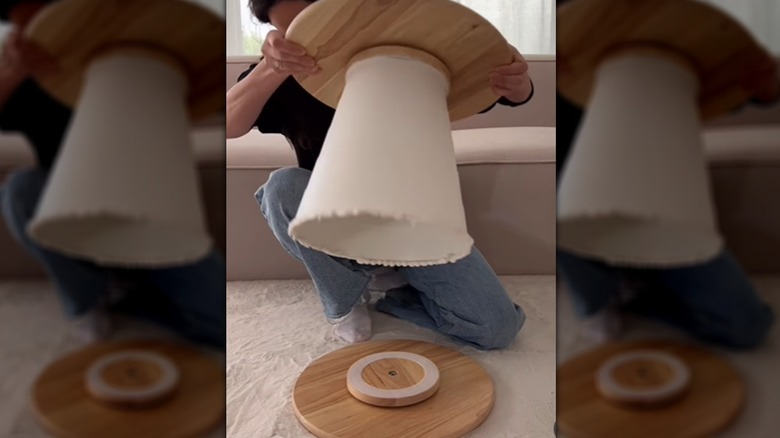
To get started, visit your nearest IKEA and grab two SNUDDA Lazy Susans and a FNISS trash bin. Then with some strong multi-purpose glue, turn the first Lazy Susan upside down and place it on a flat surface. Afterwards, apply the adhesive in a thick ring on its turntable center. Dab dollops of adhesive on the middle of the spinning surface too for a stronger bond line between the wood and the base of the plastic trash can.
Next, center the trash can's base smack on top of the glue on the rotating piece, then press the bin's base down firmly for a strong hold. Now you have your side table's spinning top and pedestal. Once the adhesive is set, move on to the next step and build the stylish base of your side table. To do so, place your second IKEA Lazy Susan on a flat surface. Then, run a thick ring of adhesive around the rim of the trash can. Turn the bin upside down, then place it right in the center of the Lazy Susan. Press down and hold for a while until the adhesive has set. Now wipe off the excess adhesive at the intersection of the trash bin's rim and your side table's bottom, and you're done.
Modifying the IKEA DIY side table to make it your own
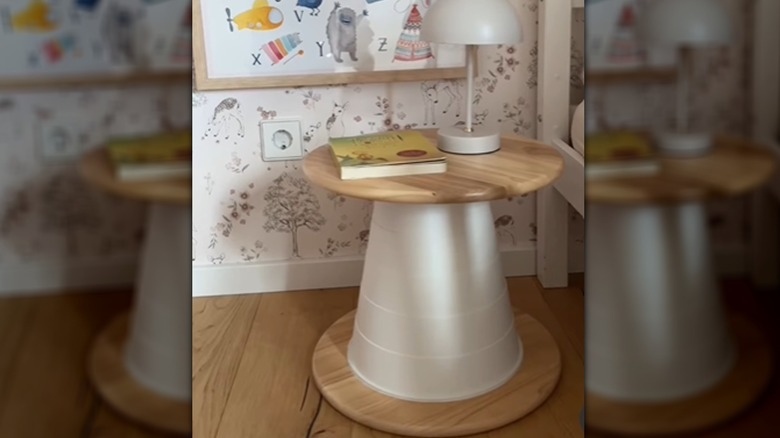
Now that you have an affordable no-tools DIY side table made with two IKEA faves, you can add some flair to make it uniquely yours. An optional upgrade would be to place quality non-slip self-adhesive felt furniture pads on the base to prevent scratches on the underside of your table and to keep it from leaving marks on your floors. Customize it further by spray painting the trash can pedestal something like metallic black or chrome silver to give the table a modern look, or go for a rustic finish by trying the baking soda painting technique for a textured-matte look. Alternatively, wrap jute twine around the trash can for a chic boho style.
Finally, choose the perfect spot to place your elegant DIY side table, whether it's in the kid's room, at a reading nook, or next to the front door as one of the IKEA entryway hacks to organize and transform your storage.