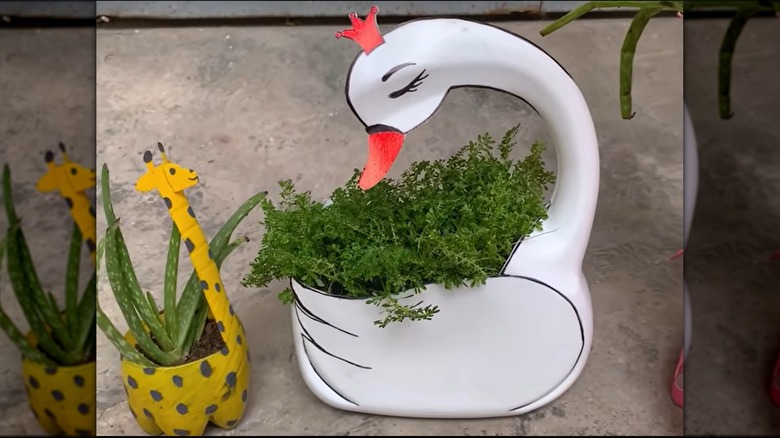
Use Old Detergent Containers To Create A Stunning Swan Planter DIY

If you're a plant lover who can't seem to resist the urge to keep buying new houseplants for your space, no judgement here. The thrill of finding rare plant varieties and seeing them grow and thrive under your care can be addicting. As you add to your houseplant collection, your need for planters also grows. But instead of making more purchases, did you know you can use common household items to make stunning planters? One of the most stunning DIY planter ideas is turning an old plastic detergent container into a cute swan planter as demonstrated by YouTube creator Anna Home.
If this is your first time hearing of the swan planter DIY, it may sound complicated. But don't fear, the process is pretty simple. Basically, you draw a swan on the container, cut, then add a few simple finishing touches to boost functionality while increasing visual interest. Besides making a pretty home for your beloved plants, DIY projects have a way of boosting your physical and mental health, so it's a win-win situation.
Begin by gathering your supplies and tools. You'll need an empty laundry detergent container (preferably the kind with a molded side handle), a permanent marker, a sharp utility knife, and a soldering iron for punching drainage holes.
How to create a cute DIY planter using old detergent container
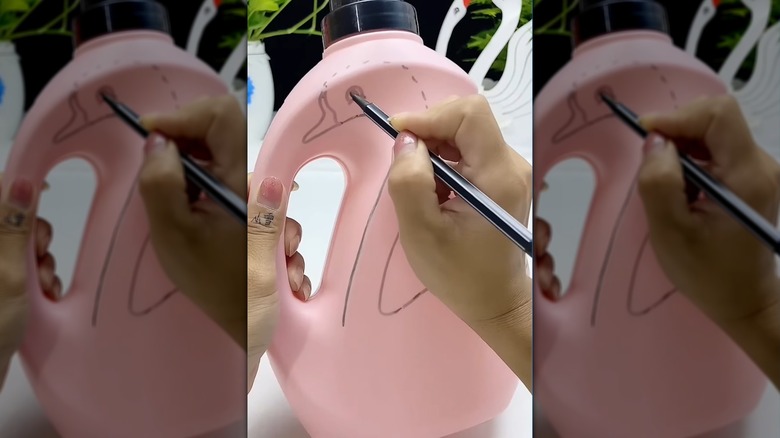
First wash the plastic container and remove the label. Using the permanent marker, draw the shape of a swan on the container. This is perhaps the most important step in this DIY as it determines the final look of the planter. Draw a line starting at the base of the handle all the way up to the container's neck where it should curve and then draw the swan's head at this point. Then on both sides of the container's body, sketch out symmetrical arches to form the bird's wings.
Keep in mind that this is just one way of doing it. You can vary the final look of your planter by positioning the swan's neck and head differently. For example, instead of drawing the neck and head along the side handle, have it popping up from the middle section of one of the wide sides of the container.
Besides the position, you can also vary the number of swans. Draw one large one on the side handle and a couple tiny ones on the flat side of the container so it looks like a mother and her babies. Alternatively, make the classic heart shape created by two swans facing each other from the sides with their beaks touching at the center. Finally, remember to use a black marker for the outline and red, orange, pink, yellow or black to color the beak to make the swan look as realistic as possible.
Cutting the container, final touches, and potting your plant
Once the drawing is done, take your utility knife and carefully cut the plastic container, ensuring you stay well within the drawn line. Your cutter must be very sharp to aid in precision. Go slowly, especially when cutting the detailed parts of the drawing, like around the head, beak, and curved tail wings.
The last thing is to punch drainage holes at the bottom of the container using a heated soldering iron. You can also use a drill with a small drill bit if that's what you have on hand, or go the old-fashioned way and heat the tip of a pointed screwdriver on your stove. After this final touch, your stunning DIY planter is ready.
Now get fresh potting mix (make sure you choose the right type for the plant you want to pot). Put it in your DIY planter to fill it only partway. Remove your plant from its previous pot and remove the old potting mix from its roots before positioning it in the new pot. Top up the fresh mix and water your plant. Now you can place your stunning DIY swan planter in your living space and keep it on top of a saucer to catch the excess liquid that drains after watering.