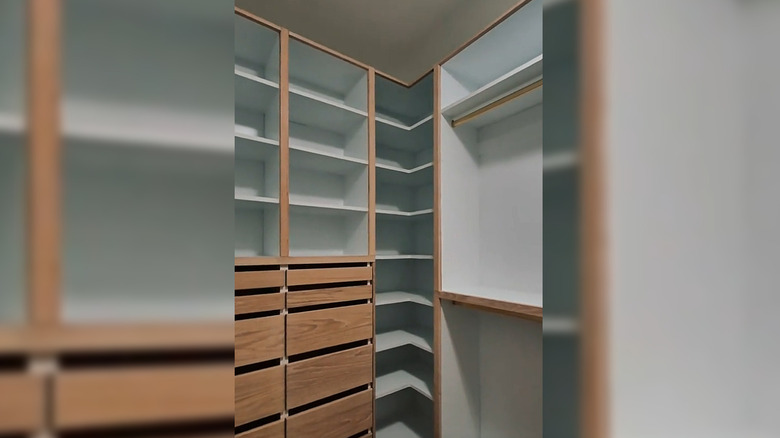
Embrace The Unused Space: The Home Project To Store Shoes In A Tight Corner

Finding somewhere to put all those shoes, boots, sneakers, etc., can be a real challenge — especially if you have a growing family (or a growing shoe collection). Although there are lots of creative DIYs to keep shoe clutter organized, many of these solutions demand space that you may not have available. Over on TikTok, Adrian from Casa Roja Woodworking, shares a project that makes the most of a tight corner in a closet while providing storage for more than a dozen pairs. Let's look at how it's done.
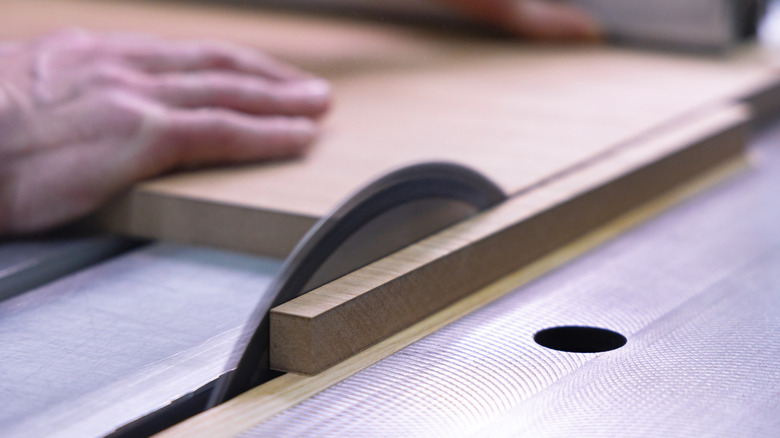
Adrian calls himself a DIY woodworker, but it's clear that he is experienced and has an extensive set of tools. That said, there's nothing in the video that requires complicated joinery or advanced techniques, so with patience, attention to detail, and perhaps a helping hand from a friend, it's something that many people could tackle. In terms of equipment, a table saw will certainly make life easier and is one of the top tools worth investing in to start woodworking at home. Adrian also uses a drill/driver, a jigsaw, a circular saw, a router, and a nail gun. If you have all those, great, but you can probably manage without the circular saw and use a hammer and nails rather than a nail gun if you don't have one.
Corner shoe rack design, materials, and first steps in construction
In the video, the build is part of a large closet installation, but if you focus on the corner shoe rack on its own, it could be installed in a relatively small space. In fact, depending on your closet you might be able to maximize shoe storage with left- and right-handed versions, or a single wide one. You can experiment with dimensions until you get a good fit. It's worth cutting test pieces from card and trying them in place before you commit to the actual wood.
@casarojawoodworking Step by Step on how to build a corner shoe rack for a closet-wardrobe by casarojawoodworking. Learn how to build amazing pieces of furniture by visiting my Etsy shop. Download Woodworking plans with step by step instructions. Click in Bio or Links below DIY Plans available. click in Bio for more details or paste the following link in your browser https://etsy.me/3h3CnaR https://linktr.ee/casarojawoodworking Planos de Carpinteria y bricolaje. Link en Bio Para Mas detalles o copia los links de Arriba #casarojawoodworking #Woodworking #handcraft #diy
It's obvious from the video that Adrian is using MDF. It's easy to work with, but heavy and creates a lot of dust. Plywood is an equally effective alternative, and is lighter and stronger, but more expensive. Most professionals prefer plywood for carcasses and cabinets. Whichever you choose, always wear a mask and eye protection when woodworking. Any kind of sawdust is unpleasant and will irritate your eyes, nose, throat, and lungs.
The first job is to make those 'L' shaped top, bottom and shelf pieces. Cut squares first (using a circular or table saw) then cut out the smaller square using a jigsaw. Adrian then uses a router to clean up the edges. If you're careful and go slowly with the jigsaw, you may only need to sand these instead.
Building the closet shoe storage rack
Cut the back and side pieces to fit the 'L' shape shelves and to your desired height. Use two of the 'L's for the top and bottom, and pre-drill and screw everything together. Do not use nails for the carcass, as screws are much stronger. The shelves are fitted in place in the same way as the top and bottom. To ensure equal gaps, cut some spacers that are the same height as the dimension between each shelf. Use the spacers against the sides to position the first shelf, drill and screw into place, and then move up to the next one.
Once all the shelves are fitted, you can paint, then cut thin trim pieces for the fronts. This where a table saw can come in handy. 1-inch thick boards are available from most hardware stores. Poplar stains easily, or you could use red oak or walnut if you want a darker look. Glue and nail in place. If you knock the nails just below the surface, you can apply a dab of matching wood filler and sand back so they are practically invisible. To avoid any danger of the shoe racks toppling over, screw a couple of L-shaped metal brackets to the top (if you haven't gone right to the ceiling) or the sides, and fix them to the drywall.
There are some DIY projects you should avoid at all costs. However, this one requires patience and careful measuring rather than a great deal of skill. If you want to maximize your closet space, this DIY is a great cost-saving option for beginner woodworkers.