Use A Plastic Bottle To Make A Clever Craft Room Storage Solution With A DIY
We may receive a commission on purchases made from links.
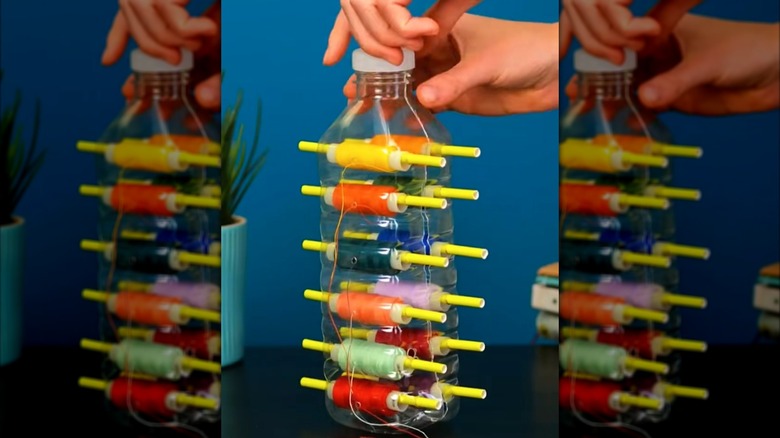
Nothing kills a craft or sewing project faster than a disorganized heap of supplies. Sewing thread, jewelry wire, small ribbon, and embroidery floss are common casualties since they can easily become tangled or knotted. But what if there was an easy and budget-conscious way to get them organized? One crafter on social media shared an easy way to repurpose plastic water bottle for storing thread. You can create your very own thread dispenser for under $20 or for free depending on the supplies you use or already have on hand. For this DIY craft storage idea, you'll need a clear plastic water bottle (colored plastic might make it more difficult to distinguish the shades of thread), and it should be wide enough for spools to fit horizontally along the inside of the bottle.
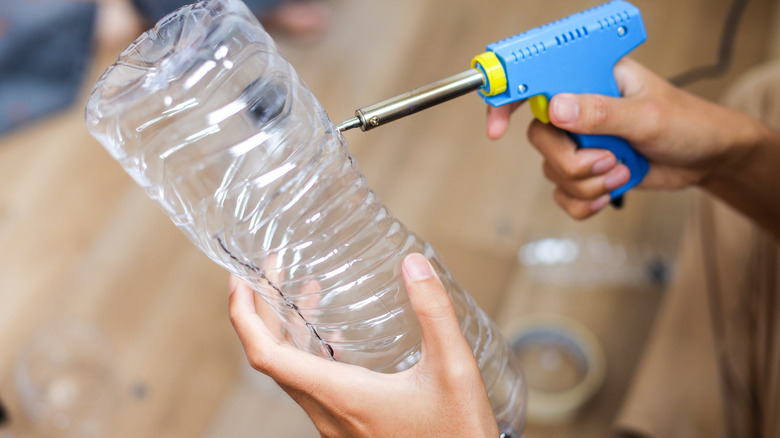
In addition to the storage vessel, you'll need an electric hot knife to cut the bottle in half and puncture holes (this Lounsweer Electric Hot Knife is $18 and comes with different attachments). Although you can use a heated kitchen knife, a box cutter, or a pair of scissors, the hot knife tool may be safer to use and prevent sharp or jagged edges around the punctured holes. This will keep thread from becoming trapped or frayed when you pull it out. If you use a heated knife or plastic melting tool, wear a mask to limit plastic fume exposure. However, if you don't want to spend the money, you can totally DIY it with the tools you already have. Another key component is what the spools will rest on inside the bottle. Straws or wooden sticks will work, so long as the spools fit through them.
Tips for turning a plastic bottle into a thread organizer
Creating a DIY string dispenser for all your crafts is as easy as cutting a plastic bottle in half, adding holes for the spool anchors and thread, and assembling it. That being said, there's important things to consider at each step to guarantee success. For starters, save the cap since you'll need it later. When you cut the water bottle in half lengthwise, stop just before the bottom so you have two connected compartments. Some bottles will have a seam down each side that you can use as a guide for even cuts. After splitting the bottle, clean out any leftover water residue with a paper towel (you don't want your thread exposed to moisture).
Next, test how many spools of thread you can fit on each side before you make any holes you can't undo. Then on each side of the bottle, puncture two holes on opposite end — this is where the dowels will sit. Also add a hole in the center of these marks for the thread to dispense through.
@mariyamkhan20041 Genius ways to reuse plastic bottles#creatorsearchinsights #treanding #treandingvideo #foru #craft #hacks #bottle #plastic #handmadecraft #viralhacks #viralcraft #fy #fypシ゚ #mahakhan4181 #mariyamkhan2004 #atiqakhan2004
If using a scissors or a box cutter, cut an X shape first to make it easier to create a hole. If the holes are too big compared to the size of the straws, just fold and tape the straw ends on the outside of the bottle to keep them from sliding around or dislodging. For unbendable materials like wooden dowels, use hot glue to fill the gaps and cement them in place. Finally, secure the dispenser by closing the plastic folds and twisting on the bottle cap. Keep it upright by anchoring it to the table with a forgiving adhesive like duct tape.