Ditch The Shoe Cabinet: The DIY Solution That Saves Space And Stores So Much More

We may receive a commission on purchases made from links.
Shoe storage is one of the most annoying issues for homeowners to tackle. From using your bedskirt as the completely hidden way to organize shoes in your bedroom to installing built-in shoe storage for your closets, there are plenty of easy, creative ways to address the eyesore or unorganized shoes. But what about when it comes to your garage? Shoe cabinets may seem like a good idea, but can ultimately just be hiding the clutter in deep cubbies or containers. Instead of a cabinet, YouTuber @backtobackcustoms shared a simple shoe storage solution for the garage that you can easily DIY on a budget using just some plywood and 2-by-4s.
This DIY creates open-concept wall-mounted shelves that can fit several 4-foot rows of shoes for large shoe collections or large families. Mounting it in the garage means you never have to deal with shoe clutter, or tracked-in debris, inside the house. The concept is affordable and simplistic. Instead of using expensive brackets that get in the way of the storage, you'll use the 2-by-4s to hold up the shelves by cutting trenches for the shelves to slide into. The idea is to maximize storage space without compromising on weight capacity. Ultimately, this DIY shoe storage project uses basic materials and tools that even beginners could easily learn to use.
Planning your DIY wooden shoe storage on a budget
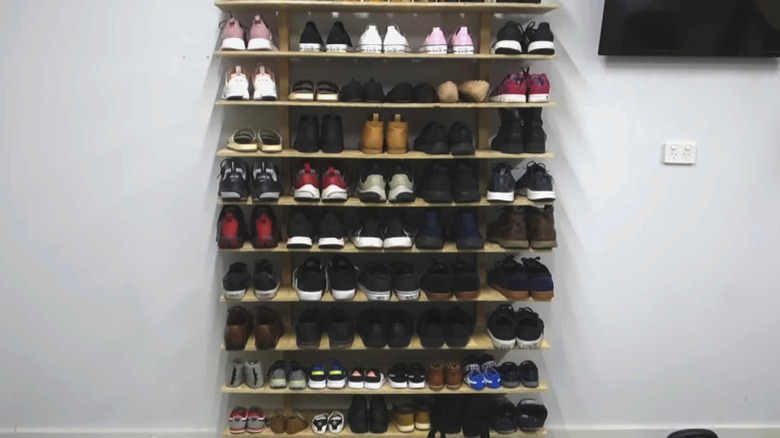
As you plan your project, you'll need to consider the amount of materials needed. Back To Back Customs created a wall-mounted shoe storage rack with 9 shelves out of two 2-by-4s and a single sheet of plywood. If you're looking to complete this DIY on a budget, you can get a 4-foot-by-8-foot sheet of ⅜-inch-thick plywood for under $25 from Home Depot. Similarly, you can get 8-foot-long 2-by-4s for under $5 each. Don't forget about important things to consider when choosing wood for DIY projects, like soft wood versus hardwood, cost versus quality, or how the wood grain will handle your chosen finish.
Other materials that you will need to complete this project include a carpenter pencil, measuring tapes and straight edges, a clamp, a saw, a sander, a drill, and mounting hardware. A simple 6-inch trigger clamp should get the job done and shouldn't cost more than $5 at Home Depot. For your drill, you'll want at least two bit sizes: one to drill pilot holes for the mounting screws, and one slightly larger to create a notch to countersink the screw.
Technically, you can complete this DIY with any saw, but since you'll be cutting trenches in the 2-by-4 to hold the shelves, a miter saw is the ideal option. Depending on how much woodworking you do, you may want to invest in your own miter saw, which can range from a couple hundred dollars to over $1,000. However, if you only need it for this project, you may be able to rent one from your local hardware store — for example, Home Depot allows you to rent an 8.5-inch miter saw for $40 a day.
How to assemble a DIY garage shoe rack using 2-by-4s and plywood
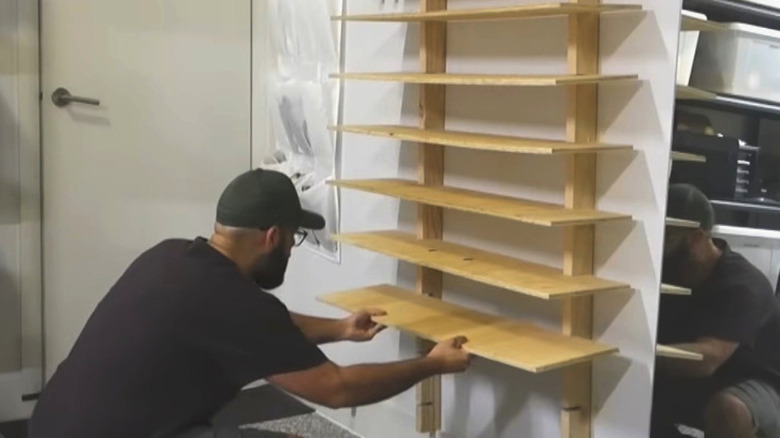
First, determine how much space you want between each shelf depending on the height of your shoes. Cut a small piece of the plywood that's the same thickness as your shelves to use as a template for each trench width. Clamp the two 2-by-4s together and lay the template piece on top, sitting perpendicular to the 2-by-4 where you want the first shelf. Mark either side of this small piece; this will mark your cuts for the trenches. Repeat for each shelf location.
Then, using the miter saw, set the depth to be about three-quarters the depth of the 2-by-4. Make cuts on either side of the template markings, cutting away the remaining wood until there is none left in between markings. Test the fit of the plywood in the trenches between cuts to make micro-adjustments as needed — the fit should be snug. Next, mark the center of each trench and drill a hole there for a screw. Three total screws in each 2-by-4 should be enough, with one at the top, middle, and bottom.
Then, take a drill bit about the size of the screw head and drill slightly over the smaller hole from the inside of the trench to countersink the screw. This creates a notch for the screw head to rest in when you mount the 2-by-4 so the shelves sit flush in the trench. Sand the wood, then use mounting anchors to attach it to the wall. Cut 4-foot-long shelves out of the sheet of plywood and slide them into place. You can finish the wood with stain, varnish, or paint if you desire.