Ditch The Expensive Seating Benches: IKEA Has A Stylish DIY Solution That Doubles As Storage
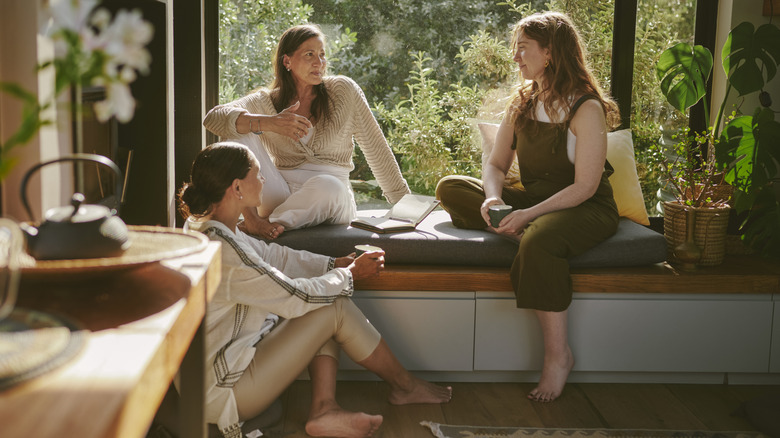
While it would be fun to splurge on new bench seating for your space, buying one new often costs hundreds of dollars. Sometimes, it's just better to save a little money and DIY something of your own. You can still maintain the luxe look of a bench seat and all its functionality by using pieces from IKEA to create a custom storage solution. Homeowners have been hacking the IKEA EKET cabinet to make some impressive portable storage solutions. And TikToker Taraxhome adds a seating bench with storage to the list, showing how to join a few of the cabinets, which are essentially small modular storage cubes, with a support rail, attach a hinged lid on top of the cubby holes, and add wheels to the bottom to create a rolling bench seat that also helps you stay organized.
Whether you're aiming to add function and flair to a small entryway with a DIY bench or crave a storage solution in your living area, mudroom, or bedroom, this DIY could be worth tackling. To make a storage bench from IKEA EKET cabinets, you'll need four cabinets, two large boards that can work as lids, a drill and screws, hinges, wheels, measuring tape, and two thin furring strip boards. When choosing your lid boards, aim for minimum dimensions of 27.5 inches by 13.75 inches, which would allow each board to cover two EKET cabinets exactly.
How to build and style IKEA EKET cabinets as a bench seat
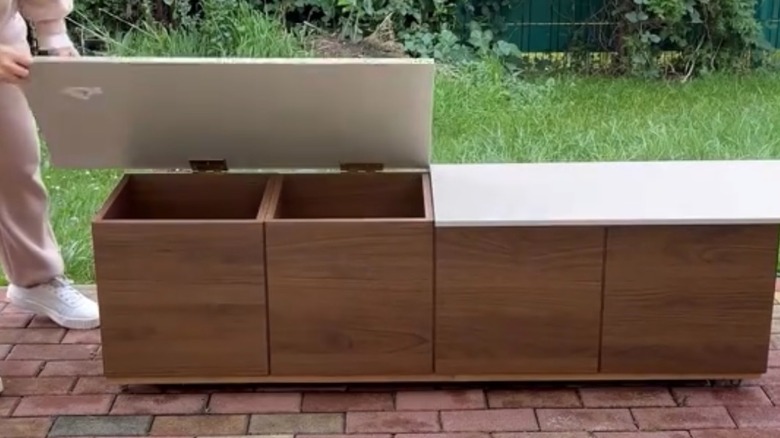
To DIY the perfect bench for your space, start by picking the EKET cabinets you like best — they come in seven different colors. Each cube measures 13.75 inches on every side, and one face of the cabinet is open, like a cubby. IKEA's website notes that these storage boxes have a 15-pound weight limit, and while the DIYer reinforces them with wood, that might not be enough to withstand adult weight for long periods. Because of that, it might be best to use this bench in a low-traffic area that allows it to act more as decor and storage than seating
Each cabinet costs $28, so if you use four EKET pieces, you can expect to spend $112. Though some folks have been able to get these pieces at bargain prices as well. This content creator said the project only cost them roughly 49 Euros ($56-ish), though either price is far less than the hundreds you could spend on a similar piece. You will also want to get two thin furring boards, like 1-by-2s, and cut them to the length of the four cabinets put together, 55 inches. For the lid boards, this DIYer chose larger pieces that had a substantial overhang.
@taraxhome_ DIY – IKEA Hack Unleashed✨ From Cabinets to Spectacular Bench Trunk💫🏡 I Created a seating bench/trunk with ample storage using 4 Eket cabinets and caster wheels. Found the lids at IKEA's Bargain Corner. The entire DIY furniture piece cost me just €49. I already had screws and tools at home. Comparable bench trunks of this size would cost at least 4 times more. It's a low-budget project with great functionality and an impressive look. I'll be linking all the parts in my story. The idea was to have a bench trunk with hidden storage for my cluttered corner behind the couch in the living room. I'll soon reveal where I'll be placing this amazing piece because the result is more than perfect. How do you like the idea? I hope to inspire you to try similar DIY projects. Have fun experimenting🪚🏡 ___________________________________________ #diyfurniture #ikeahacks #homedecorinspo #creativeprojects #budgetfriendly #storagesolutions #diyinspiration #interiordesignideas #organizeinstyle #ikeafinds #transformyourspace #cleverdesign #functionalfurniture #doityourself #repurposed #homeimprovements #hiddenstorage #lowbudgetdiy #innovativeideas #spacesavingsolutions #getcreative #diycommunity #interiordesigninspiration #diyprojects #homemakeover #decoronabudget #inspirationforyourhome #customfurniture #diyfun
To start, flip the cabinets upside down (with the cubby holes facing the floor). The EKET cabinets come with stabilizing feet so the item can be placed on the floor. However, for this DIY project, you'll want to remove the feet so you can add the adjoining planks (furring boards), which will connect the cubes together. Lay the cubes upside down in a row, then use a drill to attach the thin planks to the EKET cabinets' bases. Follow up by screwing on your rolling wheels or new cabinet legs. Flip the entire unit over and then lay your board lids on top of the cubby openings. The edge of the boards should sit flush against the backside of the EKET cabinets. Add a hinge and screw it in.