

Skip The Chainlink Fence: The Easy Solution That's Cheaper And Blends In

We may receive a commission on purchases made from links.
Chain-link fences were first introduced in the mid-19th century as a less costly, easy-to-install alternative to cast-iron and wooden fences. But your average chain-link fence installation still costs between $10 and $40 per linear foot. If you're looking to reduce costs even more, consider a wire fence. This option has all the benefits of a chain-link fence and you can install it quickly by yourself. A wire fence will keep your pets in your yard and the neighborhood pets out of your yard. It's an easy DIY solution for deterring deer from destroying your garden, too. Best of all, a wire fence won't obstruct your view as much as a chain-link fence.
You should be able to find all the tools and materials you need to complete this project at your local hardware store. For the first step, which is measuring the total length of each side of the fence, you'll need a reel-style tape measure. To mark the dimensions of your fence, you'll need a spool of string and a bag of tent stakes.
You'll also need one T-post for roughly every 8 feet, a T-post driver, which should cost about $50, and a level. Finally, get some hog rings, hog ring pliers, Craftsman Cutting Pliers, Craftsman Long Nose Pliers, and a package of Yukibefo T-Post Clips. You can make the rest of your fence from a roll of steel wire mesh, which costs around $170 per 150 feet. The wire mesh needs to be about one foot shorter than your T-post. For your protection, wear safety glasses and leather gloves.
How to build a wire fence around your yard
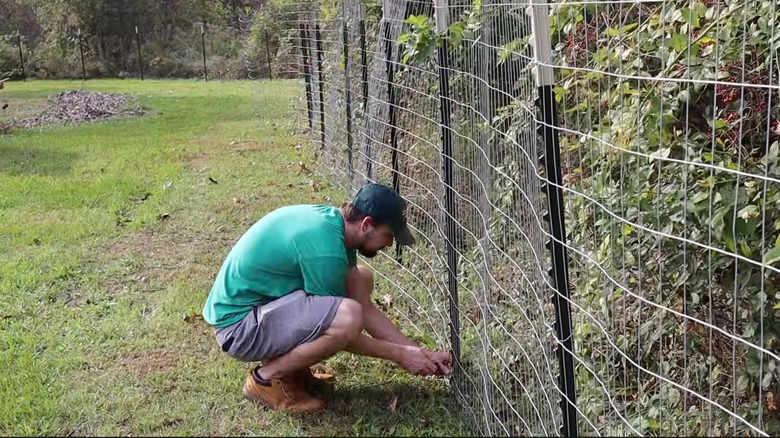
The first step in making a wire fence is marking the corners of your fence line. Insert stakes into the ground, then connect the stakes with a length of string pulled taut. Use your T-post driver to pound posts one foot into the ground at each corner and roughly every 8 feet along the string lines. Use your level to ensure that your posts are plumb, or standing straight. Run your wire mesh along the length of each side of the fence line, and then cut off the length you need with your wire cutters. Each post needs three evenly spaced T-post clips. There should be hangers on each post, and each clip needs to be hooked over a hanger. You'll need to use your needle-nosed pliers to clamp both ends of each clip to the wire mesh.
If your lawn is uneven or your yard is sloped, the wire can bunch up at the top and bottom of the fence. While your fence will likely still be sturdy enough, the bunching looks unsightly. If you hate the aesthetic, you can correct this problem by cutting the length of mesh down the middle and overlapping the two cut sides. Clamp them together using your hog rings and pliers. This is just one of several sleek wire fence designs to consider for your backyard. You could, for instance, build a fence out of chicken wire, hog wire, or even barbed wire. There are, however, disadvantages to installing a chicken wire fence to save money, ranging from a lack of sturdiness to limited privacy.
Need a gate in your wire fence? You can DIY it
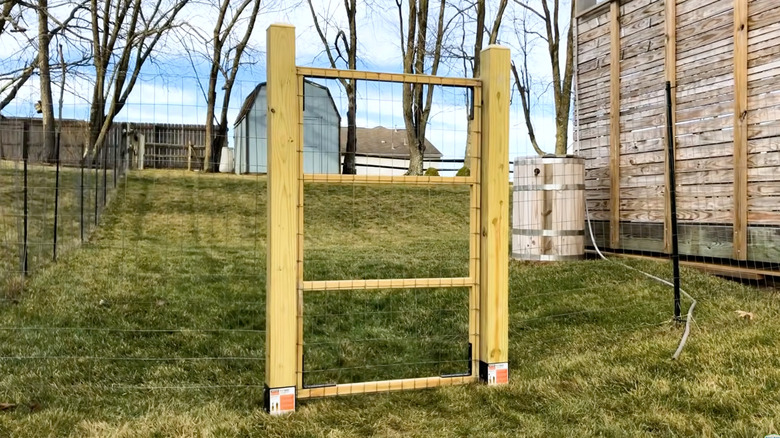
If you want to take your DIY wire fence to the next level, add a gate. The materials you'll need include two 4-inch by 4-inch poles, several 2-inch by 2-inch furring strip boards, a pack of screws, a pack of galvanized fence staples, two hinges, and a Ludacoo Hook and Eye Gate Latch. Tools-wise, you'll need a post hole digger, a level, a hammer, a power drill, several C-clamps, and a circular saw.
Choose the spot for your gate, and then measure the length along your fence. Use your snips to cut the wire out of the fence. Then, using your post hole digger, dig two holes 2 feet deep each — including the spots where you cut out the wire fence. Next, cut your 4-inch by 4-inch poles so they are 2 feet longer than the height of your fence, and then sink them into the holes. As you pack the dirt back into the holes, use your level to make sure the poles are straight. The next step is to cut your furring strips into five pieces. You need two vertical pieces that match the height of the fence connected by three horizontal pieces, which match the width of the gate.
Hold the pieces in place on a workbench using the C-clamps and then either screw or nail them together. Then screw your hinges into the frame and into one of the 4-inch by 4-inch poles. You may need to drill pilot holes so the wood doesn't split. Then you can screw on your eye gate latch. The final step is to attach the two sides of fencing to the respective 4-inch by 4-inch poles using fence staples, which you can pound in with a hammer.