

Use A Floor Mat To Create A Rustic, Fluted Side Table
We may receive a commission on purchases made from links.
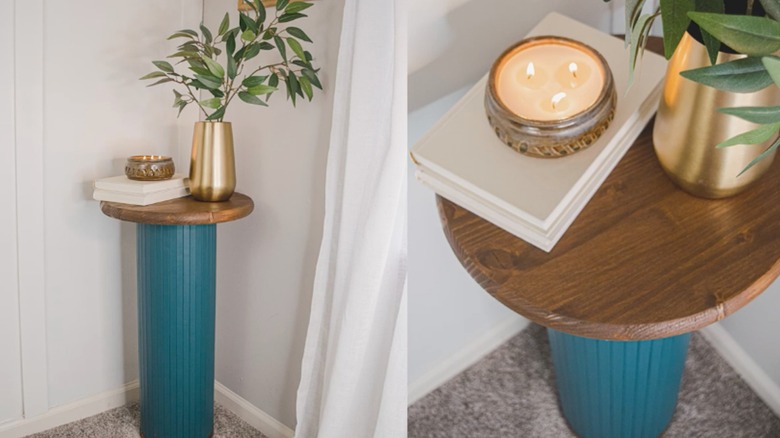
Savvy DIYers are always on the hunt for creative ways to transform vintage thrift store finds into unique DIY wall accents, tabletop decor, or new furniture pieces. It's a great way to fill your home with bespoke design objects on a budget. One item you might stumble across while thrifting is a wooden floor mat. YouTuber Actually Alli shared an ingenious way to salvage this quirky vintage decor item you should always look for at the thrift store: she turned it into the base of a fluted side table.
For this project, you'll need a fluted wooden floor mat, an 8-inch-diameter cardboard tube, a measuring tape, a handsaw, a miter saw, a utility knife, Liquid Nails Heavy-Duty Construction Adhesive, a 12-inch-diameter wood round, an 8-inch-diameter wood round, paint, and wood stain. This project is a great opportunity to repurpose a forgotten thrift shop find into a unique statement piece for any room — you can reuse the top from any old side table. Natural stone is probably too heavy, but you could opt for a hand-poured resin tabletop round, like this 14-inch Blue Lazy Susan from Etsy for $69. For a more affordable option, this four-pack of 12-inch-diameter Sasylvia White HDPE Rounds goes for about $35.
Prepare your materials before getting started on the build. Clean the floor mat thoroughly if you bought it secondhand, then roll it up tightly. Cut it to a height of 24 inches using a miter saw. If it has fabric trim that needs to be removed, don't forget to factor that into your measurements. Use a utility knife to trim away any trim that's left on the mat after cutting it to size. Use the handsaw to cut the cardboard tube to a height of 24 inches.
How to build a fluted side table using a thrifted wooden mat
Lay the wooden mat on your work surface with the underside facing up. Line up the cardboard tube with the edge of the mat and roll the mat tightly around it. Mark on the tube where the mat ends — it's okay if there's a small gap between the two edges. Use your utility knife to cut where you marked. Now lay the mat flat — with the underside facing up once again — and cover it with Liquid Nails. Place the tube down on the mat and roll it up until it's completely wrapped around the tube. If there's a gap, use a slat from the mat offcuts to fill it in. Allow the adhesive to cure before moving on to the next step.
As you wait, it's time to prepare your tabletop. If you're using wood rounds, stain them. You could cover the plastic round with a piece of scrap fabric using glue to attach it or create geometric patterns with painter's tape and spray paint in two colors. Now it's time to paint the fluted base. Options for a pop of color include deep red, tawny brown, or olive green. These colors fit the moody, organic palettes popular right now. Or, for a natural look, stain the fluted wood base, too. Sand it down first to remove any imperfections or printed patterns.
Once the finish on the wood rounds and base are dry, it's time to assemble your side table. Attach the 8-inch round to the base with Liquid Nails, then adhere the 12-inch round to the 8-inch round, making sure everything is perfectly centered. Place something heavy on the table to weigh it down as the adhesive cures. Now, you're ready to style your new side table!