

Ditch The Baskets: Here's A No-Drill Rack To Add Storage To The Bathroom
We may receive a commission on purchases made from links.
The mere thought of having to drill and hang up an HGTV-worthy bathroom storage solution is exhausting for many people who end up choosing overcrowded vanity counters over optimized organization. But what if there's a no-drill product out there that doesn't require you to buy or use power tools or put holes in your walls? The ROYALITA Acrylic Bathroom Shelf Organizer (with 17- and 24-inch options) from Amazon serves as a perfect example of an option that both renters and inexperienced drill users can get behind. It comes with different mounting options so you can choose the most practical method for your home. The package includes two stick-on adhesives that work on smooth surfaces, as well as screws and wall anchors if you want a more permanent installation or need to install it on an uneven surface. However, this second option does require a drill.
In addition to its versatile mounting options, the rack is thoughtfully designed to be installed on the wall behind a sink, since it has a curved cutout that fits seamlessly around a faucet (making it another space-saving bathroom storage solution). The unique design would also be a perfect fit for kitchen sinks, and can also function as a useful under-sink storage solution in your bathroom, as the built-in cutout can just as easily fit around pipework. It also has drainage holes to prevent water build-up, mold, and mildew, along with a raised edge to keep toiletries from sliding off. With this setup, you won't have to store all of your getting-ready essentials in baskets on the floor or precariously balance them on the sink rim. The installation flexibility, along with the price, makes it worth a try.
Installing this no-drill rack and helpful add-ons
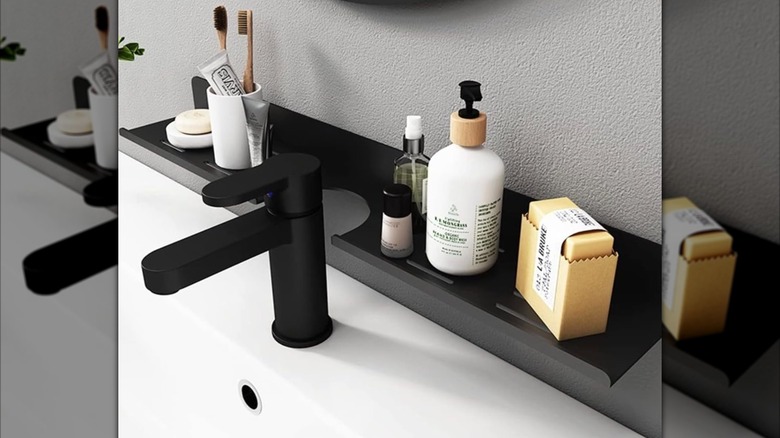
It's important to note that there are a few customer reviews that caution about the stability of the rack when installed via the adhesive method. Some reported that their shelf fell down when paired with heavy items, and warned that the adhesive stickers came loose over time. To get the best use out of this product, make sure you're installing it onto a flat surface that has been washed and dried, and let the adhesives set for 24 hours before hanging up the rack and filling it with items. Customers also seemed to have mixed feelings about the shelf's stability when laden with products, so while a specific weight capacity isn't mentioned, it's a good idea to stick with lightweight items instead of heavy or bulky toiletries.
To make sure the rack rests flat once it's installed, be sure to use a level and a pencil to mark a straight line where you plan to put the adhesives. This will keep the two adhesives working in harmony, instead of one carrying more of the load when products inevitably slide to one side of an uneven shelf. You can also pair the adhesives (or replace them) with durable mounting tape if you want peace of mind but still have no desire to go anywhere near a power drill. Look for options like Gorilla Max Strength Mounting Tape, which can be applied to a ton of different surfaces and maintains adhesion even when exposed to moisture (ideal for bathrooms). However, this method isn't recommended for renters, since the strength of the mounting tape can cause damage to paint or drywall.