

Use A Functional, Cheap Material To Mold Concrete For Planters
We may receive a commission on purchases made from links.
There is no shortage of DIY videos online illustrating the various ways you can repurpose items in your home as planters. A quick search on YouTube will show everyday people making planters from what seems like almost any common household item. Everything from garden bed edging and cut bucket rings to metal cooking pans and water hoses is being used to make some rather stunning DIY planters. Well, here's one more planter idea to bookmark — using sandbags to make planter molds. YouTuber Paradise Builders – Planter Skool demonstrated his approach for this, which involves using a polypropylene sandbag, bonding adhesive, cement, and river rocks to build a planter mold that's definitely one-of-a-kind.
The sandbag is packed with sand and shaped, then coated in cement and finished off with various rocks for a simple, stylish accent. If you're sold on this cool planter idea, you'll need to purchase a handful of supplies before getting started. You can buy sand at Home Depot, where 50-pound bags cost about $4. While there, you can also pick up an 80-pound bag of Quikrete cement mix for about $7. Polypropylene sandbags can be purchased on Amazon, such as this 10-pack of DURASACK Heavy Duty Sandbags with Ties, which is available for $11.
Additional supplies needed include tape, a bucket and trowel, cement bonding adhesive, a sanding block, and a good glue for the rocks — all of which cost under $10 for each item. For example, Loctite PL Premium Polyurethane Construction Adhesive can be used to bond the rocks to the cement. Overall, this project doesn't require lots of effort, and it can be a fun and low-budget garden DIY to enjoy over the summer.
Steps to create the planter mold
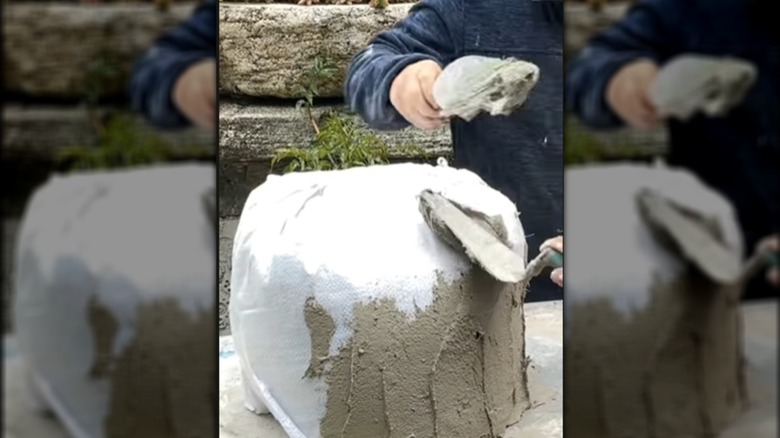
Start by setting the sandbag on your worktable. Then, create about a one-inch outward-facing fold on its opening — this will allow you to easily fill this area with sand, which forms a ledge later (though the video doesn't actually show this step). Next, pour sand directly in the bag, filling it to the top. Once it's full, seal the bag closed with duct tape, making sure to squeeze any extra air out before doing so.
Flip the bag face-down. Then, press down the two corner edges (the "wings") and tape them to the side of the bag. Use your hands to smooth out the sides and top so there are no bumps, creases, or unevenness before you start applying the cement. You don't want any random bumps poking out that'll need a lot of sanding later. Once your bag is ready, mix your cement and then coat the bag with it to form the mold.
Using a trowel or a utility shovel, make sure the final layer is smooth and even. After you have a nice thick layer (about 1 to 1½ inches thick) of cement on the bag, add the river rocks to cover the cement, using the smaller rocks to fill in the narrow gaps. Make sure to add adhesive to the back of the rocks before applying each one. After the cement mix sets, move the bag above a cart or trash can and unseal the top to allow the sand to fall out. Remove the bag (which should peel away easily) and then sand the inside and top of your new planter as needed. After that, it's ready to welcome its first plant.
Make it your own with different stones and colors
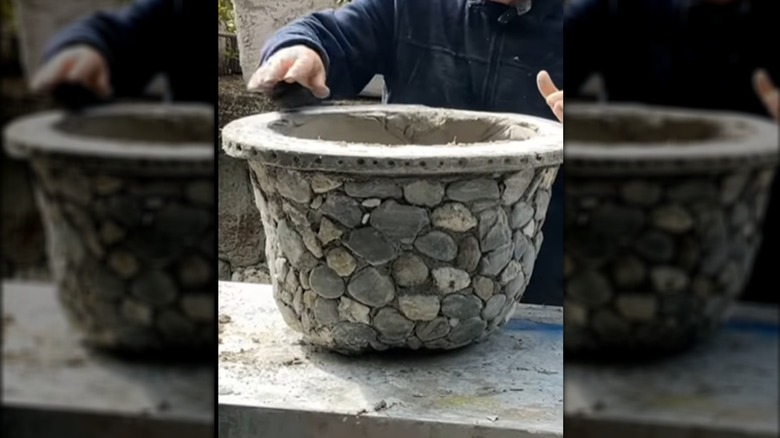
There are so many creative directions in which you can take this DIY. One approach is to swap the river rocks for decorative stones like polished pebbles, sea glass, or even broken tile for a mosaic-style design — perhaps even match the color to your backyard's theme. Consider mixing up the design by applying small pebbles sideways on the mold, giving it a layered appearance.
This may be a bit more labor-intensive, but the display of colorful layered stones can make for quite a statement piece on your patio or front porch. Of course, there are always marbles or beach shells, which can be used instead of stones. For example, if you want a more coastal finish that still includes some texture, include shells on the outer design and perhaps a few starfish accents.
Another way to personalize the planter is by adding concrete pigment to your cement mixture while mixing it. A splash of color can create more of an intentional look that complements your outdoor space — just be sure to add fewer rocks so it's visible. For example, a deep terracotta red or slate blue can help make the pot stand out as a statement piece against the greenery.