

Turn An Old Kitchen Whisk Into A Creative Way To Add Ambient Lighting

We may receive a commission on purchases made from links.
When we think of whisks, we picture them beating eggs or blending cake batter. Then, when they get old and worn, they're often pitched in the bin without a second thought. Surprisingly, these humble kitchen utensils can be given new life as something unexpected: a lighting fixture. More specifically, this project works best with wire whip-style whisks, as their large dome-shaped frames create a cool cage-like effect for the light — and they're big enough to comfortably house a small bulb. That said, smaller handheld whisks can be upcycled into light fixtures as well. There are various approaches you can use for this chic DIY pendant light idea.
One approach involves threading a hanging light cord (such as the LYOOWNG Plug in Pendant Light Cord) through the base of a whisk and securing the bulb inside. The DIY fixture can then be hung from a ceiling hook or lamp. Another approach is placing a puck-style LED light inside the whisk's base — though you'll end up sacrificing brightness. These devices put out fewer lumens, making them better suited for small accent spaces rather than serving as a room's main light source. With either approach, you'll find that this fixture idea is just one more reason to repurpose a whisk in your home or garden instead of scrapping it.
When choosing bulbs, ensure they're small enough to fit inside your whisk. For example, compact bulbs like those in the Ascher Candelabra LED Bulb Set have a slim profile that works well for this design. If you prefer the puck light setup, options like the mini HL Submersible LED Lights are a good fit. Also, when buying your electrical cord, make sure it's long enough to reach the outlet, with a little slack for adjustments.
Steps for setting up both fixture options
Before starting, ensure your whisk is clean and dry. If it's rusty, paint over it or remove the corrosion with a vinegar bath, sandpaper, or a metal file to stabilize it and prevent it from spreading. For the puck light setup, place the device inside the whisk at the base, securing it with its self-adhesive backing. To hang the lighting fixture, loop a piece of metal wire through the attachment hole at the whisk's base, create a knot on the end, and suspend it on a hook. If it doesn't have an opening, secure a hose clamp to the base. Afterward, loop your wire over it and create a knot before tightening the clamp.
For the electrical cord option, first perform a quick fit test to ensure the wire will run comfortably through the whisk's base and hang evenly once it's up. You may need to add a small fitting around the base opening to keep the cord centered so the fixture doesn't hang lopsided. Also, make sure the light fits easily inside. Once you've confirmed the cord and bulb fit, you can hang your wire on either a ceiling hook, a clamp, or a lamp.
If you plan to paint the whisk, now is a good time to do so. After applying the paint, make sure to set the whisk on its base to dry to avoid any drips pooling in the wire dome. Let it dry fully before threading the hanging cord through. Next, secure the bulb inside the whisk, plug in the cord into the outlet, and then flick on the switch to test out your new light fixture.
Creating new looks for the lighting fixture
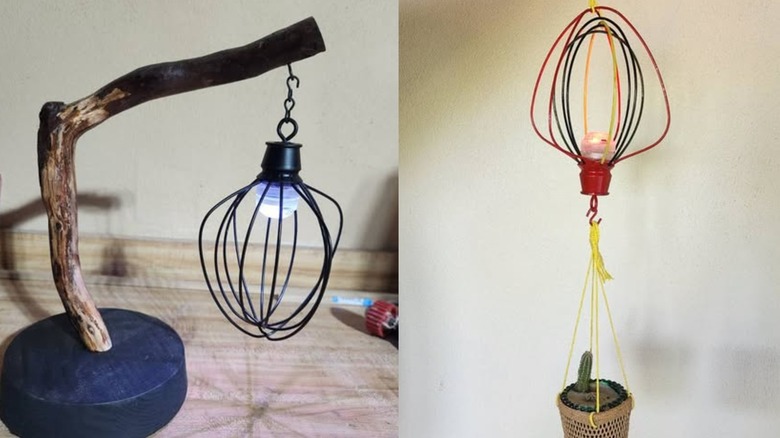
Now that you've discovered that a whisk can be one of those kitchen items you can reuse in your home to reduce waste, perhaps it's worth seeing how many are hiding in your kitchen cabinets. You can also put other spins on this DIY idea. For example, if you have extra whisks to use as pendant lights, consider painting them different colors and hanging them at different lengths, setting up an eclectic cluster of cool ambient lights in your home workshop or craft room.
You can also make changes to your original design, such as opting for a smooth matte black or gray for a subtle moodiness that adds character to those transitional spaces like hallways and small foyers. If you used a tea light, consider moving it to the top of the whisk's dome instead of the base for a softer, more lanternlike glow through the wires. This setup will also make it easier to replace the lights if needed. If your whisk is worn, try using paint to create different finishes such as gold or chrome to hide the blemishes while maintaining the industrial look of metal. Or, simply play up the distressed look by applying a dry-brush technique with colors like bronze or white over the wired edges of the whisk to mimic natural wear.