

How To Make The Cutest (And Easiest) Ruffle Pumpkin Wreath From Dollar Tree Finds

Nothing says fall quite like pumpkins, burlap, and DIY crafts. We're bringing these classics together to make a ruffle pumpkin wreath that will look adorable anywhere you need a little seasonal flair — whether you're trying to recreate Martha Stewart's fall porch decor or just want to add a splash of pumpkin spice to your existing decorations. It's so cute and easy you might end up making an entire pumpkin patch of wreaths.
You might have seen basic burlap ruffle wreaths before, but we're modifying the popular technique to give it extra stability using a clever tip from Julie's Wreath Boutique. Plus, to keep things budget-friendly, we're snagging a Floral Garden Metal Wreath Form from Dollar Tree in the 14.25-inch size for only $1.75. You can go bigger with the 18-inch frame or smaller with the 8-inch form, just be mindful to adjust the amount of burlap to the size of your frame. For a 14-inch frame, you'll need about 10 yards of 5.5-inch orange burlap ribbon.
To manipulate the frame using Julie's hack, you'll need a pair of pliers and a hot glue gun with glue sticks, which you can also pick up from the Dollar Tree. Make sure to have a pair of scissors on hand as well. Other helpful, though optional, supplies you can get from Dollar Tree include fall ribbon or bows and a metal wreath hanger.
How to easily hack the burlap wreath ruffle method
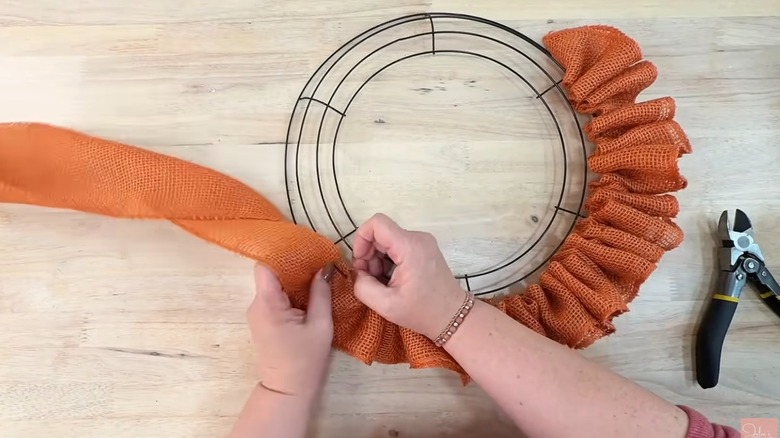
You can skip the basic store-bought fall wreaths and use this modified ruffle technique to create a homemade version that holds its shape. The burlap wreath ruffle method is simple. Start by securing one end of the burlap ribbon to the wire frame with a zip tie. Then fold the burlap in half and snuggle one of the wire rims inside the fold. Gather the burlap into ruffles within each section of the frame, continuing around the second and third wire rings. Anchor the end of the burlap with a zip tie like you did in the beginning.
Julie from Julie's Wreath Boutique skips the zip ties altogether, using a technique that secures the burlap along the frame rather than just at the ends. For an extra sturdy wreath that won't have sections of burlap falling through, Julie threads the wire frame through the burlap instead of wrapping the burlap around the wire.
To do this, use wire cutters to cut the second wire ring near one of the frame's crossbars. Fold the burlap ribbon lengthwise, then push the cut end of the wire through the material just below the fold, leaving the loose edges facing outward to create the ruffle. Move one inch down the burlap and stick the wire through again. Continue gathering and threading the burlap until that section of the frame is full. Cut the excess burlap and reattach the cut wire frame with hot glue. Allow it to dry, then repeat with the next section. Repeat the process all the way around the frame. Then repeat the process again with the third wire to complete the wreath.
How to bring your burlap ruffle pumpkin wreath to life
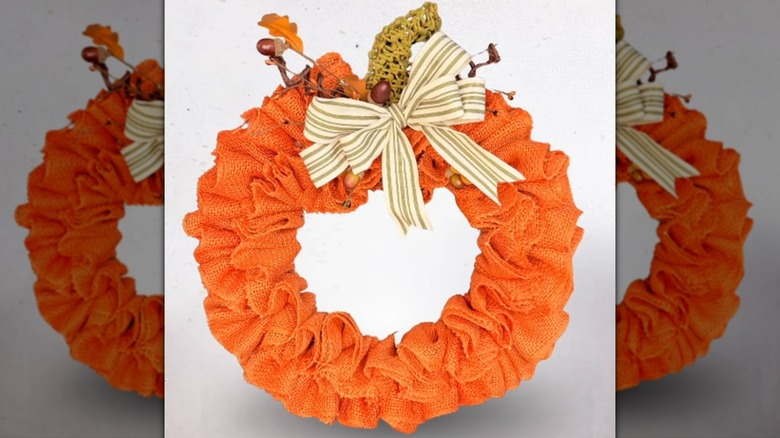
For a simple wreath, you can add a decorative bow to the top and let that be the finished look. Craft your own bow from fun fall-inspired ribbon or purchase one premade. Attach the bow to the wreath frame using hot glue, zip ties, or floral wire.
To really play up the pumpkin vibe, add a stem extending up from the top of the bow. Your creativity is the limit when it comes to what to use here. A piece of driftwood would give it a rustic aesthetic. Or you can use green mesh wire rolled and formed into a stem-like shape. You can even use an empty toilet paper roll and cover it in green or brown burlap ribbon to match the texture of the wreath. Use your hot glue gun to attach the stem to the top of the wreath. Finish with additional embellishments, such as leafy floral stems, acorns, or pinecones.
To hang your wreath, use a metal wreath hanger that fits over the top of a door. This is perfect for a front door or even interior doors like a pantry or closet. A useful hack for when your door doesn't have room for a wreath hook, is to recreate the same thing by putting a command hook upside down on the inside of the door. Secure a long ribbon to the back of the wreath frame, leaving enough length to extend over the top of the door. Position the wreath on the front of the door, run the ribbon over the top, and secure it to the Command hook on the inside.