

She Used Simple, Affordable Materials To Build A Floating Backyard Deck (No Saw Required)

We may receive a commission on purchases made from links.
Whether it's a statement piece or a simple place to relax after a long day, everybody dreams of an outdoor deck. But unless you already have a deck in your backyard (or front, or side — we don't judge), adding one can feel overwhelming, impossible to DIY, and out of budget. The good news is that creating a stunning floating deck in your yard doesn't have to be any of those. Instead, take a page out of a clever YouTuber's book and DIY a floating wood deck without the single turn of a saw.
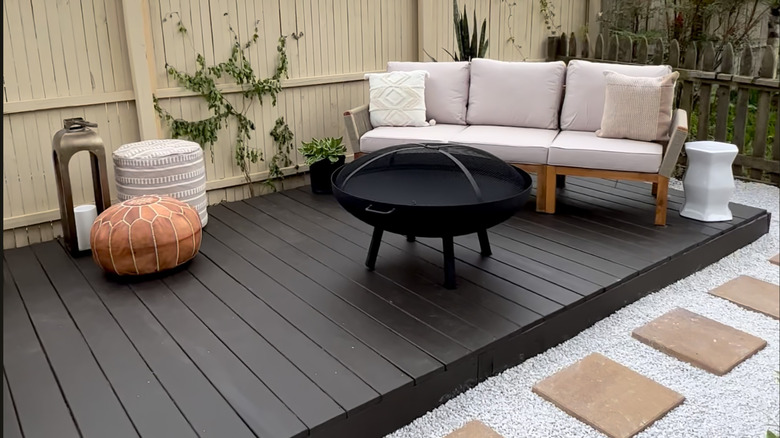
As the name implies, a floating deck is one that stands on its own instead of one that's connected to a building. On her channel, DIY Dream Home with Cara Newhart, this savvy YouTuber builds her own floating deck. After clearing out and leveling her yard, she laid down landscape fabric, then arranged 2-by-8-foot pressure-treated boards into two side-by-side square frames and secured them with galvanized nails and corner braces. She then used joist hangers to fix the support boards into place, then screws on the deck boards. After a coat of paint, she added her furniture and some lighting to complete the DIY. Oh, and did we mention she didn't use a saw?
Why should you do this DIY? One, it's so affordable. You could build an 8-by-8 floating deck for around $300. (For comparison, having a professional build a floating deck costs upwards of $2,500.) Two, it's quick. An experienced DIYer might tackle it over a weekend, while beginners might need a few weekends.
A few things to consider before building a solid floating deck

You may be tempted to start this project quickly, but first, confirm with your local building inspector's office if you need a permit. While many areas do not require one, some, especially those that experience frost, do. Then, decide where to install a floating deck in your yard. Look for a level area, away from any buildings and any places in your yard that don't dry out properly. Use string to mark out your proposed deck and lay out where the deck footing will go.
The best footing type depends on your location's climate. In warmer areas, you can use 12-by-12 concrete pavers as deck supports. However, if you live in a colder climate, pouring solid concrete footings is key for your deck's longevity. Why? During winter, freeze-thaw cycles can disturb the concrete pavers, creating an uneven base for your floating deck. To add these supports, look up your area's frost depth, then dig just below it. Pour in concrete, let it set, then continue building your deck (you may need to hire a professional for this step).
Finally, check your wood. Ensuring your deck boards are fully dry before building and sealing will prevent moisture from getting trapped inside the wood and rotting. Wet boards will have a greenish hue and feel heavier than their drier counterparts. Let it dry in the sun, and pin landscape fabric to keep weeds at bay before you start building.
Tips to build and personalize your floating wood deck
Now, it's time to start assembling your deck. Whether building the frame or laying the deck boards, begin on one side and work your way across. This helps ensure an even build and keeps you from losing your place as you go. When laying the boards, leave a small gap between them so rain or snow can drain away, and the wood can expand and shrink safely. Use screws designed for outdoor decks, like Grip-Rite #2 Phillips Bugle Head Coated Exterior Wood Deck Screws, to secure the boards.
Once the deck is built, it's time to add some color, which leads to the big question: Is painting or staining a better option? Generally, stain is often the most effective option because it sinks into the wood rather than layering on top of it. This lets the stain wear away naturally, unlike paint, which tends to flake. Does that mean paint is a bad choice? Absolutely not. Paint is great for adding color, concealing, and protecting the wood from harmful UV rays, which is a bonus for an outdoor project like this. However, one thing to keep in mind regarding paint color is that darker hues usually show dirt more than other shades.
Once you've picked the perfect color or stain, make sure to properly clean and sand the deck before applying. In the comment section of the YouTuber's video, one person recommended adding a deck-friendly sealant, like Thompson's WaterSeal Clear Wood Sealer, after applying the paint or stain and reapplying it every five years or so to keep the deck looking fresh. Whichever route you choose, the final result will be a unique outdoor patio space.