

Man Turns An Old Lawn Mower Blade Into A Functional Garden Trowel

We may receive a commission on purchases made from links.
Although good lawn mower blades can last several years, you'll eventually notice the tell-tale signs they need replacing. You could toss the old one in the recycling, but a number of enterprising individuals make something useful with them. Over on YouTube, the Solid Steel Ironworks channel turns one into a functional garden trowel. Let's look at how they did it.
The key tools required are a forge, an anvil, a heavy blacksmith hammer (2 pounds or more), and some tongs. That list might seem expensive, but the Vevor Portable Propane Forge with two burners is under $120 (a single burner is cheaper, but too small for this project). The anvil might be challenging since you'll need one that is at least 70 pounds. You can shop second-hand suppliers and online marketplaces, but given the weight, be wary of delivery costs.
Working with metal at over 1,000 degrees Fahrenheit is dangerous, but experts don't usually wear gloves. They can't feel the tool properly, misjudge the temperature of hot metal, and increase the chances of burned. However, fire remains a hazard, so check what you need to know before buying an extinguisher.
Forging the garden trowel blade and the tang for the handle
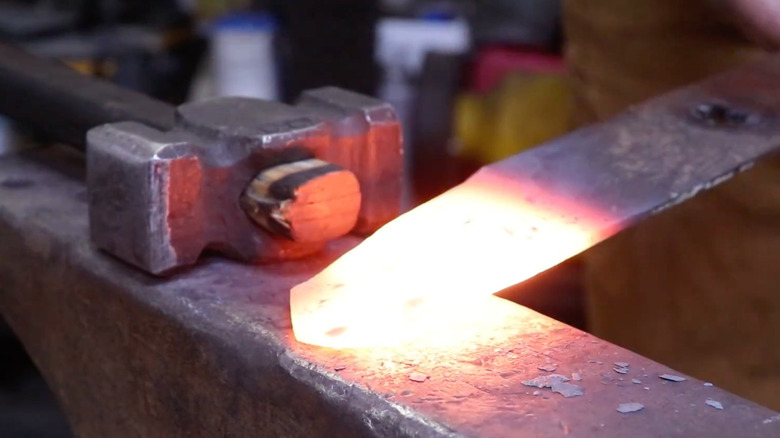
First, flatten the lawn mower blade to remove the cutting edge. Even red-hot metal cools quickly, so when hammering is no longer effective, return it to the forge to reheat. Next, shape the end of the trowel. Hammering is laborious and can result in flaws (called a cold shut in the video). Instead, a chisel removes unnecessary material. Alternatively, let the metal cool and use a hacksaw to remove the excess. Return the piece to the forge to refine the shape.
In the commentary, we learn he spends a long time forging the trowel because he needs the practice. Chiseling away portions or sawing them off would be considerably quicker and easier. Eventually he is satisfied and uses what looks like a belt sander (a bench grinder would do the same job) and a file to finish the trowel profile.
Next, he marks a center line and depth scale with a Sharpie, reheats it, and incises the marks with a chisel. Note these are metalworking chisels (often called cold chisels), not the kind used for woodwork. He also adds inch markings using special punches, although you don't need to. The blade is returned to the forge, and the curve is added to the blade using the front section of the anvil.
Adding the handle and finishing the garden trowel
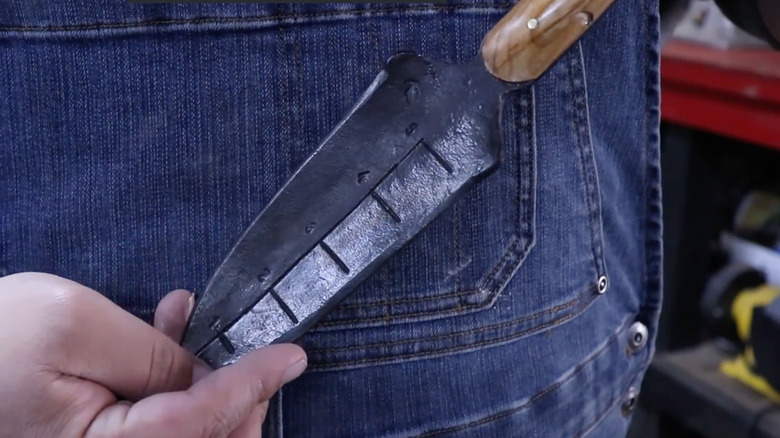
In the video, the wooden handle is made from a piece of cherry. Any scrap lumber you have will do. Hardwoods are tougher and more durable than softwoods, but as long as it is protected (more on that in a moment) it's not really important. In this example, the handle components are drilled and riveted together. It is the traditional approach, but using a specialist two-part epoxy glue such as JB Weld can be easier (in the video, Gorilla epoxy is used in addition to the rivets, though the maker admits he is no expert at this phase).
Before the handle parts are attached, the metal is blackened by heating it and then quenching it (cooling in a tray of liquid). He uses a mixture of linseed oil, turpentine, charcoal, and beeswax. The amounts aren't detailed, and the process isn't shown, so you would need to investigate further. Quenching makes the metal harder, but it is not necessary for a trowel.
After shaping, the handle is attached and clamped while the glue cures. Use small pieces of plywood to stop the clamps from marking the wood. After sanding, the last step in creating this essential garden tool is to apply boiled linseed oil to protect the wood. It's a penetrating finish that leaves a nice warm glow. Danish oil is another popular choice. Varnish is generally not recommended, as the shiny surface can make the handle slippery.