

Woman Turns Cardboard And Paper Into A Beautiful Bookshelf With An Impressive DIY
We may receive a commission on purchases made from links.
Cardboard can easily be seen as trash, but as the famous saying goes, one person's trash is another person's treasure. After all, there's nothing more satisfying than repurposing what would have otherwise been thrown away. Perhaps a pile of trash could be turned into your own treasure if you explore storage solutions made from cardboard boxes and paper clay. The result can be just like the quirky DIY paper clay bookshelf that artist Dansy Thomas posted on her Instagram. In a series of short videos, she cleverly uses cardboard boxes to create a bookshelf shape, covers them in paper clay, then paints them to reveal a beautifully unique storage piece.
Add style to your home with this cardboard DIY by first gathering all the materials that you need for the bookshelf. For the bookshelf frame, grab cardboard boxes, a pair of scissors, a glue gun, and some masking or joining tape. To make the paper clay mixture, you'll need finely torn or shredded paper — like old mailers — hot water, a blender, salt, vinegar, PVA glue, and joint compound. You'll likely also want to paint the final product. This creative DIY project might take up to a week to complete, but it's worth it for the final result!
Create a unique organic bookshelf from cardboard and paper clay
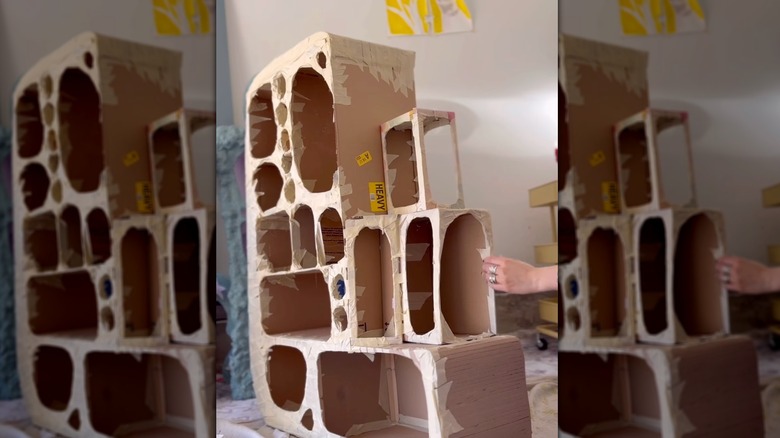
To sculpt your own shelf inspired by artist Dansy Thomas, begin by making the cardboard bookshelf structure. The overall look and layout of the bookshelf is down to you, but the easiest way to do this is by sticking whole cardboard boxes together with the openings facing outward, creating shelf compartments. Thomas forms arches and more organic shapes by adding smaller pieces of cardboard around the edges of the boxes, adhering them with a hot glue gun. Once you're happy with your frame, smooth out the edges by applying either masking or joining tape on top of them.
Making the paper clay mixture is a little more complex, so Thomas shared a separate Instagram video on the process. Start by gathering a load of torn or shredded paper in a bucket, then submerge it with boiling water. Leave it for at least a day to let it fully soak in. Next, Thomas blends the paper until it fully breaks down and strains out as much liquid as possible using a cheesecloth. She suggests adding a splash of vinegar and some salt to your mixture to preserve it. Lastly, kneed in equal parts of All Purpose Liquid School Glue and joint compound until the paper clay resembles a thick, plaster-like texture.
Now for the fun part! Take your paper clay and start applying it to your cardboard frame, pressing and shaping it as you go. You may need two to three layers to smoothly cover the cardboard. Once your cardboard frame is fully covered and you're happy with it, leave it a few days to fully dry.
Finish and decorate your paper clay shelf
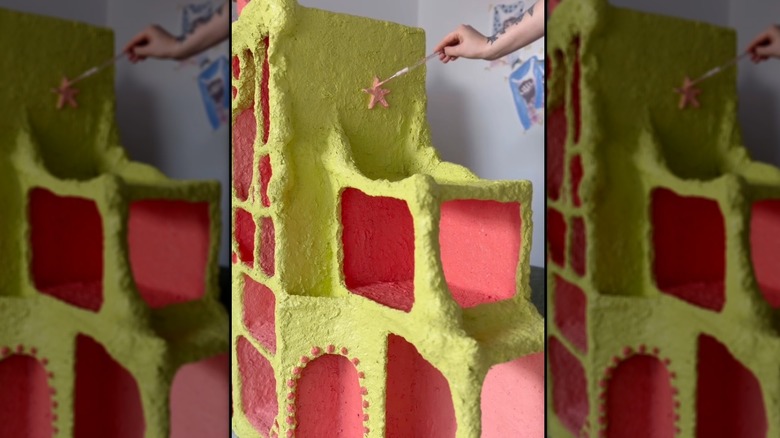
The wonderful thing about paper clay is the unique texture it creates. However, you can tailor this to how bumpy and rustic you want your shelf to look. If your application isn't the neatest and you'd prefer a more even surface, use some sandpaper to smooth it out. Leaving it unpainted may be best for those that prefer a more muted, neutral color palette in their home. If you decide that you'd like to paint your shelf, use an acrylic paint for a smooth finish, even coverage, and a little bit of water resistance. Be aware that it may take a bit of time to get in between all of the gaps and crevices.
Need some inspiration for where to display your bookshelf? Create a cozy reading nook in your living space with this proudly sitting in the corner as a focal point. Due to the nature of paper clay, you may want to avoid displaying it anywhere with excessive moisture, like a bathroom. To protect your bookshelf, you can also use a sealant after you've painted it to shield it against any possible damage or moisture exposure. If you still have leftover materials, consider upcycling vases with paper clay.