

Ditch The Pricey String Lights — Take A Basic Set From Plain To Breathtaking With Beads

We may receive a commission on purchases made from links.
Let's be honest, gorgeous lighting solutions for your home can get expensive. Especially if you're looking for unique, interesting pieces that will add a little flavor to your decor. There are a ton of creative lighting ideas for indoors, but we've found a budget-friendly option that will add personality and color to your space. It's yet another way to update ordinary string lights for a more stylish and modern look. You can transform a basic set of string lights into a rainbow-hued one by threading colorful beads along the wire and over the tiny bulbs. It's an affordable DIY that requires just beads and a little patience.
First, you'll need a set of string lights with tiny, flat LED bulbs. These 66-foot-long Minetom Fairy Lights cost just $12 and come with a remote, while these Minetom Plug-In Twinkle Lights are half the length and about half the price. Your choice will depend on how much space you have to cover with the lights. You'll also need a lot of beads — for example, this pack of Anpiwshjo Pony Beads has 1,100 pieces in a variety of colors. Depending on the length of your string lights, you may need to get more than one pack of beads. You could even purchase different packs of beads to ensure you have a diverse color palette. Creating string lights for the festive season? Get a pack of red and green beads. Prefer a minimalist vibe? Go for monochromatic beads. It's also a good idea to have a piece of cardboard on hand to wrap the lights around as you work, which will help prevent knots.
How to transform a basic set of string lights with beads
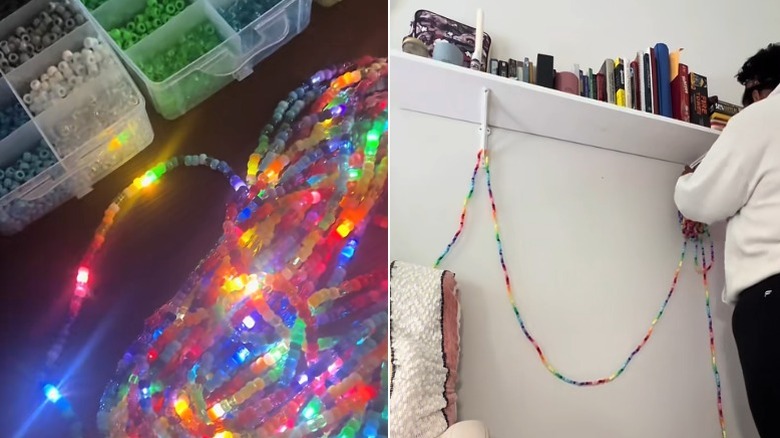
Start by unraveling the string lights from their packaging and rewrapping them around the piece of cardboard to keep them tangle-free. You don't want to give yourself a headache trying to remove knots, so don't skip this step! Next, start threading the beads onto the string lights. Place a dot of hot glue at one end of your string lights if needed, though the plug, battery pack, or switch should keep them in place. You can choose to follow a pattern of colors or go entirely random to give your decorated string lights a wild vibe.
Once you've covered the entire length of string lights — this may take a while — you need to secure the other end to make sure your beads stay on. There are a few different methods to choose from. One option is to leave an inch or so of excess wire at the end and tuck it inside the last few beads. You could also use a bit of hot glue, just as you did at the start of this project.
One thing to note: This style of fairy lights is typically very lightweight and easily attached to a wall or shelf. But covering them in beads will add some weight. It's a good idea to use sturdy hooks, like these Command Mini Light Clips, to hang your lights. If you ever want to take your beaded string lights down — for example, if you used beads in seasonally themed colors — consider using a household staple to keep your lights tangle-free: a cardboard paper towel or wrapping paper tube. Whether you're looking for a fun lighting solution for your craft area, book nook, or bedroom, this project is budget-friendly yet breathtaking.