

Make Faux Marble Storage Boxes With An Affordable Plastic Crate DIY

Whether you live alone or are part of a busy household where adults, kids, pets, and the occasional guest all stay under one roof, maintaining order is paramount for peace and harmony to prevail. Yup, we're talking about maintaining a tidy space, and one of the easiest and most budget-friendly ways to keep your home organized is to use plastic crates. From storing shoes and clothes in closets to holding utensils and groceries in the kitchen, plastic crates really come in handy. The best part is that you can transform a simple plastic crate into a stylish storage solution without spending a fortune. Case in point: You can make a faux marble storage box using an affordable plastic crate you might already own, just like YouTuber Miras-e-Hunar did.
This is a relatively simple plastic crate DIY project that you can replicate even when you're on a tight budget. You're going to need something like this 24-quart EconoHome Milk Crate — collapsible or not, it does not matter. The idea behind this DIY glow-up is to add faux marble-covered cardboard panels to the sides of the crate to give it a stunning new look, so you'll also need a roll of faux marble adhesive sheet, like this Nuxovilar Black-Gold Marble Wallpaper Peel-Stick Vinyl. Then gather some pieces of cardboard, a roll of black foam sheet, gold ribbon, glue, a ruler, a pencil, and some scissors. Pretty sticker labels are optional. Now, let's get building!
Transforming a simple plastic crate into a faux storage box
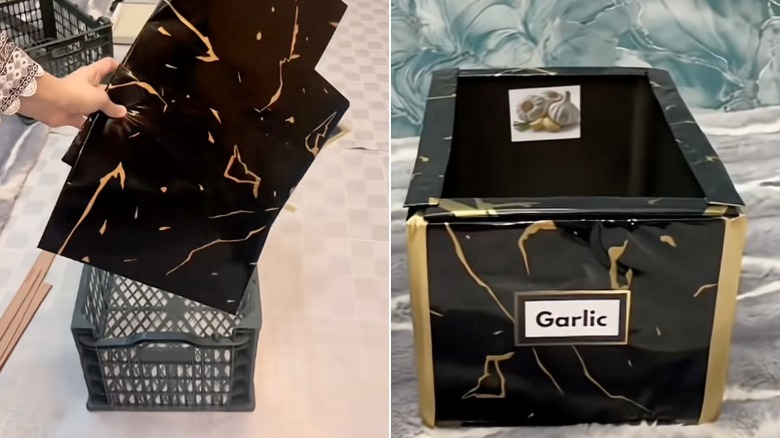
The most technical step in this DIY project is measuring the sides of the box and cutting the cardboard panels to fit. You can use a ruler to measure the walls of the crate and then use those measurements to create the cardboard panels. Alternatively, turn the crate on its side and place it on top of the cardboard. Trace the shape onto the cardboard before cutting out the panels. Repeat the process with the three remaining sides of the crate. Next, cut out four narrow cardboard strips for the rim of the crate.
Now, it's time to wrap the cardboard panels and strips in faux marble! Cut the adhesive sheets a bit larger than the cardboard panels, providing some overhang to wrap around the edges of the panels. Go ahead and cover each panel. If you couldn't find adhesive sheets, you can still undertake this revamp using marbled wrapping paper. You'll just need to use glue instead. However, depending on what you plan to store in these boxes and where you want to use them, it might be better to stick to plastic sheets that won't get soggy if they come into contact with water.
Once you've covered the cardboard panels and strips, glue them one by one to the walls and rim of the plastic crate. Finally, cut the black foam sheet into pieces and glue them to the inside of the crate, covering the walls and base as a liner. With that done, your DIY storage box is basically ready for use. There are, however, a few final touches you may want to add.
Style and add functionality to your plastic crate DIY storage box
For a neat finishing touch, glue strips of ribbon along the exterior joints of the crate where the cardboard panels meet. Gold ribbon will stand out beautifully against the black and gold marble. If you don't fancy the darkness of black marble, feel free to experiment with other hues to coordinate the box with your existing decor. For example, making a pink and white marble storage box (with pink or white lining) is one way to add trendy pink color to your bathroom without a whole renovation. Blue and white marble with matching lining would look great, too. Or try brown marble for a modern touch to a rustic room.
Beyond choosing colors and making your plastic crate look pretty, why not customize it to improve its functionality? Start by labeling all the storage boxes to make it easier to find what you're looking for. It's a genius way to use a label maker around your house. Alternatively, you could get some decorative label stickers from a local craft store or online.
You could also fashion a lid for your storage box. Just cut another cupboard panel to fit over the opening, wrap it in the same marble sheet you used on the side panels, attach a wooden drawer knob to the center, and that's it! Now you can hide all the stuff you've dumped inside the plastic crate under a cute lid. Lastly, a useful modification would be attaching caster wheels to each corner at the base of the crate. Then you can easily move the box and your belongings from one spot to another — when you're cleaning out a room, for example.