

Don't Leave Them Unadorned: The Eye-Catching DIY Window Sill Cover Anyone Can Do

We may receive a commission on purchases made from links.
When's the last time you upgraded your window sills? Sure, it may not seem like an important area of the home to pay attention to, decor-wise. However, not only is a window sill a significant part of the window — it provides structural support and protects the wall from the elements — but it's also an underrated area to decorate. Pay it some attention and you can really change the vibe of a room. There are a number of easy ways to revamp your dull window sills, from giving them a new coat of paint to installing embellishments. Instagrammer Rachel Verney of the_shoestring_home shared a simple DIY project that will transform your window sill from boring to beautiful. You can create an aesthetic, eye-catching window sill cover using tiles and colorful grout.
To complete this project, you'll need a piece of plywood that is the size of your window sill, along with a small strip of plywood that's the same length as the first. This thin strip will serve as the lip or overhang of your window sill. You'll need some wood glue, a drill, and screws to build this window sill cover. Alternatively, you could buy a pre-made cover, like this Sxsjmy Window Sill Protector for about $45. You'll also need some colored grout — Verney used pink grout. You can make this by mixing water-based, interior acrylic paint in your preferred hue with grout, like this Red Devil Pre-Mixed Tile Grout. Finally you'll need some mosaic tiles — these Merola Tile Square Matte White Tiles are a good option. It might also be a good idea to grab a few basic tiling tools, like a sponge, a trowel, and a utility knife.
How to DIY a window sill cover with tile and colorful grout
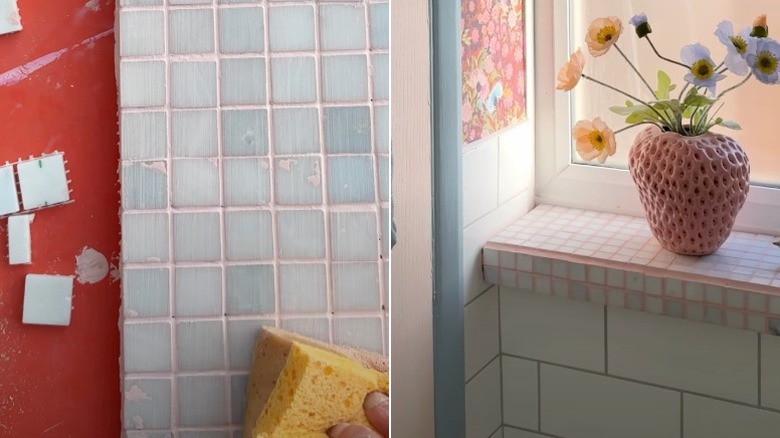
This is a relatively simple DIY that anyone can complete. First, you'll build your window sill cover. (Skip this step if you bought a pre-made one.) Use wood glue to secure the two pieces of plywood together — the top and the overhang — and then screw them together. Let the glue dry completely before moving to the next step. It'll likely take 30 minutes to an hour. Then you can create your colored grout. Pour the paint into the grout slowly while stirring until you've reached your desired shade. Dollop the grout on your window sill cover and spread it across the surface using the trowel.
Next, you'll lay your sheets of tile. Cut the sheets to the appropriate size using a utility knife. Then use more grout to fill in all the gaps. Use a sponge to wipe any excess grout off the tile, and then leave the cover to dry for at least 24 hours. Now, you're ready to attach it to your window sill! You can use something like Liquid Nails Construction Adhesive for a strong, lasting attachment.
One of the easiest ways to add a little personality to this project is to change the tile or grout color. Colorful grout and tile combinations that inspire you to join the bold decor trend are a fun way to make your space your own. Or consider this clever tile trick: using multiple grouts for a unique, stunning effect. You could use a rainbow of colors or go neutral with shades of gray. After you've transformed your window sill, don't stop there! Adorn it with plants, trinkets, and more. Before you know it, you'll have turned every window sill in your home from overlooked to outstanding.