

Use Tissue Paper To Convert Glass Jars Into Fancy Lanterns That Beautifully Light Up Your Home

We may receive a commission on purchases made from links.
There's only so many ways you can brighten up different parts of your home without resorting to pricey lamps and other light fixtures. This won't stop crafty and resourceful people, though, as you can create your own custom home decor with things you already have in stock. If you have any empty glass jars that need a purpose outside the pantry, you can turn them into decorative lanterns, embellished with swirls of tissue paper.
For this project, it would be better to use glass jars without embossed designs to make sure the glue can be applied evenly, and for the tissue to adhere without much trouble. Speaking of tissue, feel free to use either tissue paper like Kleenex or gift bag tissue paper; just make sure it's thin and translucent enough for this DIY to function properly as a lantern. An assortment of colored tissue paper like Hallmark Classic Rainbow Tissue Paper would be perfect. For the adhesive, a PVA glue like Titebond All Purpose White Glue would suffice. Equip yourself with a paintbrush for easy application. Furthermore, this DIY would not be complete without a light source for your lantern — in this case, pick up some Homemory Battery Tea Lights or fairy lights instead of a real flame-lit candle as it can risk igniting the tissue or destroying the glass jar with prolonged use.
Adorn the glass jar lantern with tissue paper puffs
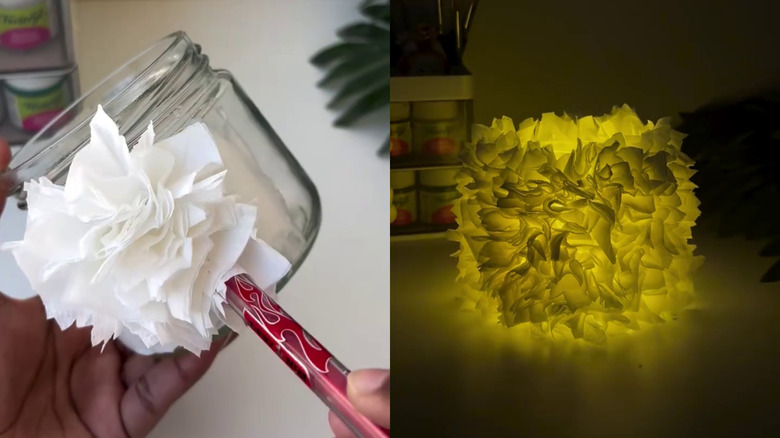
Before you start decorating, make sure your glass jar is empty and clean. If there's a label affixed and you can't peel it off, soak it under hot water to remove stickers from glass jars easily. Once it's clean, dry, and free of sticky residue, you can turn your attention to the tissue paper. Start by cutting the tissue into squares about 2-by-2 inches in size. Layer two squares together, and then using the back of your brush or a pencil, press and twist the center of the square to form a pinwheel.
With the craft glue already brushed onto the jar, immediately stick each pinwheel onto the surface by pushing it on with the back of the pencil or brush. You don't need to apply glue to the entire exterior of the jar before applying the tissue paper. Instead, work in one section at a time so you'll have enough time to glue the swirls onto the jar without letting the glue set for too long. Make sure each section is evenly covered with the tissue paper until no gaps are visible. If you want more flair to your lantern, you can try adding floral embellishments like Mulberry Paper Flowers. Once the glue has fully set, place your battery-powered light inside your newly-made lantern and enjoy the warm glow it emits.
You can choose to use this as a desk lamp that will light up your home office, or it can work as a decorative accent light on any other surface in your home. It's also a great DIY for holidays and special occasions; just choose tissue paper colors to fit the theme. Plus, the fluffy tissue will disguise the fact that there's no real flame.