

No More Basic Coasters: DIY A Cuter Set Using Clothespins
If you're a must-use-coasters household, you've most likely cycled through your fair share of different styles, many of them probably pretty basic. But while you might choose your coasters based solely on their functionality, don't sleep on their potential as a cute table accessory. Instead of buying more run-of-the-mill coasters, why not craft a unique set of your own using wooden clothespins? You can save your surfaces from unsightly water rings in style.
This simple DIY transforms ordinary wooden clothespins into decorative coasters. It's an easy craft that anyone can do (including the kids), and you can even give away the final product as a creative housewarming gift. Arrange the clothespins into different shapes and customize their look, from rustic bare wood to bright pops of color, to match your home's aesthetic. Of all the amazing ways you should be using clothespins, who knew they'd end up making the most adorable set of coasters?
To get started with creating these coasters, all you'll need is some wooden clothespins and glue. A hot glue gun will make assembly quicker. Optionally, you can also use wood stain, paint, or glitter to customize your coasters, along with felt to use as a backing or a water-resistant sealant to help protect the wood from moisture.
How to DIY your own coasters out of wooden clothespins
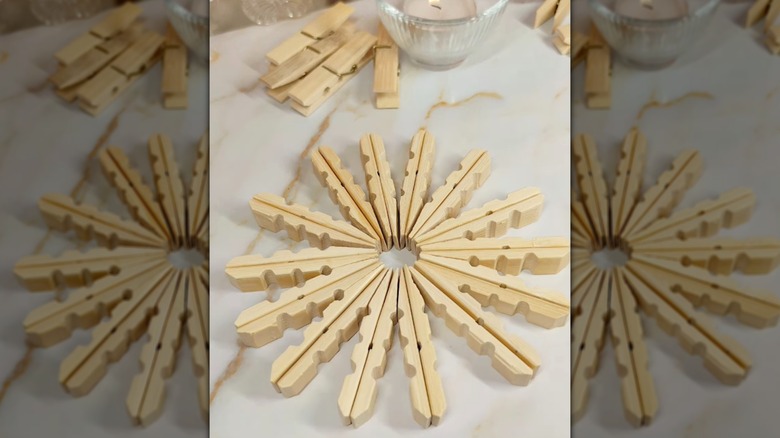
To DIY stunning coasters for personalized home decor, gather your clothespins and other supplies. You'll need 14 clothespins to make a simple star-shaped coaster. Begin by removing the metal hinge on each clothespin to take it apart — you can do this by twisting the two wooden halves of each clothespin in opposite directions. As the halves come apart, slide off the metal springs and toss them since you won't need them for this project.
Next, take two wooden halves and glue their flat sides together, creating a single piece with a rounded end and a pointed end. Repeat this process with the remaining halves until you have 14 glued pairs. If you lay them all out in a circular fashion with the pointed tips on the inside and rounded tips on the outside, it will form a star shape with an open circle in the center.
Glue the flat sides of the pointed ends together one at a time to hold the star shape together. Make sure you're keeping the clothespins on a flat surface so that the sides are flush together as they dry. This will help create a level coaster, although you should test it with a glass before using it to make sure a cup's base can sit securely over the opening in the center. Allow the glue to fully dry while the coaster sits flat before adding any decorative elements.
Creative ways to elevate your clothespin coasters
The basic DIY uses standard-sized clothespins, but you can experiment with using mini clothespins for a different look. Whatever size you use, once you've assembled the basic coaster, you can start customizing it. If you like the natural wood vibe, you can add a bit of wood stain to the exposed surfaces. Alternatively, you can use colorful paint to make the clothespins match your home's color scheme. Once your paint or stain has dried, apply a clear, water-resistant sealant suitable for wooden coasters.
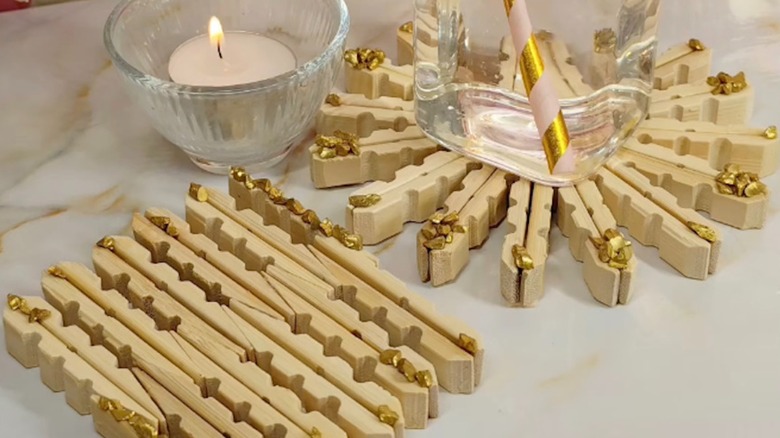
Feel free to get as creative as you'd like with the shape of your coasters. After removing the metal springs and gluing the flat sides together, you can form them into a rectangular shape instead of a star by gluing the pairs together while alternating whether the pointed ends face right or left. No matter what shape you choose, you can add felt fabric to the bottom if you want extra protection for the surfaces the coasters sit on. Glue small pieces of felt beneath the outer points of the star-shaped coaster, or use one larger piece to fit beneath a rectangular design.
To really jazz up your coaster, you can add glitter or jeweled accessories. Be careful to glue any raised items around the edges of the coaster only — you'll want to maintain a flat surface in the center to have a safe place for cups to sit.