

She Turned A Garden Trellis Into A Unique Bookshelf With An Impressive DIY
Shelves, especially bookshelves, are always a great DIY, whether you're a beginner looking for a fun project to take on or an experienced DIYer wanting to make a special piece. Bookshelves can be large or small, simple or complex. And with the right plan, you can even make an incredibly easy bookshelf that punches far above its weight by looking way more complicated than it is. YouTuber Anika's DIY Life shows how to make a gorgeous bookshelf that brings a touch of outdoors inside by repurposing a garden trellis in a bookshelf project. This DIY involves creating a bookshelf that has a garden trellis lattice rather than a back wall. This gives it a more open appearance and helps it stand out beautifully.
To build your own lattice-back bookshelf, you'll need all the regular supplies to build a bookshelf in addition to a piece of latticed wooden garden trellis. Wood, wood screws, wood glue, a drill, measuring tape, a level, sandpaper, and paint or stain are all important for this DIY. Birch, pine, and oak plywood in 3/4-inch thicknesses are all great options for the shelves and sides of the unit, and the amount you need depends on the size of the bookshelf you want to make. When deciding on a size, keep in mind that the shelves should be about 9 to 12 inches apart in order to fit most books and look clean. The depth of your shelves should be at least 8 inches to hold paperback books and at least 10 inches deep if you plan to store hardcover books as well.
Assembling a garden trellis bookshelf

Once you've determined your measurements, cut your plywood to the desired size. You may even be able to use the hardware store wood-cutting tip that'll save time on your home improvement project if you are purchasing new plywood. All you need to do is bring the detailed measurements with you when buying the wood. While there, they may be able to make the cuts for you. Your own saw will still be necessary to cut the trellis, though. A new trellis should be in good condition, but if you are repurposing an old trellis that has been outside, be sure to thoroughly check the wood for bugs, mold, or other signs of decay that may make it unsuitable. Cut the best possible section from the trellis to use for your bookshelf, and clean it thoroughly.
With the all of the shelf pieces, sides, and backing done, you may assemble the shelf. Start by laying down the two sides. Measure and mark where the shelves will be attached to each side piece of wood to ensure that the shelves will be level and even. Then, begin pre-drilling 3/4-inch deep pocket holes on the underside of each shelf near its corners that will be used to connect them to the sides. Use wood glue and screws to attach the top and bottom shelves first, then fill in the remaining shelves, being sure to check that each one is level. Finally, line up your lattice trellis back panel with the back of the shelf, and nail it into place.
Styling your new DIY bookshelf with a lattice back panel
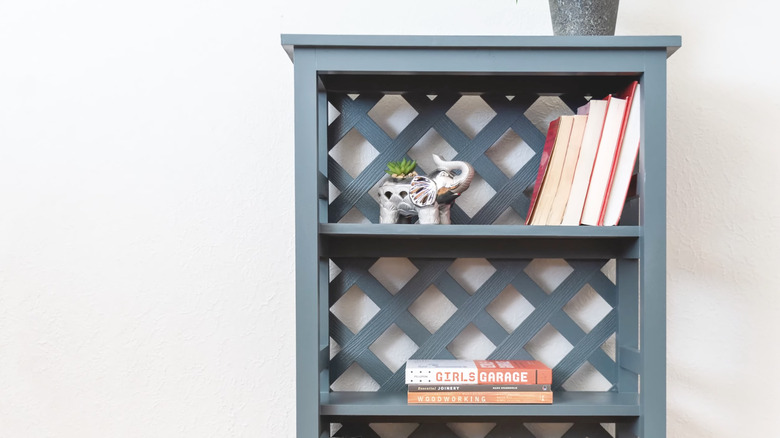
The bookshelf should be fully assembled. Allow the wood glue to cure completely, which often takes up to 24 hours, then begin sanding the wood to remove splinters and rough areas. This will prep the surfaces for paint or stain and prevent the shelves from accidentally damaging your books when actually using the shelf. Just be sure to avoid the common mistakes you're making when sanding wood projects.
When choosing a paint or stain color, it helps to consider the space where the bookshelf will be placed. Because you'll be able to see the wall color behind the bookshelf through the lattice openings, be sure to find a color that complements the walls. Bold colors will contrast nicely with a white wall and make the back panel look more like a unique design, while a natural stain can evoke more of the garden trellis look, creating a more outdoorsy vibe. Whatever you choose, be sure to use a clear sealant on top to prevent wear and tear.
The last step is to style the bookshelf. It can be tough to get the right aesthetic on shelves, but luckily, there is a way to perfectly decorate the shelves of your bookcase with an easy formula for success. Consider adding potted plants, sentimental items, and even art alongside your books for a stylish yet functional display. Be aware of how much weight your bookshelf can bear, though. Wide shelves and thin plywood make for a weaker bookshelf, but wall anchors and keeping heavy items on lower shelves can help with strength.