5 Budget-Friendly Halloween Decor Crafts You Can DIY
We may receive a commission on purchases made from links.
Whether the weather has turned chillier or you're still sweating it through the summer heat, once September hits, you may find yourself running to the craft store and buying supplies in every shade of orange. There seems to be a seasonal bit of euphoria that folks just can't help but be compelled by when it comes to decorating for fall time, especially Halloween, which kicks off the end-of-year holidays. According to New York-based psychiatrist Dr. Elaina DellaCava in an interview with the HuffPost, decorating for fall can actually make you happier.
But something that might make you less than happy is the price tag, which so many of these projects and products carry. Even DIY crafts can cost a pretty penny, and with Thanksgiving and Christmas on the horizon, you don't want to blow your decorating budget for the rest of the year. We decided to put together a list of five stunning and budget-friendly Halloween DIY crafts. In fact, all of our selected crafts can be made for under $15!
1. Chilling cheesecloth ghost garland
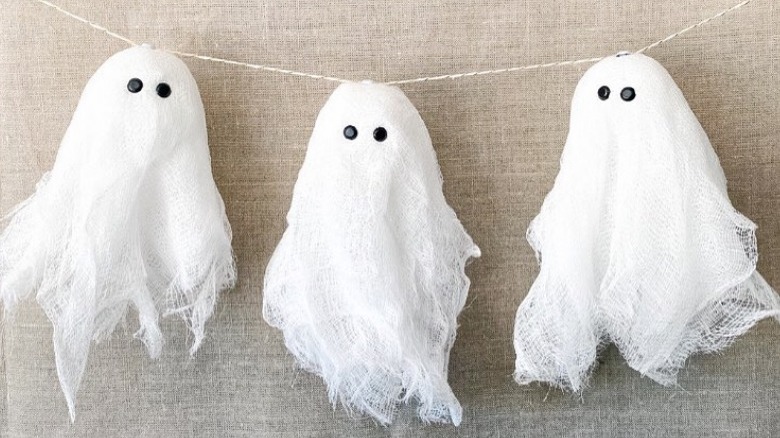
There are plenty of ways to use cheesecloth ghosts in your Halloween décor, whether they're tall freestanding porch decorations or tiny figurines. But one of our favorite ways to show off these happy haunts is in a garland. Of course, you'll need a few supplies, including water, a large bowl, black paper, or black buttons, a cheesecloth ($4.17 on Amazon), white balloons ($1.25 at Dollar Tree), twine ($1.25 at Dollar Tree), and Elmer's School Glue ($1.25 at Dollar Tree). The total would be $7.92.
Elmer's recommends mixing 50% glue with 50% water for your solution. Blow the balloon to the desired size, then set it over a cup or other base so you can form your ghost. You can vary the size of the ghost by blowing the balloon up more or less — just be sure to have an extra cloth at the bottom for a ghostly floating effect. Dip cheesecloth strips into your glue solution, then drape gently over the balloons. Use more cheesecloth for a more layered effect, or just use one layer per ghost. Let dry overnight. Once your ghosts are completely dry, pop the balloon, and get ready to attach the eyes. You can cut circles out of black paper, attach buttons, or even googly eyes to give your ghosts some peepers. Finally, run a string and hang the garland from a doorway or mantle.
2. A menacing monster door
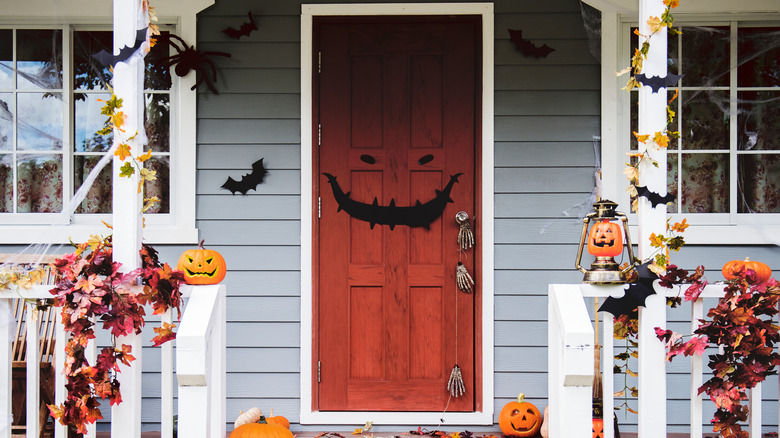
You don't have to be a DIY diva to make some cute, high-impact Halloween porch décor. All you'll need is five thick poster boards (which you can get for $3.95 at Dollar Tree), two white poster boards ($1.00 at Dollar Tree), masking tape ($1.25 at Dollar Tree), and scissors, with the total at $6.20 only. We recommend using masking tape to attach anything to your door, as it's extremely delicate and generally won't strip paint or finish off your exterior.
You can make your face as complex or simple as you like — place the eyes on the side of the door for a bigger figure, add teeth, or paint extra details. As shown by Kids Activities Blog, you can use different colors of poster board, play off of the hue of your door (green would make for a charming Frankenstein's Monster, for instance), or just keep it simple with a black poster board.
To make this Halloween craft, just cut the spooky or silly face of your choice from the poster board, and stick it with some tape. You may need to use a fair amount to attach it securely, or you can use removable mounting putty if the tape isn't slicing. Check out our other tips for creating an amazing fall porch display.
3. Knitted pumpkins
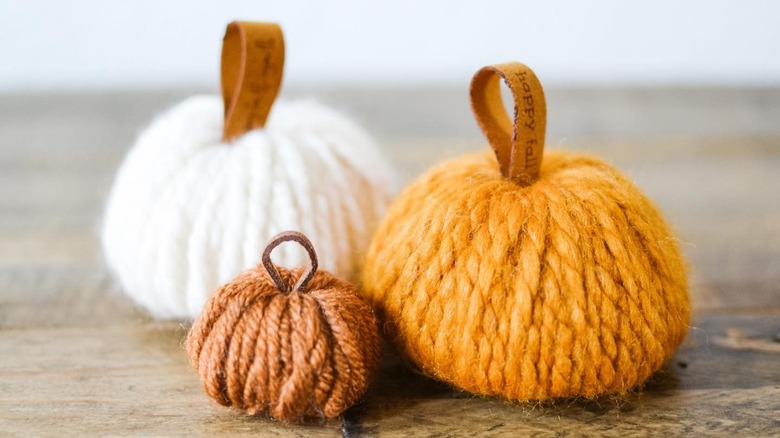
We like a craft that works for Halloween and will look cute all through fall; that's why we fell in love with these yarn pumpkins from Yarn Society, and while these look like they are reserved only for master knitters and crocheters, anyone can take them on. But first things first: Gather the supplies. You'll definitely have a paring knife, scissors, and measuring tape hanging around. Next, you need foam crafting balls ($1.25 at Dollar Tree), one to three rolls of yarn (running from $1.25 to $3.75 on Dollar Tree's site), and yarn needles (available for $5.12 on Amazon). You will cut the styrofoam balls in half, so each one will give you two pumpkins. Try a 3-inch ball for a standard pumpkin and a 1-inch for a mini version. To cover the 3-inch ball completely, Yarn Society used about 20 feet of super bulky yarn, so if you're using a thinner spool, be sure to have plenty of length.
To make these cute pumpkins, slice a styrofoam ball in half and create a 1-inch hole in the top. Then, secure your yarn to the styrofoam ball, as shown in the tutorial by Yarn Society. After you've created your anchor, pull your thread with your yarn needle through the hole over and over until the whole pumpkin is covered. You can use a contrasting color of yarn, cinnamon stick, or leather pull to create a stem. And there you have a darling mini yarn pumpkin.
4. Petrifying potion bottles
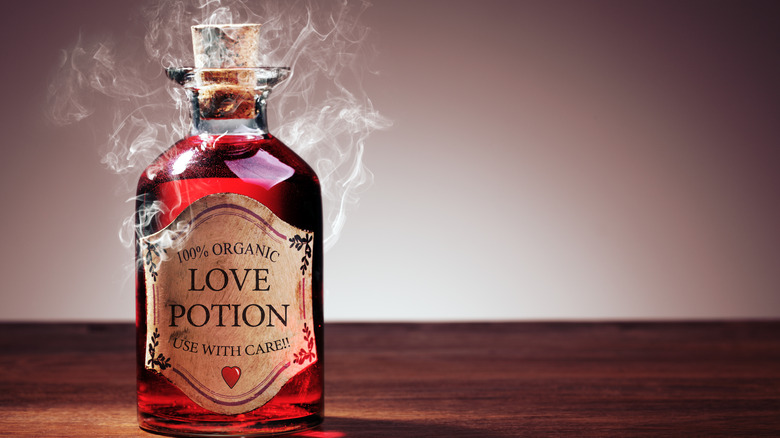
This DIY can cost you zero, zip, and zilch with a little planning ahead. The bulk of the expense comes from glass bottles, but you probably already have some in unique shapes clanking around in your fridge or on your bar cart. Either wash and save these bottles when they're used up or transfer the contents to other, less desirable containers if you're pressed for time. But if you've got no glassware in the house, Stephanie Hanna recommends heading to the thrift store or ordering a set from Amazon. To get rid of labels, soak the jar in baking soda and water for an hour — they should peel off easily. So, you need hot or craft glue, a printer, printer paper, scissors, baking soda, some water, and a large bowl. Optionally, you can get some acrylic paint, available on the Dollar Tree website at $1.25 to $2.50.
Now, remove labels from your jars. Print potion labels from Stephanie Hanna's website and cut them out with scissors. If you don't want clear glass bottles, mix acrylic paint with baking soda for a chalky finish to help the paint adhere to the glass. For a low-cost decorating option, you can also fill the bottles with water and food coloring. Once you've painted the bottles, adhere the labels with hot glue or craft glue.
5. Frightening floating candles
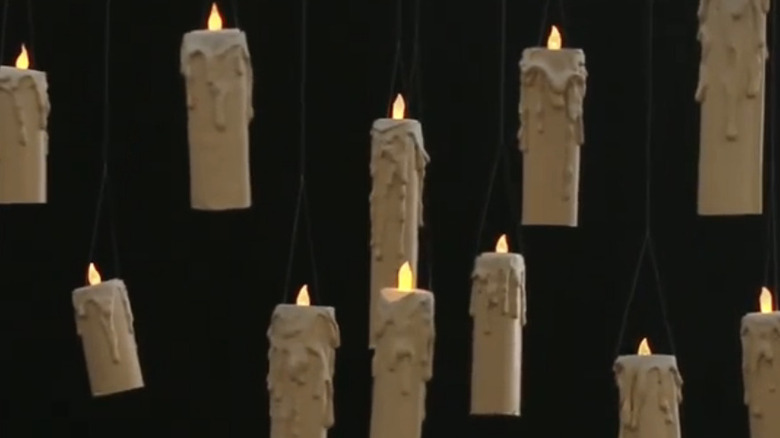
If you've been dreaming of floating candle sticks in your dining room since you saw the first Harry Potter movie, you aren't alone! Luckily, with a little DIY know-how, you can create your own floating candles for very cheap, thanks to a tutorial from Nifty. First, you'll just need to save up your paper towel and toilet paper roll cores. Paper towel cores can be cut into two or even three candles. Then you'll just need hot glue gun sticks ($1.25 at Dollar Tree) to create that dripping wax effect, some spray paint ($6.43 on Amazon), LED tea lights ($1.25 on Amazon), and a clear fishing line (available for $4.99 on Amazon).
Now for the crafting part, pipe the hot glue along the top of your cardboard cores as you desire. Once hardened, spraypaint the rolls in the color of your choice — we like black or off-white. Next, attach battery-operated LED lights to the cylinder's top with hot glue. Finally, run the fishing line through the top of the cylinder and attach it to your ceiling or archway. If this DIY is too mild for you, perhaps you'd like some other ways to bring Harry Potter Hogwarts magic into your house.