The Easiest Way To Install Bifold Doors, According To An Expert
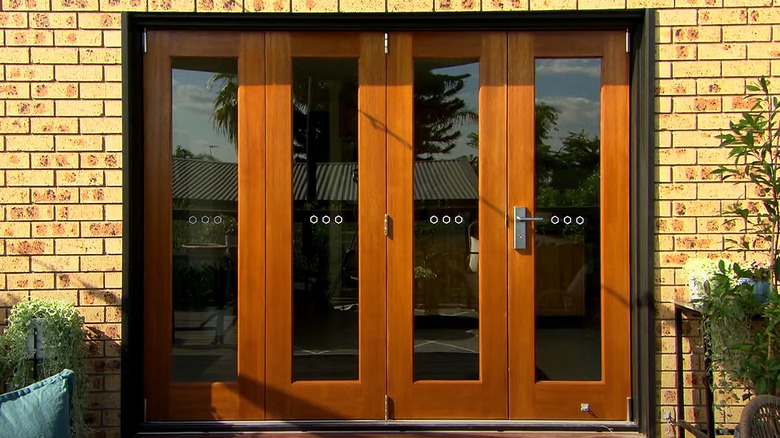
You may have seen bifold doors on closets, laundry rooms, or pantries. Sometimes referred to as accordion doors, these models usually open from the center and fold against the wall. They're beneficial for a number of reasons; Vibrant Doors says bifold doors can save space in cramped areas, can work in just about any home, and come in a large number of styles, colors, and materials.
Almost anyone with some DIY knowledge could install an indoor bifold door themselves, but you'll most likely need installation experience if placing one between an indoor and an outdoor space. The benefits of an external bifold door include that it could create an open flow between nature and the indoors and add lots of natural light.
In an exclusive interview with House Digest, Greg Evans, a sales consultant for Renaissance Windows & Doors in Houston and Austin, Texas, with 20 years of installation experience, shared the easiest bifold door installation method. You'll find Evans' six steps to installing bifold doors between an indoor and an outdoor space below.
1. Start by checking the manufacturer's guidelines

Before you begin, make sure you have the manufacturer's guidelines on hand, as you'll want to ensure everything you do coincides with its instructions. According to Renaissance Windows & Doors' Greg Evans, "You need to always refer to the manufacturer's installation instructions for tolerance, waterproofing, installation steps, and whether or not any added supplies, such as pans, are needed." The term tolerance refers to the amount of extra space you'll need to cut out of your opening, per Origin. In other words, you'll need to add the tolerance to both the width and height of your door to ensure your opening is the correct size.
There's also another crucial task you need to complete before you begin installing your bifold doors, and it's choosing the right sealants. Evans says, "You also need to find compatible sealants that will pair with your builder's envelope," or the boundary between the inside and outside of your home, per Springtime Builders. It's important to select the right sealants so that your bifold door is properly weatherized.
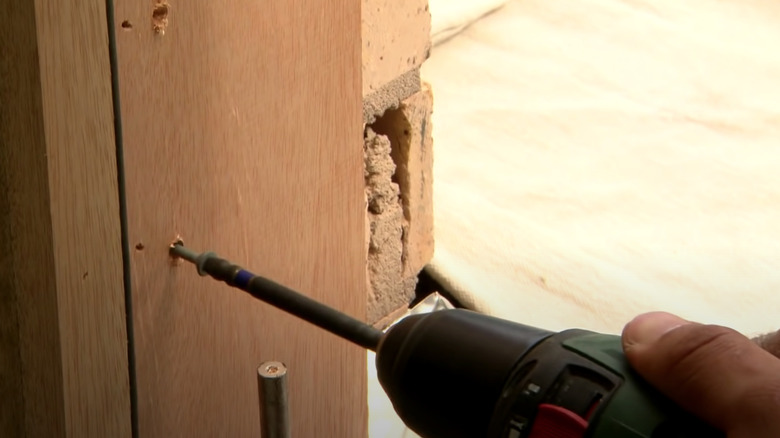
2. Prepare the rough opening

After you've read the instructions and purchased your sealants, it's time to prepare the opening. According to Greg Evans, "preparing the rough opening to accept your folding doors will ensure the success of your installation." Of course, the most important thing to consider is that your opening is large enough to fit your door while also taking tolerances into account. As Evans explains, "Your rough opening must have sufficient room to accept your unit ... If the opening is out more than 1/16th of an inch, depending on the manufacturer's recommended tolerances, now is the time to correct the opening."
You also need to make sure that both your door's frame and the opening are level, plumb, and square. According to JenTra Tools, level means that it's straight horizontally, plumb means it's straight vertically, and square means that it has even 90-degree angles in the corners. "You must have enough room to be able to shim the frame," notes Evans, adding, "it is important to install in that order." He continues, "You then want to see if the opening itself is [level, plumb, and square] too."
3. Assemble the frame

Next, you'll need to assemble the frame for the bifold door. For this step, rely on the manufacturer's guidelines once again. According to Marvin, the frame will be made out of a few basic parts, including the side jambs, head jamb, and mulls. While the side jambs are the two vertical edges of the opening, the head jamb is installed on top, and the mulls (short for mullions) refer to the seams between the jambs.
Putting the frame together should be a pretty straightforward task, as the manufacturer will provide you with step-by-step instructions. As Greg Evans explained to us at House Digest: "Once all of the steps are completed, you may now assemble your bifold frame. Most frames will come knocked down and assembly will be required. Again, refer to the manufacturer's instructions on where and where not to place sealants." Also, keep in mind that every building and sealant is different.
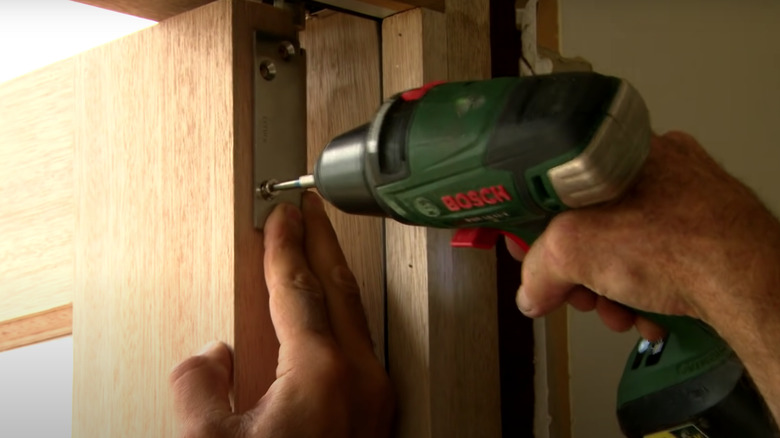
4. Install the frame
Once the frame is assembled, it's finally time to install. To begin, Greg Evans says to "set the frame in the opening dry. Once you are positive it will fit, you can add your sealants and set the frame level, plumb, and square to the earth." As stated before, these tasks should be completed in this order: level, then plumb, and then square.
Further, when doing this, Evans warns to "never set a door or window frame to follow the framing. Determine your high spot in the sill and then set [the] level to that." He continues, saying that "you will always need a string to ensure plumb from left to right of the frame. Some units can be very long and a string is the easiest way to keep it in plain." Therefore, while another item could be used to make sure your door is level and plumb, a simple string may work best, especially for larger units.
Evans also warns against exposed screw heads, as these can look less than ideal. He says to "take precautions to avoid exposed screw heads. There are many places you can fasten the frame to the rough opening that will not be seen. Hinge screw holes are a perfect place to add fasteners."
5. Install the panels
Next, you can begin installing the bifold panels. Just like in the other steps, it's important to follow the manufacturer's guidelines to complete this installation. To begin, "Determine the stacking order and install the number-one panel first. The manufacturer should have this clearly marked for your ease," explains expert Greg Evans. Each panel will most likely have a protective plastic covering that's numbered.
As you add the panels, Evans says to "check for smooth operation ... You want to make sure that none of the rollers or panels are scraping the head or the sill. This can damage the frame and be a costly mistake." In other words, each panel should easily move without hitting the frame.
You should also look out for scraping once every panel has been installed; according to Evans, "Once all of the panels are in and connected, ensure the whole unit operates and is not dragging the sill or rubbing at the head. If panels are dragging or rubbing, refer to the manufacturer's instructions on how to adjust the hinges. All quality bifold doors will have hinges that adjust up, down, and left to right."
6. Flash or waterproof your frame
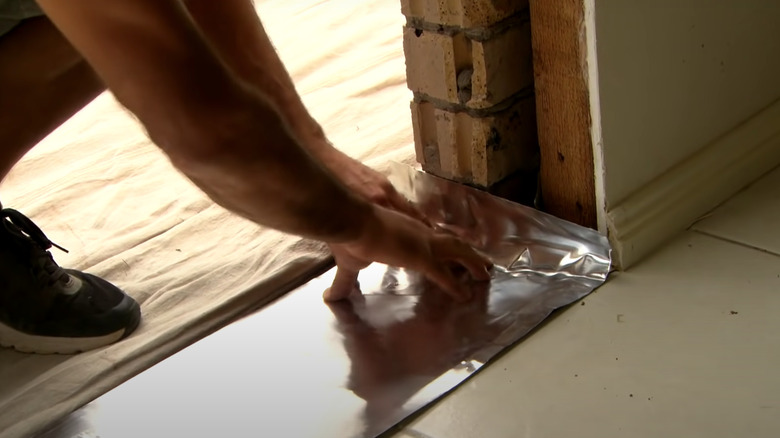
To ensure that no moisture from outside seeps into your home, it's important to flash or waterproof the frame of your bifold door. Greg Evans says that "this will also depend on the installation method. If the unit has a flashing fin, this will be the easiest way to flash it and waterproof to the opening." According to W.R. Meadows, flashing will seal or waterproof any gaps around the frame, and it may need to be installed before the frame and panels. Evans continues, saying that "If the unit does not have a fin, you will need to place a backer rod to insulate the unit." Backer rods are round pieces of foam used to insulate a door around the edges, per Armacell.
Finally, to finish the job, Evans tells House Digest, "Seal the interior and exterior using a compatible sealant with the building envelope" (which was purchased in the first step). Once this is completed, "you can now rest assured that your unit will operate and perform the way the manufacturer has intended."