How To Water Your Raised Garden Bed Using An Olla
Keeping up with watering your raised garden bed can become quite the job, especially during a tremendously hot summer. Depending on the vegetation, your garden may even need to be watered twice a day, as many full grown fruits and veggies are heavy drinkers. Nevertheless, there are many approaches to watering a raised garden bed that suffice, such as hand watering or drip watering. But both of these methods require either a lot of watering time or setup time. Enter the olla pot!
An olla (pronounced "oh-yah"), originating in north Africa nearly 4,000 years ago, is a great alternative way to hydrate your raised garden bed, and it requires far less maintenance than daily watering and less setup time than a drip-watering system. Simply bury a clay pot in the garden bed, fill it with water, and cover it. This clay pot will gradually release water into the bed as needed, effectively eliminating the need to hand water your garden every morning.
How to install an olla in your garden
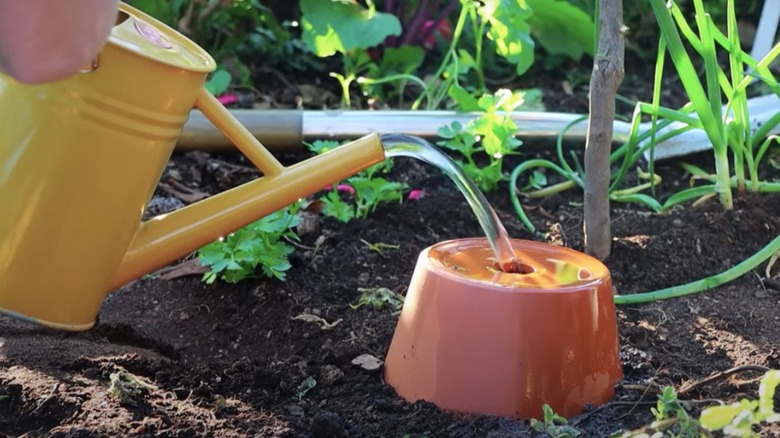
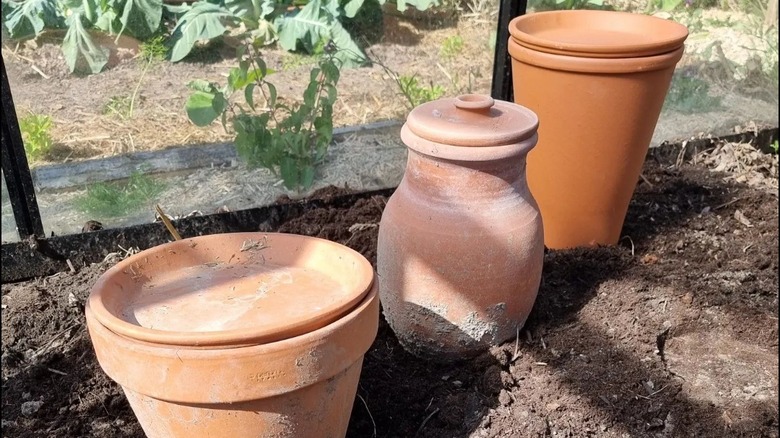
Installing an olla pot in your raised garden bed is a simple process, even for the beginner gardener. It's best if it's buried before you add plants to your garden bed, but it can still be added alongside established plants. You'll need a medium clay pot, a clay drip tray that fits the top of the pot, a trowel, a penny, some waterproof glue, and a watering can. Depending on the size of your raised bed, you may actually need several clay pots and drip trays as ollas should be buried every two to three feet to effectively water your nearby plants. Before you begin, plug the drainage hole in the bottom of the pot by gluing a penny over it. Allow to dry before proceeding.
Plan out where you'd like the olla pots to be in your garden bed, centering them in the bed with the aforementioned spacing. Using a trowel, dig a hole about the size of the clay pot and bury the pot in it with the blocked drainage hole at the bottom, leaving one to two inches of the neck exposed above the soil. Tamp down the soil around the olla pot so that it fits snugly in the garden bed. Using your water can, fill the clay pot with water and cover the top with the clay drip tray to prevent soil and insects from falling into the olla pot.
Why the olla method works well
The olla pot method works well for watering your garden for a few reasons. First, the clay pot allows water to slowly hydrate the soil and roots of the surrounding plants as needed. Through osmosis, the water seeps through the walls of the clay pot into the soil around it, encouraging deep root growth. For this reason, plants like tomatoes, peppers, squash, and melons thrive with olla pots since their deep roots can grow toward the water source. Herbs, radishes, and lettuce may not respond as well to the olla pots as their roots are predominantly shallow. At the same time, the moisture level of the soil creates tension around the pot, pulling in moisture only when necessary, preventing the roots from becoming waterlogged.
Another reason why the olla pot is successful is because unlike hand watering, it requires little maintenance. Check the olla pot every few days and fill it back to the top once the water level has reached below 50%. During heat waves, you may want to check the pots more often to ensure your plants receive adequate water. Nevertheless, the olla pots provide a sense of ease to the worrisome gardener who feels like they cannot leave their garden for a few days in the summer. Take a long weekend away knowing your plants will be hydrated by your olla watering system.