How To DIY Mulch Glue For Your Flowerbeds
We may receive a commission on purchases made from links.
Adding mulch glue to planting beds, containers, or borders is gaining in popularity. Spurred on by products populating garden center shelves that promise to hold mulch or pea gravel firmly in place, mulch glue can prevent the materials homeowners paid for from washing away any time a heavy rain thunders by or a sturdy wind blows in. But if you can find it on a shelf at the local store, someone will create a way to make it at home. With the right formula, you can turn household glue and water into an environmentally-sound mulch adhesive that mimics the ones available from retailers. The formula for making mulch glue at home is most often identified as one-part ordinary white glue (the kid-friendly, non-toxic kind) and two-parts hot water.
While it's important to get the formula in the correct proportions, that isn't the only consideration. The end result can vary due to the type of mulch you have. Mulch can be made from shredded leaves, wood chips, pieces of bark, or inorganic material like rubber or other synthetic material. Always choose the best type of mulch for your garden, but when using glue, many experts and homeowners find that adhesives work best on chunkier mulches.
And remember to check the weather; apply mulch glue on a dry, windless day.
Ready, set, glue your mulch
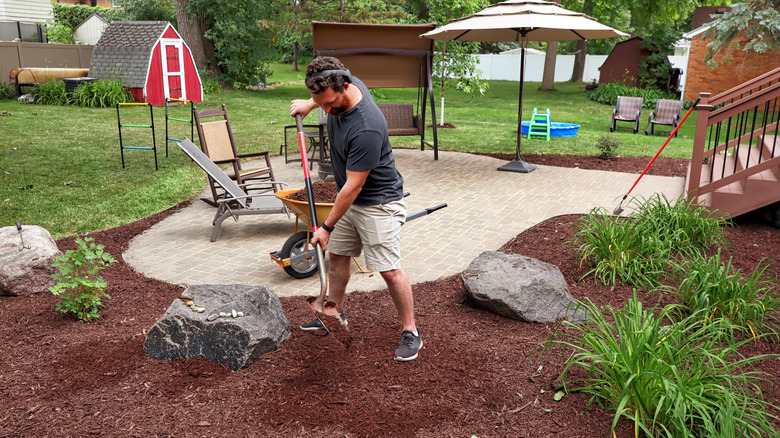
Before mixing mulch glue for your flowerbeds, get them ready. Remove weeds, taking care to yank out all the roots. Be sure you have the proper amount of mulch and that it's spread in a level layer.
Have everything ready to go before you start mixing your mulch glue. Once combined, you'll need to start spraying immediately. If you have larger beds or you're edging all around your property, using a garden sprayer will make this project much easier than a spray bottle, which would be worthwhile only if you have a few containers or need spot application.
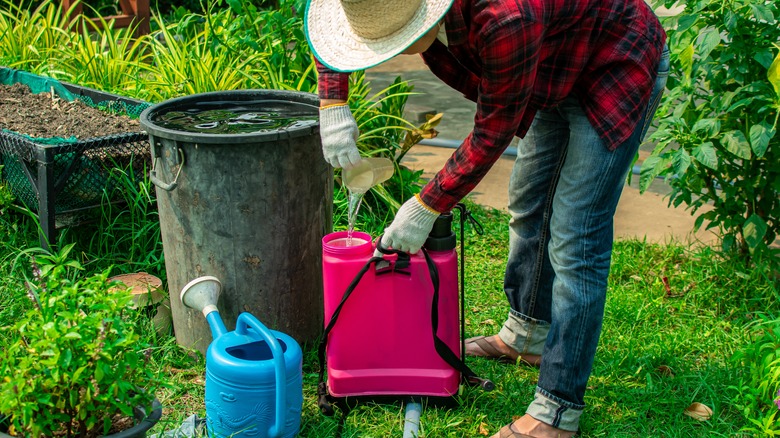
Mix one-part non-toxic white glue, such as Elmer's Glue, with two-parts very hot (but not boiling) water. If possible, mix the glue and water right in the spraying vessel. Anything can serve as a measuring cup, like a washed and dried empty can. Something that holds roughly one-third the total capacity of your sprayer is ideal; you won't have to figure out math as you're filling the sprayer with glue and hot water.
Spray steadily and evenly; avoid a heavy hand. Apply a thin, light coat. Allow it to dry for about an hour so you see if you missed any spots. Give it another light coat, paying more attention to any gaps.
The last step is to do nothing. The glue will need to dry thoroughly (a day or two). In arid areas, it will dry more quickly than in areas where the humidity is high.
Other ways to use your DIY mulch glue
Now that you know how to make and apply mulch glue, it's necessary to learn where you can use it. The most obvious application is to secure — you guessed it — mulch. This includes the mulch in your flowerbeds, but if you're using material to cover bare spots or suppress weeds around trees or your mailbox, for example, this mix can come in handy there, too. While this glue is made of fairly simple ingredients, it's still important to be mindful of where you spray your adhesive. If you're not careful, you could end up in a sticky situation. At worst, your mulch glue can cause stains on your driveway or pavers, and at best, you could end up with a pile of gooey clothing that's both difficult and messy to wash.
With that being said, however, your usage of mulch glue doesn't have to be limited to just coating wood chips or shredded leaves. It can also hold other relatively lightweight materials, like pea gravel, in place. Using mulch glue to keep your pea gravel from washing away is a very similar process to using it for your garden beds — just mix it up in the correct ratio, apply a thin coat with your sprayer, and let it dry down before testing the hold. While this won't turn your gravel into a solid piece and shouldn't be used on areas with heavy foot traffic, it will help to provide some extra security and ensure stray rocks don't constantly end up littering your other surfaces.