DIY Pumpkin Crafts That Involve No Carving
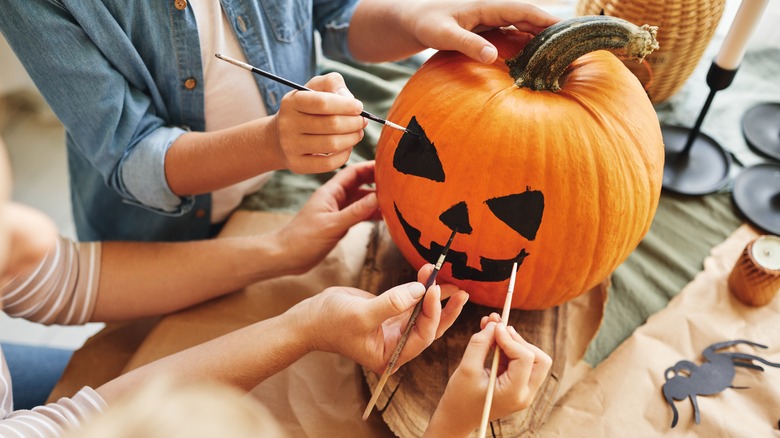
Fall is just around the corner, and the excitement is palpable. Many people are putting up their decorations and making their pumpkin-flavored drinks as they wait for the leaves to turn colors. If you're looking to get into the fall spirit, consider a day spent making pumpkin crafts. Carving pumpkins is a fall favorite activity, whether you're making spooky or silly faces.
Unfortunately, carved pumpkins don't last very long — it may only take three to seven days for the pumpkin to begin rotting. However, if you want to display your crafts throughout the season, try no-carve pumpkin crafts. Uncarved pumpkins can last one to three months, depending on conditions. Uncarved pumpkin crafts are also ideal for small children as they won't have to handle sharp tools to make a pretty design. It's also ideal if you simply don't want to deal with the mess of carving up pumpkin guts to make a fall decoration. With these no-carve crafts, you can make fun and easy decor that will last you through the entire season.
Mummy pumpkins
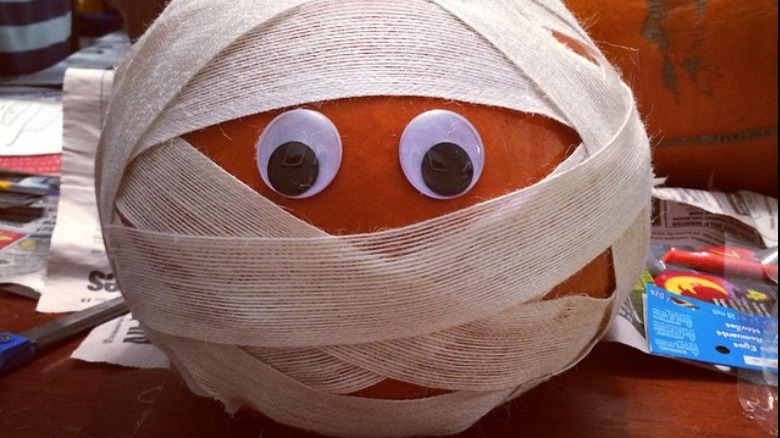
Embrace the spooky spirit of the season and make mummy pumpkins. This easy craft will be a fun way to get kids in the Halloween spirit. You'll need a pumpkin or two, large googly eyes, Mod Podge, some paintbrushes, and thick toilet paper. Be sure to use toilet paper that's thick, such as a three-ply, to avoid breaking and ripping it during the project.
For the actual DIY, you'll want to start by taking a strip of toilet paper between four and seven squares long and folding it in half length-wise. Apply a thin coat of ModPodge onto the pumpkin with the paintbrush, lay the toilet paper on top, then gently smooth it out. Continue to do this while alternating the direction of the toilet paper and layering it on top of each other. Leave an open place for the googly eyes where you'll glue them on, allowing the mummy pumpkin to peek out from behind its bandages. You could even make the bandages look worn and aged by using a little bit of brown or tan paint to tint the toilet paper. This will make your mummy pumpkin look even more creepy. Now, you can place your pumpkin somewhere prominent for the spooky season.
Pressed flowers and leaves
Love the look of fall florals and foliage? Create a pumpkin that shows off pretty pressed flowers and leaves. To find colorful leaves and blooms for this project, go on a nature walk! Next, you'll want to press and dry the flowers and leaves before putting them on your pumpkin. You can accomplish this by placing them between sheets of parchment paper and then inserting the paper into the middle pages of a book. Close it and put a few more books on top to add weight. After two to four weeks, your flowers will be ready.
For a quicker drying process, use an iron on low heat. Follow a similar process of placing the foliage between parchment paper, then flatten them under a book. Remove the book and leave the parchment paper in place before applying the hot iron on top for 10 seconds. Allow the flowers and leaves to cool before using them in the project. Gather your dried flowers and leaves, your pumpkins, and paint, which is optional. To start the project, you can paint the pumpkin a base color if you like. A neutral like black or white will often allow the flowers to pop. But leaving the pumpkin natural can give it a fall vibe. Next, apply a thin layer of Mod Podge to the pumpkin, then press the flowers and smooth out the pieces. Then, apply a thin layer over the flowers and leaves to keep them secure.
Marble dipped pumpkins
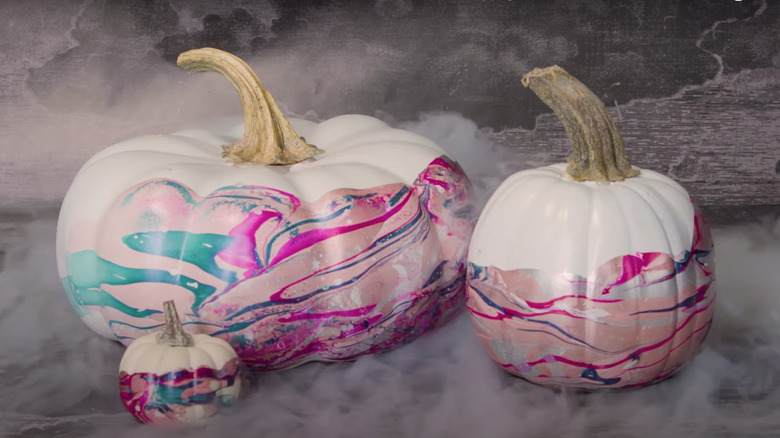
Elevate your pumpkins to a luxurious marble look. To create these marble-dipped pumpkins, all you need is a few of your favorite shades of nail polish, water, and a container you don't mind getting messy. You'll also want to keep the size of the pumpkin in mind as you choose a container. For a large pumpkin, you'll want to use an equivalently large plastic tub for dipping.
You may opt to paint the base of the pumpkin with acrylic paint for a colorful background. However, this step isn't necessary to get the marble look. Prep the marbling by filling the container with water at least halfway. Then, take your first shade of nail polish and pour it into the water, but don't pour the whole bottle. Repeat pouring in the other nail polish colors, layering on top of each color. You can go back and layer previous colors on top. Use a toothpick or the nail polish brush to gently swirl the colors together. Now you're ready to dip. You can dip the entire pumpkin or a part of it. Slowly dip the pumpkin into the marbled nail polish to paint the parts you want to be covered. Then, slowly pull it out. Allow the nail polish to dry before displaying your work of art.
Lacy pumpkin
A lacy pumpkin is an easy way to add some texture and pattern to a classic Halloween decoration. For this DIY project, you will need lace stockings of your choosing, scissors, and a pumpkin. You could also buy lace fabric from a fabric store if you prefer; however, lace stockings are the easier method. Keep in mind that you want to buy sheer tights in order to see the pattern easier. As for the pumpkin, you don't want to choose something that's too big because the stocking should easily be able to fit over. Also, a white pumpkin will show off the contrast and provide a minimalistic piece of decor. But you can still use an orange or a different-colored pumpkin.
Open the legs of the tights and carefully insert the pumpkin into one side. You'll want to slowly slide it down on the leg, being careful not to snag the lace, especially with the pumpkin's stem. Once the pumpkin is in the foot of the tights, gather the excess lace around the stem of the pumpkin and tie a knot. Finish by cutting off the rest of the tights. Using lacy fabric is a similar process to the stockings. Spread out the fabric and place the pumpkin at the center. Gather the material around the stem, fasten it off, and cut off the excess.
Felt animal pumpkins
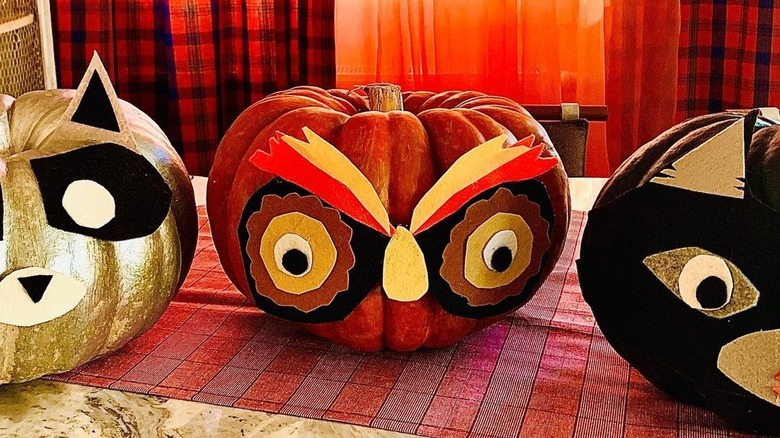
A fun, no-carve project for kids is turning pumpkins into cute little animals. Using felt sheets and pipe cleaners, you can have your own little fall forest critters in your home. For this project, you'll need felt sheets in various colors, especially browns, white, black, and other neutral colors. You'll also need googly eyes, fabric scissors, hot glue and a hot glue gun, pipe cleaners, and, of course, your pumpkins. Mini pumpkins will create cute little animals, but any size will work.
Cut shapes out of the felt to make the animals' details. For example, an owl can have circles for the eyes and a triangular beak. A raccoon can have a gray face with the iconic black mask and a black nose. Use the hot glue to attach the felt and googly eyes to the pumpkin. Get creative and choose your favorite animals to recreate in pumpkin form. Then, display them around your home for adorable fall decor.