How To DIY A Modern Wooden Bath Mat To Elevate The Look Of Your Bathroom
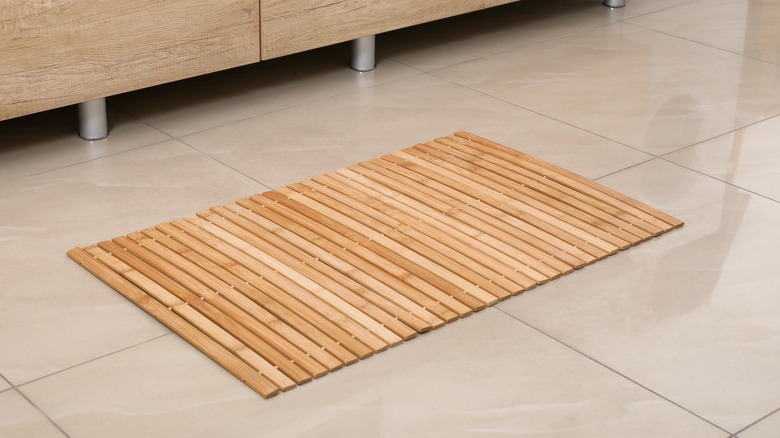
Wooden bath mats are on trend, but they can also be quite pricey depending on the craftsmanship and type of wood used. There's no denying they offer a luxe addition to any bathroom, but everyone should be entitled to a certain level of pampering without having to break the bank. That's where this easy way to DIY your own wooden bath mat comes in. With just some scrap wood and a saw, plus a few finishing materials, you too can have your own upscale wood bath mat at the entrance to your tub or shower.
Normally teak and bamboo are preferred for use in bathrooms because of their natural resistance to water, mold, and even, in the case of bamboo, antimicrobial properties. However, as you'll be waterproofing the wood, you can use whatever type you happen to have. Whether you buy some out of a scrap lumber pile, have some leftover slats after finishing another home renovation project, or even decide to repurpose wood from another source, you can use anything from ash to walnut and everything in between, as long as it's a solid hardwood, which is generally denser and more durable. The one exception to this is yew, which, though a softwood, is the hardest of the softwood varieties and still capable of being used for quality woodworking.
Cutting your boards
First, you want to determine how big your mat will be. TikTok user @taytoh decided on 24-by-17 inches, so she needed to start with boards that were at least 2 feet long. Measure your boards and cut them as necessary. For a 24-by-17 mat, she needed seven slats that were 2 feet long and no more than 1¾ inches wide so they fit within the 17-inch span of the short side with ¾-inch gaps in between. Then you'll need three slats for the underside of the mat that lie perpendicular to the top seven, one on each end and one in the center. These can be the same width as the top slats, but they'll only be, in this case,17 inches long.
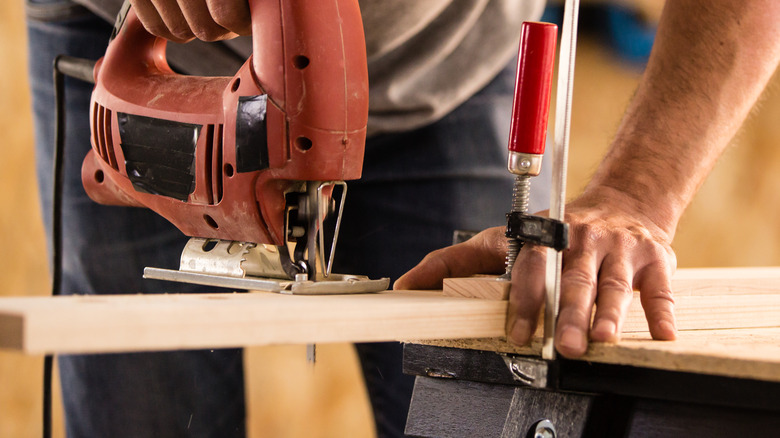
To get the slats identical in length and width, it's best to cut them all at the same time. The TikTok tutorial uses a jigsaw, but really, any saw will work. Clamp your boards together and make your necessary cuts all at once. If you're repurposing a pallet, for example, you could get two bath mat boards out of every pallet slat. Make sure you wear protective eyewear, a face mask, and, if using power tools, ear coverings to keep yourself safe. After you have your boards cut, sand them down to a perfectly smooth finish. The best way to do this is by using a coarser grit sandpaper first, such as 60 grit, then follow up with a finer, 120 grit paper.
Finishing and assembling your bath mat
When the boards are smooth as silk, tung oil can be used for waterproofing wood. Tung oil is a naturally derived wood finish that is more durable and water-resistant than even shellac. Apply this with a cloth to the entire exterior of each of your boards, allow it to dry for 24 hours, then apply a second coat and wait another 24 hours before moving on to assembly.
All you need to do to assemble your mat is to nail your top slats to your bottom boards, but because the structure is somewhat free-floating, the best way to go about this is to set them in a corner frame. Lay your top slats face down on your work surface, measuring the spacing to make sure they're correctly placed. Measure and place the baseboards as well, then hold your structure against a T-square or similar frame to make sure it doesn't slip while you hammer the bases into the top boards. If you don't have one pre-made, you can quickly make one with two pieces of wood nailed together at a right angle, one at 3 inches long, one at 4 inches long. If you've made a proper right angle, the distance from one outer end to the other should be 5 inches. Once everything is assembled, flip over your stylish new bath mat and place it in front of your shower.