The Simple DIY That Practically Doubles The Storage In Your Garage Or Basement

We may receive a commission on purchases made from links.
Chances are, you've had the experience of walking into a packed garage or basement, overflowing with old sports gear, childhood toys, and other relics of days gone by. These spaces often become a dumping ground rather than serving more functional purposes like parking a car or setting up a workspace. The good news is, if you're looking to maximize garage space with an easy and affordable storage trick, you're in luck. Adding ceiling-mounted tracks for storage totes is a simple DIY that can move much of the clutter overhead, practically doubling your storage space.
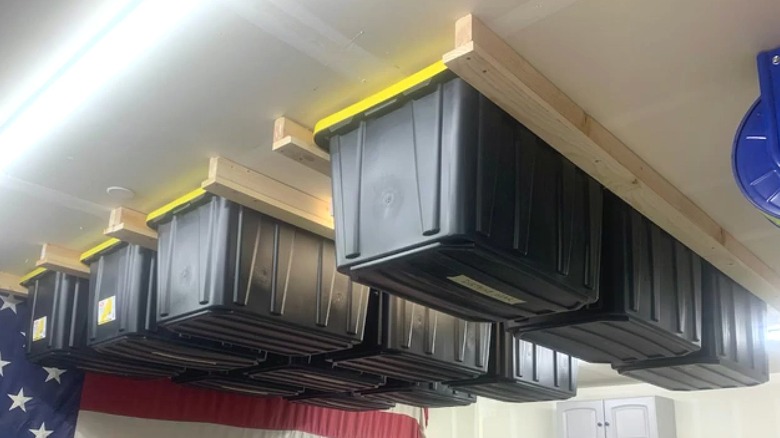
Ceiling storage tracks are mounted directly to the ceiling and designed to hold heavy-duty plastic storage totes by their rims. You could opt to purchase pre-made, steel tracks which get drilled into the ceiling, like these HANDT Overhead Storage Racks. However, these systems can also be easily made using plywood, wood beams, and a few tools you probably already have on hand. Building your own storage tracks allows you to customize the fit for your garage size and tote style.
DIY storage tracks can hold large storage totes overhead
To build two sets of tracks, you'll need a sheet of plywood cut into four, 6 inch wide strips, along with four 2-by-3 wood beams cut to the same length as the plywood sheet. Start by attaching the 2-inch side of one of the wood beams down the center of one of the plywood strips, using wood glue and screws to secure it in place. Next, attach another plywood strip on top of the beam. Only one side of the strip needs to overhang the beam, so you can trim any excess ply wood for a cleaner look. Your beam and top plywood should form an "L" shape. Repeat this process to create a second track that will go parallel to the first one.
Using your bins as a guide, you'll need to determine how far apart the tracks need to be. You can use pieces of scrap wood cut to size as spacers to keep them evenly aligned. Before you attempt to install, be sure you know how to use a stud finder as the plywood must be anchored into the ceiling joist — otherwise it won't be adequately supported and could come crashing down. When mounting, it's helpful to mark your placement with a pencil and have second person to help hold the tracks in place. If that's not an option, a support jack could do the trick. Finally, use lag bolts to securely fasten the tracks into place and slide your bins in the rails.
Customize this ceiling storage hack to fit your totes and budget
Building a ceiling storage system is one of many great budget-friendly ideas to organize your garage, and it can be an excellent solution for storing items such as holiday decorations, camping equipment, or other tote-sized items that you don't need to access often. Using totes you already own will help reduce your costs, but it's important that they're a similar size so they'll fit together in the racks. For a seamless fit, you can purchase a 6-Pack of Sterlite Industrial Plastic Storage Bins for around $100.
If you don't have the exact materials on hand to build the tracks, you may be able to keep costs down by using alternative wood sizes that you do already own. For example, if you have 2-by 4-beams can be used instead of 2-by-3 beams, which are generally less common. Additionally, if you have scrap pieces of plywood, you can use shorter lengths, but these will accommodate fewer totes. It's not completely necessary to use 6-inch plywood strips either; you could use 3-inch or 5-inch strips instead. Purchasing all of these materials from scratch could bring the cost of this project as high as $250. In that case, a pre-made track system may be a more practical, cost effective option.