TikTok Turns IKEA's KNUFF File Organizers Into A Beautiful Side Table

We may receive a commission on purchases made from links.
Finding a unique side table can be hard, especially on a budget. Thankfully, you don't have to sacrifice beauty for cost — instead, you can try out this IKEA hack by @noracontetout on TikTok, which uses two IKEA KNUFF magazine files, in addition to some other cardboard material, to create a breathtaking side table. Not only does it look stylish, but it is also incredibly functional, as it comes with some additional storage space for items like books, magazines, phone chargers, eye masks, or whatever else you want to put in there. In fact, you can even use it to charge your phone without a bunch of ugly wires getting in your face (more on that later!)
Just like with many IKEA DIY projects, the cost of this hack should be relatively gentle on your pockets, especially compared to higher-end products that can cost hundreds of dollars, which makes it a great option if you want to start renovating your room on a budget. However, you could also place your creation anywhere around your home, such as in your lounge or an entryway — your options are pretty flexible. If you've been on the hunt for something similar to this furniture piece, or simply love a bit of DIY, there's no doubt this hack is perfect for you. Now, all you need to do is collect all the materials required and get started.
Gather your materials
On the IKEA site, you'll find the first item that you require: the KNUFF file set, which is available for a grand total of £8. If you're ordering from the U.S., the KUGGIS files are always a great option for $16.49. After that, you'll need to find a cardboard tube, such as this 8-inch one from Lowe's, some super glue, plastic clamps, an electric drill, a wooden or fiberboard slab, a saw that works with cardboard, a mini-saw, wooden sticks, paint of your choice, and some interior filler. For the wooden sticks, grab them on Amazon for $9.59. Once you have everything you need, you can begin to construct your new side table.
Your first focus will be connecting your two IKEA files using your adhesive, applying it to the back sides of both (which would normally be against the wall), and holding them together using your clamps. While waiting for it to dry, get started on building the rest of your side table. Begin by measuring and marking how high you want your tabletop to be on your cardboard tube before going in with your saw to cut it to the appropriate height. Use the tube to trace a circular stencil onto your wooden or fiberboard piece, which you can cut out using your saw. Next, for an added flair, simply grab your wooden sticks or cut some of your wooden board into thin strips of the same size, and glue them in different positions around your tube.
Add your finishing touches
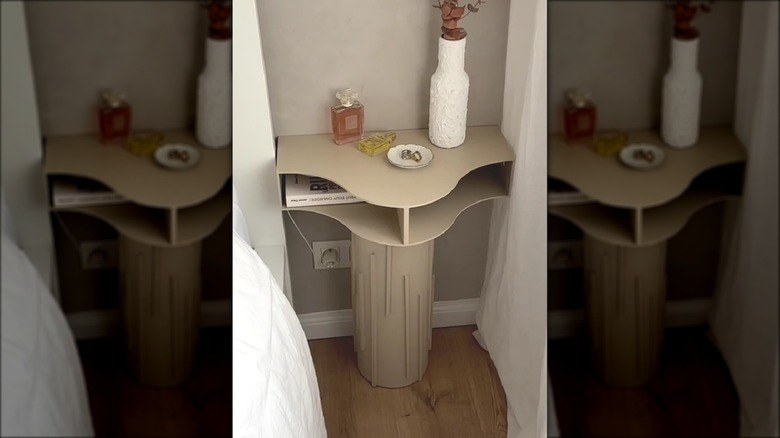
To finish the look, you'll need to attach all your sections together. First, take your circular cutout and attach it to the flat underside of your file set "tabletop" using your glue, allowing it to dry before flipping it and gluing the tube stand. Now that the base of your table is set and dry, take your wood filler and smooth it into the seams of where your file organizers meet on the topside of the piece. You can give this a quick sand before going in with the paint of your choice, making sure to cover every nook and cranny of the table, including inside the magazine files. After allowing it to dry, you will be left with a gorgeous side table for under $100, with the holes at the back of the organizers giving you easy, and tidy, charging access for your tech devices.
If you want to customize it, consider adding some strip LED lights to the back or inside to give the effect of ambient lighting or adding some mini storage baskets in the nooks. You may also want to experiment with the base of your table, such as making it square instead of circular. If you do use cardboard, you should add some weights at the bottom of your circular base to help keep it in place and ensure it doesn't fall over easily.