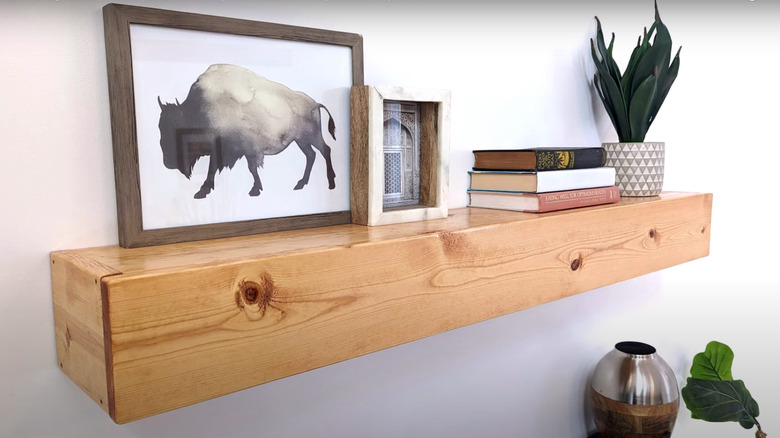
How To DIY A Beautiful Wooden Shelf With Secret Hidden Storage
We may receive a commission on purchases made from links.
Having an extra floating shelf is always great for adding some space, but what if you could double up on the amount you get? Thanks to a nifty hack by @therehablife on TikTok, you could do exactly that and install some extra hidden storage for all the miscellaneous items you don't want lying around your home, such as keys, spare change, notes, or even a rogue packet of crisps. You name it, you can store it there, providing it will fit inside. The best part is that it will all be hidden away, far from prying eyes, and you can easily open and close it to cover what you have in there. In fact, you'd never even be able to guess that there was a secret compartment there!
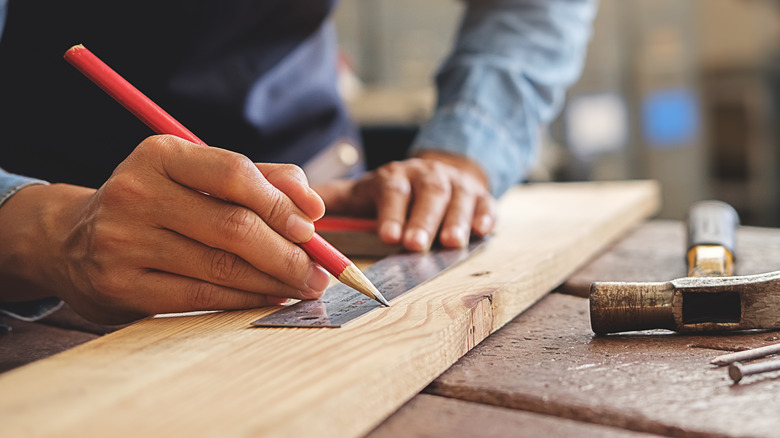
In addition to these handy benefits, it also looks good, so no matter what your style or current interior design, it should fit right in. All you'll need is a miter saw, a screwdriver and screws, a respirator, wood filler, wood stain, polyurethane, some hinges, and a wooden board or planks, which is available from Lowe's for $17.98. You'll want a 1-by-8 board, a 1-by-6 board, and a 2-by-4 board. You can get an 8-pack of hinges from Amazon for $14.39 and a respirator mask for $29.99.
Plan your shelf dimensions
To begin making this shelf, you'll first need to decide how big you want your shelf to be, whether small or large and slice four long pieces and two shorter ones for the sides to size using your miter saw. While doing this, you should make sure to wear your respirator and goggles. For the sake of this hack, we'll reference the sizes used in the TikTok video. First, use your drill to add your two-by-four piece to your wall. With the rest of your cutouts, you'll want to connect your one-by-eight section to your two shorter one-by-six cutouts on each side with your electric drill. The next step is where you create your secret opening storage.
For this part, you'll want your one-by-eight face down on the floor, with your one-by-six propped up like a wall against it, as if you're going to create a cube, adding it with your hinges and screws, with one hinge on each side. This will create your "door" mechanism. Once this bit is done you can connect your last one-by-eight cutout on top with your drill, which will create the top level of your shelf where your items will sit. In terms of aesthetics, add wood filler, sand, stain, add some polyurethane varnish, and you should be good to go. The final part of the process is to screw it to your wall where your four-by-two is and add all your items to your shelf.
Customize your hidden storage shelf
If you're not a fan of the wooden rustic look, you can paint your shelf in whatever color you want. White would work well for a modern look, or an off-white or cream for a more rustic appeal. Just make sure you paint it before adding it to your wall, as it means you're less likely to make any mess around the area. Likewise, if you don't mind revealing the "hidden" element, you could always add a handle for easier access rather than having to grip the top every time. For example, these stainless steel handles from Home Depot are for $6.93, or an antique option from Amazon for $28.18. This will make it much easier to open and close, as it will literally be by the pull and push of a handle.
The reason this hack works so well is that the hidden drawer underneath the shelf allows for extra storage space, meaning in addition to having items on top of the shelf, you can also store clutter or stuff you don't want on the side away, all while your shelf still looks like a shelf. This way, only your best, more presentable items will be on show. It may also prove useful for hiding away items from your children, such as spare change or your car keys, in addition to maximizing storage space in your home. To cut costs further, you may also want to consider upcycling any wood you already have.