We Mounted A Staghorn Fern To Create The Perfect Gift Of Living Art
We love staghorn ferns because they are safe to have around our pets, and their unique foliage adds interest and texture to our interior. This is not our first attempt at growing staghorn ferns. We had a beautiful one in a hanging planter with potting soil for years, but in nature, these ferns do not live in soil. Eventually, our beautiful fern died, possibly because we are chronic over-waterers. Whoops. When we decided to replace our deceased plant, we wanted to try something different by mounting it to a piece of wood using moss, an arrangement that is not only a living piece of art but also closer to how these gorgeous plants grow in the wild.
We shopped around at our local plant nurseries to see if we could find a mounted staghorn fern, but neither the big box stores nor local sellers had anything. The closest thing we could find was a plant in a hanging basket for $28, and we already failed at that. We checked online for mounted options, the prices of which ranged from around $80 to over $150 for the size we wanted. There was no way we were paying that much plus shipping for one plant. After a bit of research, it didn't seem too difficult to make a mounted staghorn fern, so we decided to try it ourselves.
Purchasing materials
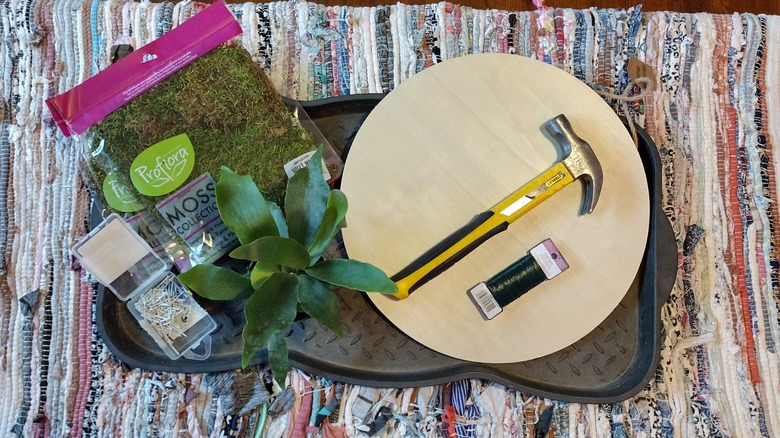
The materials for this project were exceptionally easy to find locally. We needed a piece of wood to mount our fern, fishing line or floral wire, peat or sheet moss, nails, a hammer, something to draw a circle on the wood, and a pencil. We found a beautiful, healthy plant for the centerpiece of this project at a local nursery in a 4-inch pot.
Since we already had finishing nails left over from another project, we didn't have to add that to our shopping list, and we just traced around a coffee can to establish where our nails needed to go. The craft board and sheet moss came from the craft section at Walmart. In our research, most people recommend using fishing line to secure the plant, but we opted for floral wire because we thought it would blend in better with the green moss and possibly be easier to work with. It was. In total, the mounting supplies were about $20, and the plant was $8, so we completed this project for less than $30 — a fraction of the prices we found while shopping. You could easily cut that cost even more by using baskets, scrap wood, or driftwood you already have. The mounting options are almost endless, making this project exceptionally flexible.
Preparing the board
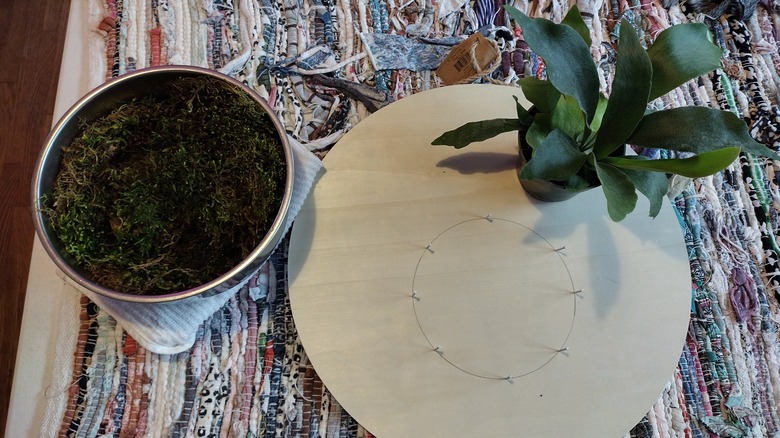
We would consider ourselves moderately crafty, so we expected this project to go pretty smoothly. Famous last words, right? Since this project involves wet moss and soil, we prepared our space by using a boot tray to work on our project, keeping any messes off our table. We started by soaking our sheet moss in water to make it easier to work with and to provide moisture for our transplanted fern. On the mounting board, we decided where we wanted our arrangement and drew a circle. Then, we added nails around the circle to provide something to anchor our floral wire and keep our plant and moss secure.
With the foundation in place, we squeezed out a handful of sheet moss so it was damp but not soggy. We kept a towel nearby for this part because it got a little wet and messy. We placed a thin layer of moss inside the circle, then we pulled our plant from the nursery pot and removed as much soil as possible. We also flattened out the roots so the fern wouldn't stick out too far from the board.
Mounting our staghorn fern

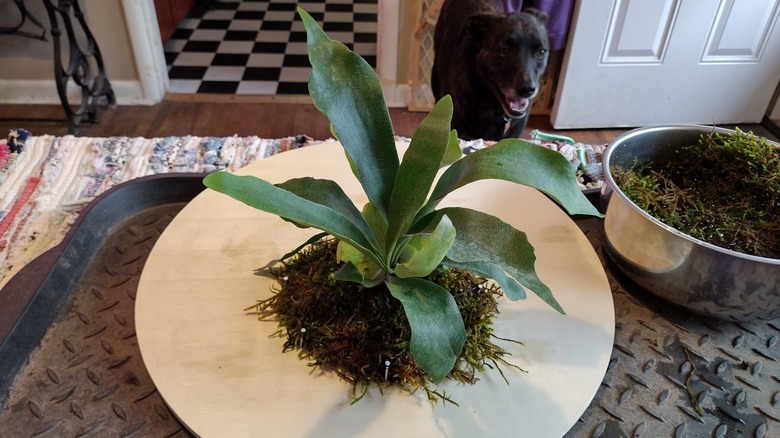
Now we were ready to move on to the tricky part: mounting. Since the moss is small, loose pieces when it's wet, it just didn't seem like some floral wire could keep it in place. We centered our staghorn fern and covered it with about half an inch of wrung-out moss. We grabbed a few handfuls and squeezed them like a sponge before carefully covering the roots and remaining soil.
To secure our plant to the board, we started by wrapping the end of our floral wire to the bottom left nail, but you could start anywhere. We made sure the end wouldn't come off the nail, and then we just went from one nail to another, wrapping the floral wire around each one. We didn't follow any pattern, just crisscrossing the mossy root ball until it seemed secure. Before cutting the wire, we picked our now-mounted staghorn fern up and shook it a little to make sure nothing would fall out. It was surprisingly solid. Success! We cut the wire, wrapped it around the final nail, and our project was complete. Now we just needed to find the perfect spot to hang it.
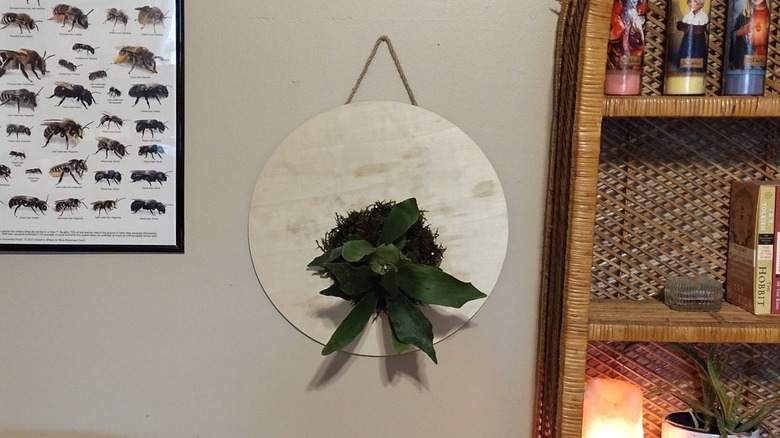
Results
To say we enjoyed this project is an understatement. Even though this was the first time we made a mounted staghorn fern, the whole process only took about 45 minutes. We will definitely make more of these as gifts — spoiler alert for everyone on our shopping list for every birthday and holiday! We will almost certainly make more for our own home because now we want a wall of this gorgeous and fun-to-make living art. We may even experiment with different kinds of plants, especially ferns.
Now that we have successfully mounted a staghorn fern, there are a few things we would do differently. The mounting board we bought is less than half an inch thick, so we couldn't hammer the nails in very deeply. They stick out a little more than we would like. Next time we will use a thicker mount. Since this project was a little messy with wet soil and moss, we would also use a darker color of wood to hide dirt stains. Even though we would change a few small things, we are thrilled with the way this project turned out and cannot wait to see our staghorn grow and thrive.