xTool S1 40W Review: It's Finally Time To Spring For A Home Laser Cutter & Engraver
We may receive a commission on purchases made from links.
You've probably been thinking about getting a laser cutter or engraver. Almost everyone has been thinking about it. They're so quick, precise, and ridiculously useful that even many woodworkers who pride themselves on their precision with traditional tools have outfitted their shops with laser cutters. But which laser is right for you? And which will be right in a week, when half of the lasers on the market will be brand new? Even in an industry that seems to move at the speed of light (see what we did there?), consumer laser cutters/engravers rarely change the playing field all at once the way xTool's new S1 40W seems to. The list of things that make it special is long, and they aren't all about the S1's extra power. xTool says the S1 40W is "aimed at DIYers, designers, artisans, woodworkers, small businesses, and educators looking for affordable and high-powered lasers," and that raises as many questions as it answers. Can one device be targeted at all those groups and still do things well?
We set out to answer this question from a few different angles. The S1 elevator pitch is that it's a powerful, enclosed, and unusually safe diode laser at a reasonable price. That's certainly unique among prosumer lasers, but that doesn't mean it has an audience. Is it more suitable for home or business use? Is it right for new users or pros? And what if this is your first laser?
What's new in the S1 40W
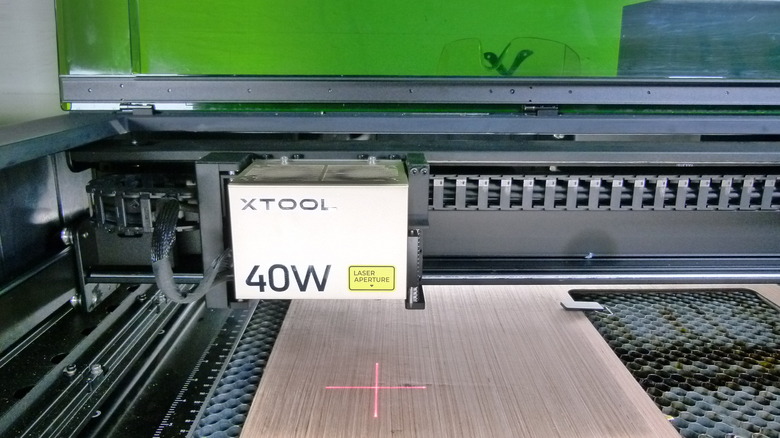
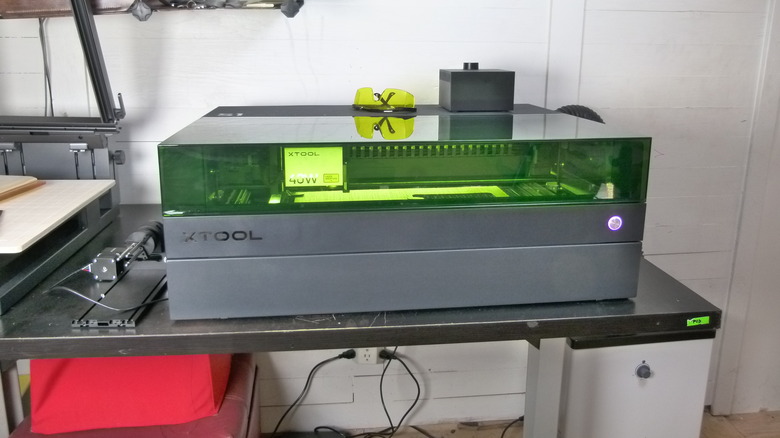
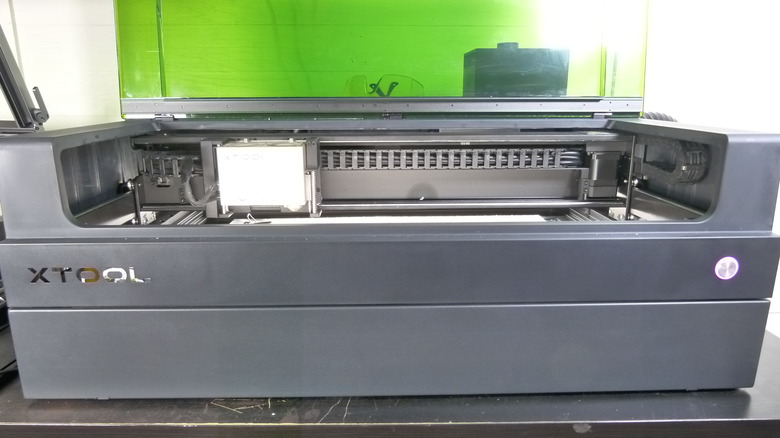
The S1 line, and the 40W in particular, do seem to be groundbreaking. xTool says the "S" in S1 is for safety; the S1 can be operated without safety glasses, has automatic shutoff for various situations, includes built-in fire detection, and has a prominent emergency shutdown button. The fully enclosed laser is quiet and very fast — up to 600mm/second. It comes with a 100 CFM exhaust fan, which puts many bathroom fans to shame. It's also incredibly flexible, supporting 10W, 20W, and 40W diode lasers, as well as a 2W infrared laser module for fine engraving on materials like metal and plastic. It sports autofocus engraving for enhanced precision and dynamic-focus engraving for dealing with curved shapes. Its bed size of 23.93" x 15.16" and working area of 19.6" x 12.5" can be extended horizontally with the optional conveyor feeder and vertically with a riser base from xTool's add-on ecosystem, which also includes an air assist module, honeycomb panel, fire extinguishing module, rotary attachment, smoke purifier, and the thing we're probably most excited about: xTool's screen printer.
Then there's the increase in power over the earlier S1 20W, which makes it possible to do more with more materials. The device can officially cut paper, wood, MDF, leather, felt, and opaque acrylic, and can engrave stainless steel, dark glass, wood, leather, fabric, jade, ceramic, shale, marble, cement, brick, and painted metal. And it can probably do even more than that.
Installation and setup
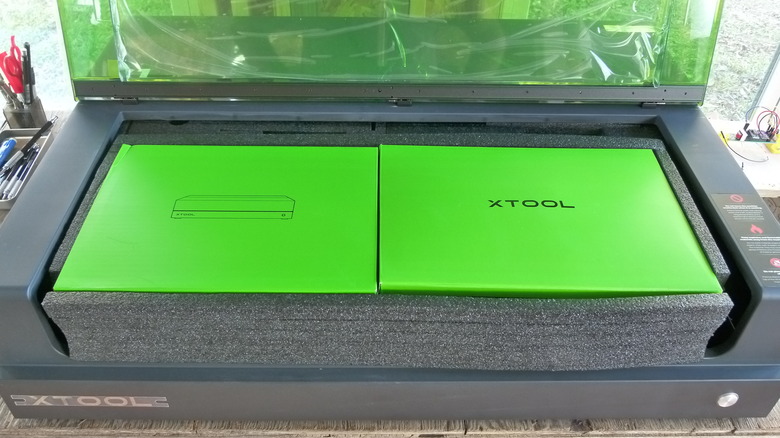
The S1 packaging was oddly satisfying. All of the basic components are packed within the enclosed bed with the sort of density and precision that makes it hard to throw away the packing materials. Pulling everything out, though, we got the sense that there should be more things to assemble, like one of those 3D printers that comes cheap because you'll have to spend an afternoon putting it together. Not so with the S1. It's hard to overstate how simple it was to set it up. The guide provided in the box mostly consists of illustrations and tasks that are named more than explained. But if this brings to mind ambiguous furniture-assembly sketches, you're not getting the right picture. The S1's installation guide is almost always perfectly clear.
The finer points of installing the software and using the laser were occasionally a little mysterious. xTool is a very online company, and when product setup relies on online media it should be very clear what info is available and where to find it. Once we figured out the flow, it all went smoothly. There was an occasional hiccup when the main setup guide conflicted with newer instructions included with a separate component, but any momentary confusion that caused was easily resolved by relying on the newest and most specific guidebook.
The S1's cutting edge
If the S1 40W instructions have a serious shortcoming, it's not fully communicating what the device is capable of. The official material settings list for the S1 is, as of this writing, fairly sparse compared with other xTool lasers. Additionally, the materials supported by the S1 sometimes don't match the materials listed within the xTool Creative Space (XCS) app or xTool's online guides. Fortunately, it's quite simple to find settings for other xTool lasers and experiment based on those.
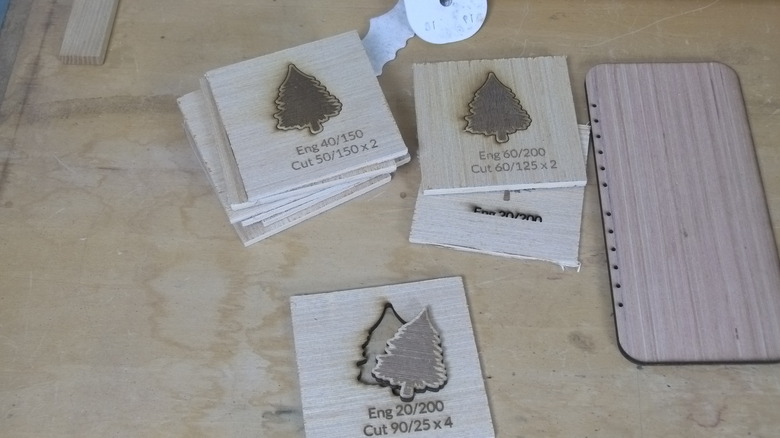
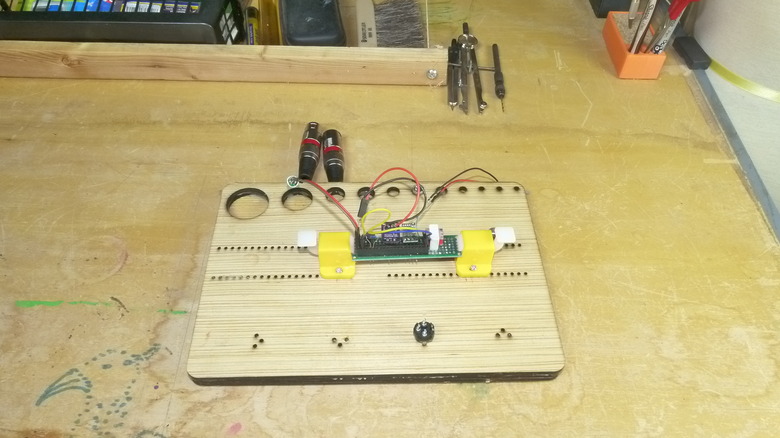
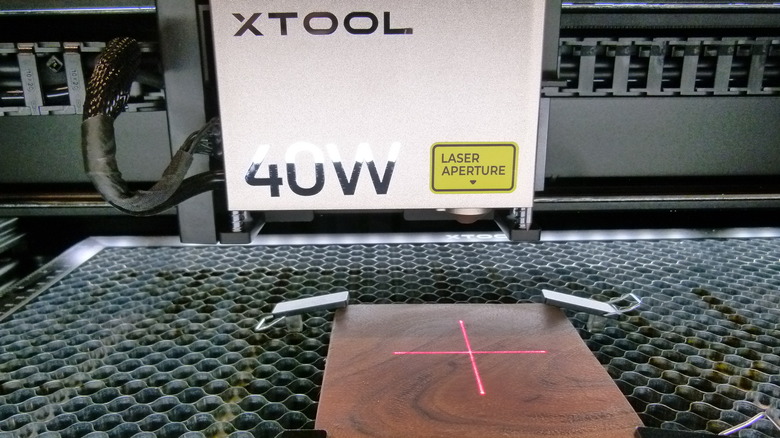
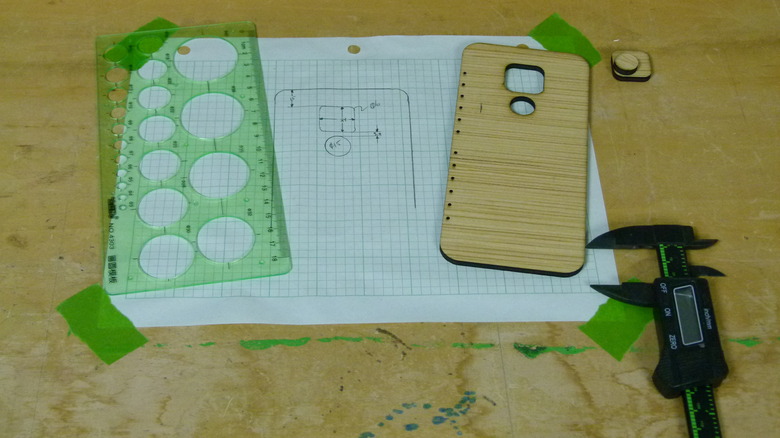
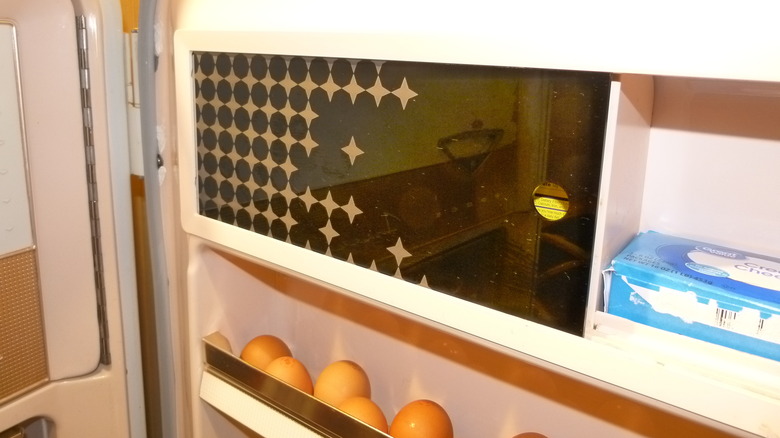
For many of our early tests, we used a 5mm plywood underlayment called Revolution ply. After an hour or so of experimenting with different settings, we dialed in the right settings for cutting the material ... and then promptly discovered that XCS has a built-in "material test array" function that would have simplified all of our tedious experiments by about 95%. We used those settings to create a PCB soldering workstation for making microphones, including mounting holes for PCB holders, holes to hold male XLR jacks while soldering, and a range of cutouts to secure all common sizes of electret microphones. We designed and cut wooden gears using Evolvent Design's free spur gear generator and Matthias Wandel's Gear Template Generator Windows app. We also cut a mounting plate for a DIY Raspberry Pi Pico-based Scoppy oscilloscope, a phone case from the 5mm plywood, a replacement butter compartment door for a vintage refrigerator from black sheet acrylic, and more.
Laser cutting off the beaten path
The S1 never missed a beat when cutting, aside from minor trouble with a climber's hangboard from laminated layers of ¾-inch pine furring. When the laser encountered knots in the ¾-inch pine, a few extra passes were required to cut all the way through, which we expected. Pine furring is unpredictable in this way and, unsurprisingly, is not officially supported by the S1. It's worth noting that by the time we had finished cutting all the pieces for the hangboard, the smoke purifier's replaceable prefilter layer was so clogged that, even on the highest setting, no air was pulled through the purifier. Far from a negative, this means that all of the particulate matter trapped by the purified ended up in the filter and not in the craft room, even though we stubbornly used unsupported materials.
We also did some quick-and-dirty inlays when experimenting with the Revolution Ply and making the phone case. This precision required for this sort of work might not be best suited to the XCS software, but it did an admirable job for the little time we put into refining the inlays. The trouble with inlays is that they're not a simple matter of cutting the inset piece at a slightly different size from the void, as you might expect. You can get close that way, but the XCS software makes it as easy as possible with its Outline Offset functionality.
Engraving all things great and small
Over the course of a month, we engraved photos of someone's children or Half-Life fan art on practically everything we could shove into the S1. Engraving flat surfaces is straightforward enough. Because the S1 40W's preset library is still a work in progress, you'll sometimes have to experiment a little to dial in the right settings, which means having extra or scrap materials on hand whenever possible.
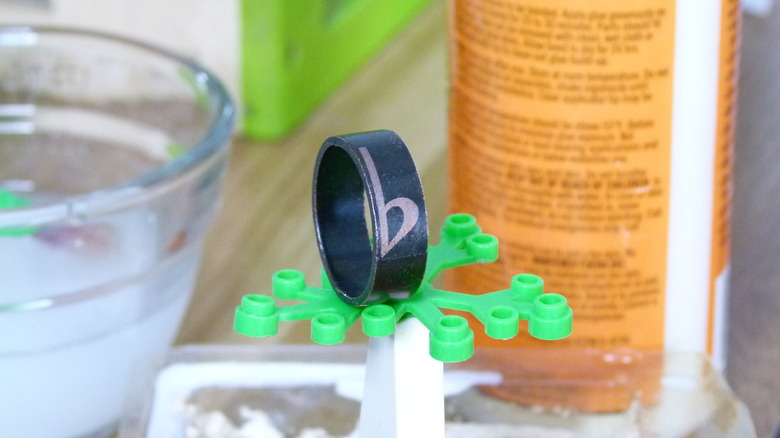
If engraving flat materials is straightforward, rotary engraving is a bit less obvious, though still simple enough. The RA2 Pro rotary attachment is an indispensable add-on for many of the things we imagine ourselves engraving: rings, coffee cups, tumblers, Christmas ornaments, and a zillion other round things. It uses rollers and an impressive range of attachments for its lathe-like chuck. They all worked flawlessly for us over the course of various engraving tasks. Then we got a little adventurous, engraving a vector graphic on a copper ring used to crimp Pex water lines, which came out great. Since we don't know what effect that black layer might have on your skin or what effect engraving it might have on your indoor air quality, we can't recommend this approach. But strictly as a materials experiment, it worked great. It took us a bit of reading to figure out how to align the laser for a ring, which you accomplish using the "framing" process to mark one point and then preview the engraving area.
Engraving curved surfaces with the S1
The S1's dynamic focus engraving is also a unique process by which the laser adjusts its z-axis (vertical) position to keep itself focused on curved surfaces with a slope of less than 15 degrees (picture a dinner plate). It works by mapping out the surface height of the material at various points, much the way mesh bed leveling works for 3D printers. You do this by marking the upper left and lower right corners of the work area as usual, then defining a grid (in rows and columns) for the laser to make additional height measurements. The maximum of 20 rows and 20 columns gives you as many as 400 measurement points to map out (use a finer grid for larger and more complex surfaces, and fewer points for simpler items). Then, when engraving, the laser moves vertically, conforming to the different heights of the material's surface.
Without a camera, the S1 does this mapping with the positioning sensor that's attached to the laser module. You must make sure your grid is fine enough to catch the highest point of your material. Otherwise, the positioning sensor can be dislodged (or can dislodge your material) as it moves across an unexpected high point. Resetting the sensor is easy, but it will start the somewhat slow mapping process over from the start.
Putting xTool Creative Space through its paces
We undertook a few of the projects specifically to test the ease and precision with which we could create art for cutting on the S1. After a few simple measurements, we were able to lay out the camera and fingerprint sensor cutouts on our DIY phone case. The microphone-making workstation was a bit more involved, but XCS handled it well.
The oscilloscope mounting plate was first scored into a paper template, then checked against the size of the enclosure (an Altoids tin) and a Raspberry Pi Pico W. Then we changed the material settings, re-measured the laser distance, re-marked the processing area, and cut the plate out of chipboard (not officially supported, but a snap to cut). Compared with our usual go-to software for 3-D printing, Autodesk's Fusion 360, it's fair to say that XCS did most things we asked of it far more quickly and simply, and ultimately there wasn't much it couldn't do. Its limitations might frustrate an engineer or CAD expert, but most users can do a vast majority of moderately complex tasks directly in XCS, and faster than using traditional high-precision CAD software.
XCS quirks to watch out for
There are some (mostly minor) quirks and bugs in XCS that are worth noting. Keyboard shortcuts like Ctrl-S don't work if one of the tool palettes has the focus, for example. And when you align two or more objects, there doesn't seem to be any way to predict which is going to move. We also ran into a few instances of imported vector SVG files not being imported correctly, though they would generally import into Inkscape properly. However, this could have been the fault of the software with which the SVGs were created.
Perhaps the most serious problem we found with XCS is that there's no clear way to import one document created in XCS into another, even by copy-and-pasting. For example, one element of our soldering station, an XLR connector holder, was created separately from the main document. We never found a way to combine the documents, and ended up recreating the XLR component within the main document. This is perhaps the best argument we found for designing such elements in a program like Adobe Illustrator or Inkscape rather than XCS. The only other meaningful bug we found was that the undo functionality would do an incomplete reversion if you were changing too many things at once, which we discovered while experimenting with a test grid. Applying settings to multiple selected objects worked great, but undo didn't change all of them back, so take care to double-check complex jobs.
Our overall impressions
Now, back to our original question: "Who is the S1 40W for, anyway?" It's moderately expensive, fairly expensive with a full set of accessories, and extremely robust in terms of its capabilities. But it's difficult to say if the S1 has capabilities beyond the needs of home users since those "needs" tend to be defined by the machines' prices and abilities. After all, you didn't "need" to engrave spherical ornaments before an affordable attachment made the process somewhat commonplace. We weren't able to come up with a task the S1 couldn't accomplish but that any other non-commercial laser could, aside from a few specialties that require CO2 lasers.
One common lament about the S1 is that the lack of a camera makes it difficult to reproduce a single action repeatedly and precisely without a spacing jig, which might limit its usefulness for a small engraving business. These lamenters are forgetting that they're standing in front of a world-class laser cutter. For most common uses, making a mass-production jig using the S1 itself can be accomplished in a matter of minutes. And we can only imagine how the automatic conveyor would increase its capacity.
The xTool S1 40W will serve you well
xTool's broad targeting of crafters, small businesses, and educators now sounds reasonable to us. The safety features make it a natural for the home craft room or a classroom. XCS is very complete but simple enough for home and school use. xTool describes the S1 as a great and cost-effective starter device for small businesses, and that also sounds right. We found it immediately useful in service to a woodworking shop, a luthier's toolkit, a greenhouse full of custom hydroponics systems, and an I.T. homelab. xTool does a great job at supporting crafters and people with laser cutting/engraving businesses, but don't discount the machine's utility for less crafty and more tool-oriented endeavors.
It's worth putting some time into learning software like Illustrator or Inkscape to make the most of the S1 in the long term, but that's not a downside for the laser any more than an inability to come up with cabinetry plans is a shortcoming for a table saw. Those tools enhance the S1's utility, just as the S1 enhances your own work. We give it a big thumbs up. And, more significantly, we give it an exhaust hole in an exterior wall. What greater love is there?