The DIY Built-In Closet System That Doubles Hanging Space For Under $200
We may receive a commission on purchases made from links.
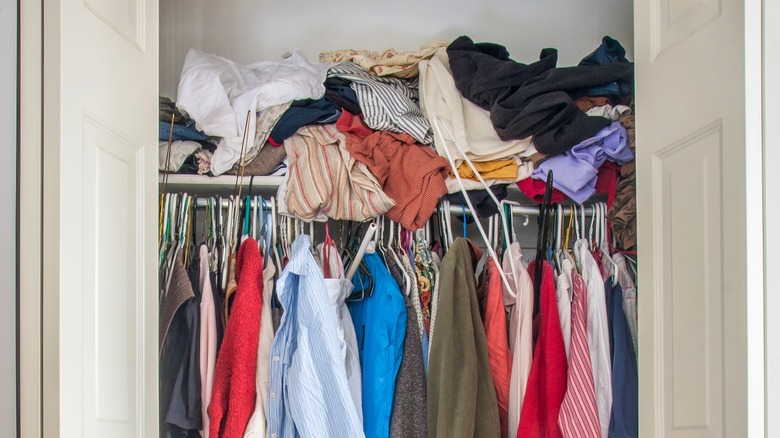
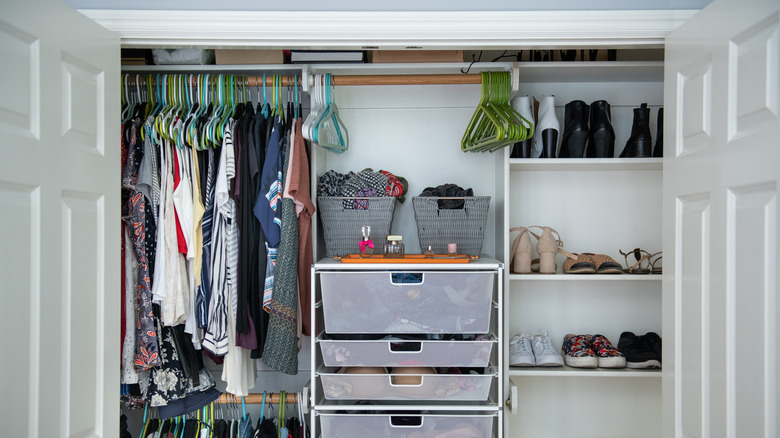
If you have a dated closet in the corner of your bedroom, you may know all too well that looks can be deceiving. Although nice from the outside, you open the door to find a cramped space piled high with mess and only a single rail for hanging clothes up. So, what can you do to fix it? Thankfully, implementing a DIY built-in closet system, as shown by @therenegadehome on TikTok, could help you re-organize your small wardrobe space. As a result, you should find that you have room for everything in your wardrobe without having to stuff things into random nooks and crannies.
Yes, this system works like a dream, but it also shouldn't cost you more than $200, making it a complete steal compared to professional re-designs and installations. If you have any upcycled wood you can use, you can cut down your costs even more, making this system all the more attractive if have a tight budget. This DIY project is also incredibly versatile, and you can use it in any room, whether it's your own closet, a child's, a sibling's, or simply for some additional storage around your home.
Construct the interior for your DIY system
To recreate this system, you'll need painter's tape, a tape measure, a saw, an electric drill with screws, a 90-degree ruler, edge banding, white paint, a flange set (which you can order on Amazon for $10.99), and a rod/rail to install inside your closet. If you don't have any spare plywood, you can grab some from Lowe's for $37.87. Just make sure you take the dimensions for your closet beforehand so you know how much you need. Once you've gathered everything, your first step is to construct the interior of your DIY system.
Measure your closet space and decide how tall you want your shelving system to be. Jot down the height and width, considering if you want to add any baskets in the compartments. If you do, account for that in your measurements. While doing this, you can also plot the design on the wall using painter's tape.
Once you have your measurements, you can slice your plywood to size and use your drill and screws to connect it before repeating the same steps for the shelf sections. You can also cut any extra pieces, such as for a compartment on top. Next, secure all the interiors in place inside your wardrobe and apply your edge-banding on the rims of your wood, ensuring you take your time so it goes in the correct place.
Upgrade your system's interior
Now, it's time to add your railing system. You can do this by securing your flange system in place using your drill and screws before cutting your rod (if need be) and inserting it. If you want two rail systems, then simply repeat this process. (If your closet is very tall or has the space, install as many additional units as you need.)
With the framework done, move on to your finishing touches, adding a coat of paint to the unit and your walls if necessary. Naturally, you could also add some extra touches to customize your system's interior even further. For example, you could add a mirror somewhere, utilizing something like a small table mirror from IKEA for $39.99. For some ambient lighting, consider installing LED strip lights.
You can play around with the design, too. For instance, you could install shelving in the bottom and add rails above it. However you make it work for you will boil down to the size and shape of your wardrobe and your personal needs. Just make sure to measure your space accurately and plan your project thoroughly before diving into anything. The reason this DIY works in the first place is because it enhances your closet space. Rather than shoving random units that don't fit your closet well into your space, you're instead expanding the space by building into its natural shape, meaning you end up with much more room and a customized closet.