The Common Mistake To Avoid When Propagating A Snake Plant

Dracaena trifasciata, commonly known as snake plant or mother-in-law's tongue, is a popular and easy-to-care-for succulent. Belonging to the Asparagaceae family, these plants are characterized by their long, sword-shaped leaves with pointed tips. Snake plants can be propagated through either leaf cuttings or division, allowing you to easily multiply your snake plant collection. A crucial stage of the process is to allow the cut edge to dry and form a callus before planting. Skipping this stage can lead to rot, so make sure to complete this step to ensure your propagated snake plants are a success!
Snake plants are tolerant to a range of light conditions and thrive with minimal water, making them an ideal choice for both novice and experienced plant enthusiasts alike. They are most happy in bright, indirect light, low to moderate humidity, and in stable, warm temperatures. Newly-propagated snake plants need to be kept out of direct sunlight until they form roots and begin to grow. At this stage, you can gradually adopt to your regular routine for growing snake plants.
Why do you need to let snake plant cuttings callus?
Succulents have evolved to survive in dry environments by storing water in specialized cells in their fleshy leaves and stems. However, their adaptation to conserve water makes them particularly-vulnerable to wet conditions, which can cause stress and eventual rot. This is why allowing the cutting to callus is a key step in propagating snake plants. A callus is a soft tissue that forms over the wound or cut edge of a plant as part of the process of healing and acts as a protective layer, preventing the cutting from absorbing too much water when planted in a substrate. Stress caused by too much water can make snake plants susceptible to pathogens, which can enter the plant through an unhealed wound or cut edge. These pathogens, such as those that cause soft rot, will kill your newly-propagated snake plant cuttings.
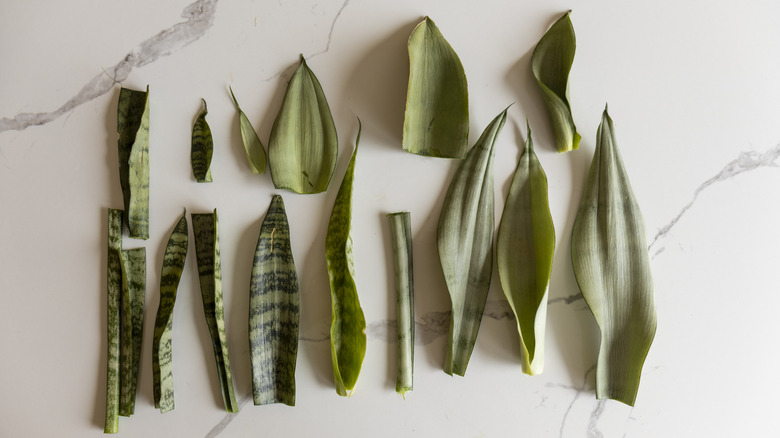
To take leaf cuttings from your snake plant, cut the leaf into horizontal sections approximately 2 inches thick. Then, to form the protective callus, simply place your cut pieces in a warm, dry location for one to seven days — larger, fleshier snake plant cuttings will generally take longer to callus than thinner pieces. Check on your cuttings every day to monitor their progress. Once the cut edge is dry, firm, and has developed a hardened surface, the cuttings are prepared for planting.
Propagating snake plants: A step-by-step guide
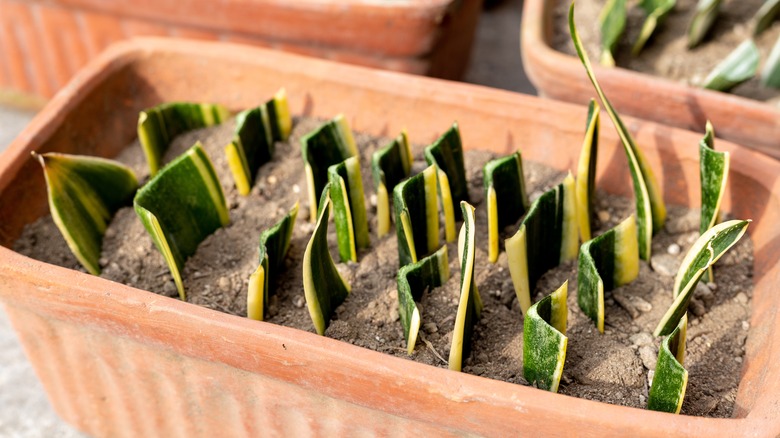
Once your cuttings have callused, plant them into a slightly-moist, well-draining medium — we recommend propagating your plants in sand, perlite, vermiculite, or a mix of these gritty substrates. Make sure to plant your cuttings the correct way up — a great tip is to mark the bottom of each cut piece with a small notch to identify the right direction. Maintain moisture but take care to avoid wet conditions, which can cause bacterial soft rot. Keep the cuttings warm, between 70 and 75 degrees Fahrenheit, to encourage rooting — they should root within several weeks. Note that it is also possible to root snake plant cuttings in water, although this method is more likely to lead to rot.
Snake plants are periclinal chimeras, which are types of plants that have different genetic layers. This means that snake plants propagated from leaf cuttings may not exhibit the same characteristics, such as the coloring or variegation, as the parent plant. To propagate variegated plants, division is the best option to make your cuttings grow to look like the parent plant. When repotting in the spring, simply divide the plant into smaller sections, each with its own roots, and plant the divided sections into individual pots. Allow the newly-divided plants some time to acclimate by keeping them out of direct sunlight until they show signs of new growth.