12 DIY Ways To Fix Those Stubborn Squeaky Wooden Floors

We may receive a commission on purchases made from links.
While a well-lived home is charming, one specific characteristic can be rather annoying: wooden floors that squeak when you walk over them. While it's common to focus on other DIY home improvement projects, ranging from laundry hacks to gardening secrets, you must also look at this nuisance that disrupts your life. Also, unlike getting general floor maintenance advice, you want to dig deep into the problem and find DIY solutions that target the noise source.
Instead of trying to prevent floor wear or discussing the benefits of hardwood, you need to learn what it means when your floors squeak and look at practical but overlooked methods to silence the noise. The goal is to emphasize unique strategies that go beyond surface treatments. Whether using household items' lubricating power or simple carpentry tricks to reinforce the flooring, you'll need actionable solutions that give you peace and quiet.
This is a critical approach because, while your squeaky wood floor may seem like a minor problem, it could hint at deeper issues, from aging infrastructure to gaps in your home maintenance routine. Understanding why these DIY fixes work gives you immediate solutions to address the problem and a deeper appreciation for all that goes into upkeeping your home.
Use a shim to fill gaps
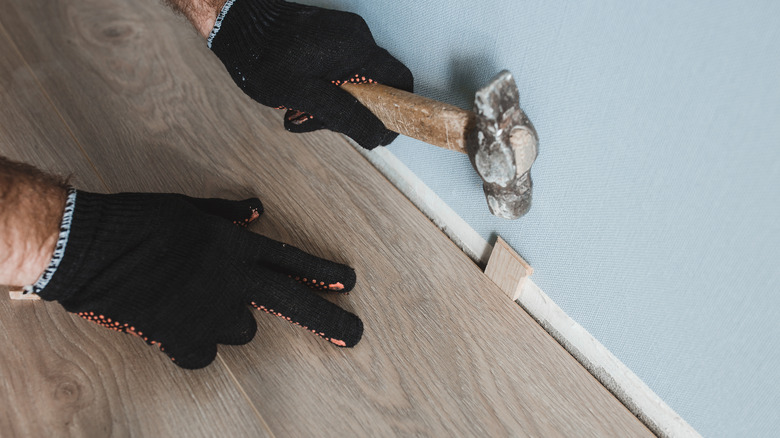
A shim is one of the fastest fixes for squeaky hardwood floors, especially if there's a gap between the floorboards and the underlying joist. A shim is a thin piece of wood designed to fill in spaces or make a surface level. Pinpoint the squeak's location to tell you where the gap is, take a shim, coat one side with wood glue, and insert it into the gap between the joist and the floor. But be careful; you don't want to widen the gap or damage anything. After inserting it, give it an hour or so for the glue to dry before you walk on it. As per 1 Day Refinishing, don't force the shim into the space because it could raise the floorboard. It's also best to use this method if you can get to the underside of your floor, like from a basement.
Shims fix squeaky floors because they stabilize the floorboards. When there is a small gap between the floor and the joist, the floorboards move when you step on them, leading to a squeaking noise. Pushing a shim into the gap fills the space and lets the floorboard move, effectively stabilizing it. Wood glue secures the shim and adds another bonding layer between the floorboards and joists, making them durable. This method lets you fix the squeak's root cause, giving you an effective method to get a quiet floor.
Nail the squeaky boards down
Nailing down the squeaky boards will stop the noise, but you must start by finding which boards are squeaking. Floor Fixers recommends using 2-inch finishing nails to attach the boards directly to the subfloor, making sure to put the nails in at a slight angle to get a better grip. Once they're in, you'll countersink the nails just below the wood's surface to ensure the nail heads don't stick up and damage the floor or cause injury. Finish by putting wood filler over the nail heads to fill the holes, picking one that matches your flooring for a seamless look. Gently smooth it into place with a putty knife and let it dry to secure the boards. For it to succeed, ensure you pick nails long enough to get through the floorboard and into the subfloor.
Nailing down your floorboards makes it harder for them to move and make noise. Stabilizing the boards is critical to stop the friction and movement that cause squeaking when you walk on them. Also, using wood filler to hide the nail heads after you countersink them helps keep your floor's aesthetic appeal. It stops the filler from expanding or contracting differently than the surrounding wood. This method addresses the mechanical issue that makes the floor squeak, giving you a long-term fix.
Apply construction adhesive
Construction adhesive is practical for removing squeaky floors where you can get to the underside of the floor, like in a basement or crawl space. Start by finding the floor joists or the horizontal beams that support your floorboards. Get a caulking gun, apply a generous bead of the construction adhesive along the top of each joist where it meets your subfloor, and spread the adhesive evenly to cover the whole joist's length where the noise originates. To get professional-looking caulk lines, consider using a drinking straw to smooth it out. Give a few hours to dry, and ensure you're working in a ventilated area because the caulk can have a strong odor.
Construction adhesive fixes squeaky flooring because it creates a permanent, strong bond between the floor joists and floorboards. This bond helps reduce how much the boards can move when you apply pressure, like when you walk over them. Friction and movement between your floorboards and joists commonly cause noise, so adding the adhesive removes the gap where it moves. Construction adhesive comes designed to withstand pressure and weight, making it a great way to secure your joists and floorboards. It's also slightly flexible, allowing for natural, minor movement without breaking the bond.
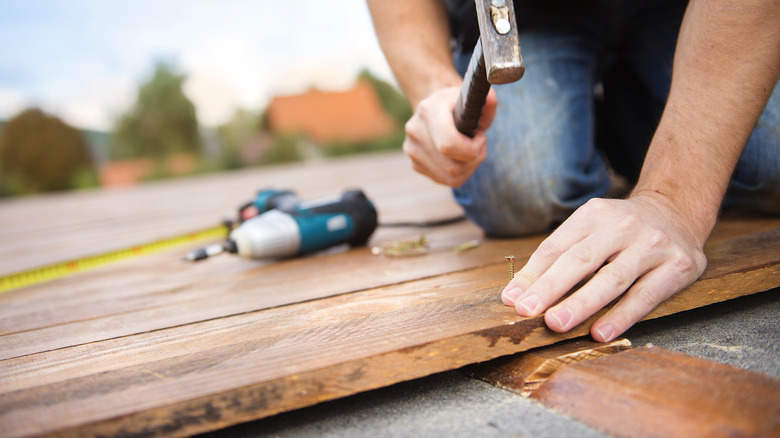
Screw boards to the joists
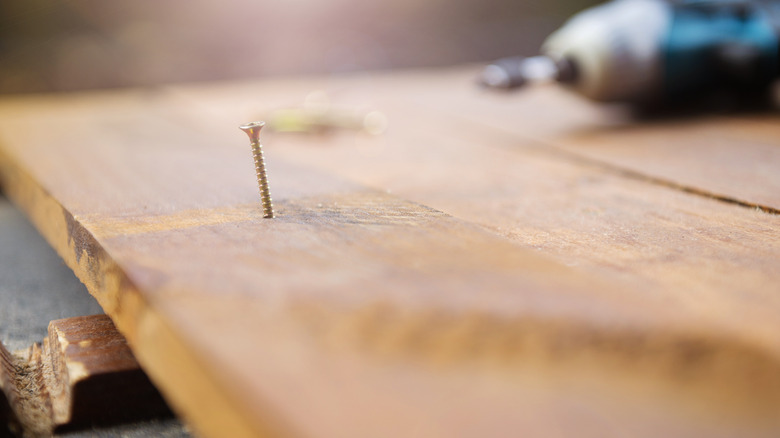
To fix your squeaky floors without getting under them through the basement, use reliable squeak-reduction screws like those from O'Berry Enterprises Squeak Replacement Screws ($12.98 from Amazon). These screws come uniquely engineered to tightly secure your floorboards to the joists, targeting the root cause of the squeak. Start by finding the exact spots that squeak, as this indicates that the floorboards are loose from the joists, and carefully position the squeak-reduction screw at an angle that ensures it'll go through the floorboard and the joist, and drive it into the wood until the head sits just below the floorboard's surface. The screws come with a breakaway design that allows you to snap the screw off at the correct depth, leaving a smooth floor. However, be careful you don't over-tighten the screws, as this could damage the joists or floorboards.
Squeak-reduction screws are an effective way to silence squeaky floors because they stop everything from moving. These screws are designed to pull the floorboard tightly against the joist, securing them. Another unique feature of the screw is its breakaway design ensures that, when you finish installing, you can leave the screw flush with the flooring to get rid of any potential tripping hazard. You'll get a stable fix while maintaining a seamless look for the floor, and the screw's design and strength ensure a lasting fix. This is also an accessible option that doesn't require special equipment.
Install a squeak relief system
To remove squeaks in rooms with carpeted wooden flooring without tearing out the carpet, Angi recommends using a squeak repair kit, like the GBW Squeeeeek No More Kit ($24.05 from Amazon). These systems are designed to secure the flooring to the subfloor through the carpet. Start by narrowing down the squeaky areas and locating the joists underneath them. The kit has a tool that lets you get through the carpet without damaging it to get to the subfloor. Follow the directions to insert the alignment and tighten parts at strategic points along your joists to pull the subfloor closer to the floorboards. In turn, this tightens the connection and closes any squeaky gaps. Remember, this method is all about precision, and if you don't find the joists, you won't get noise reduction.
This system eliminates the root cause of squeaks, gaps, and loosening boards that allow movement between the subfloor and floor. Tightening the connection between these spaces makes it difficult for anything to move. The mechanical tightening action is the key to this kit, pulling the floor and subfloor together to get a solid structure.
Use a rubber mallet
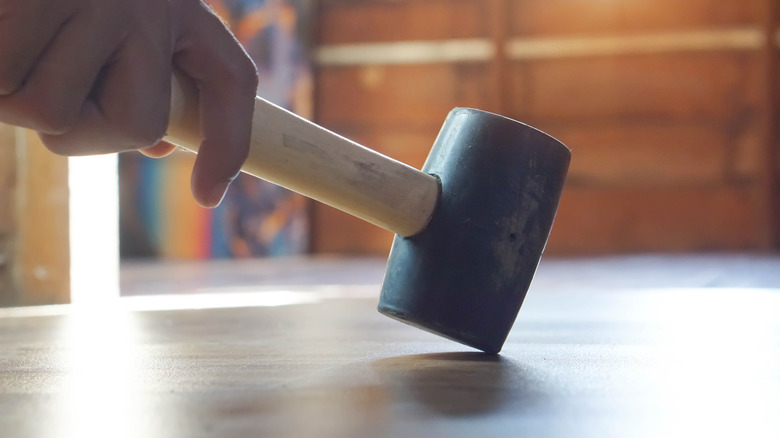
One non-invasive way to address squeaky flooring is using a rubber mallet to adjust the boards without damaging the surface or finish. You start by finding the squeaky spots; Black Forest Hardwood Floors recommends gently tapping along the edges using a rubber mallet to create a subtle vibration that encourages the boards to reposition a tiny bit. The goal is to get the boards to a spot where they are less prone to rubbing. Work around the board with your taps to avoid making it uneven on the subfloor. When you work, do so carefully and don't use a lot of force as it can damage the wood or finish.
The key to this is the effective but gentle way you reposition the boards. Tap softly yet firmly, encouraging the boards to shift slightly, reducing friction points or tension between the floorboards, the boards, and the subfloor. The rubber mallet is firm enough to encourage movement but soft enough not to damage the finish, and you can remove the squeak without needing extensive repairs by coaxing the boards to settle using vibrations.
Lubricate with WD-40
It's possible to fix squeaky floors with WD-40 because it's a lubricant with a reputation for getting into tight spaces, making it a great way to treat the seams between your floorboards. Before you start, clean any debris or dust from the floor and pull back furniture and rugs so the WD-40 can get into the seams. Spray a moderate amount directly onto the squeaky seam or spot. Aim the nozzle close to the gap between the boards to ensure it gets in, and leave for a few minutes to seep into the gaps. Gently press or walk on the area to work the lubricant deeper into the seam. Use it sparingly so it doesn't leave a slippery residue, and wipe away any excess when you silence the squeak.
Floor Fixers says WD-40 effectively removes floor squeaks because it displaces moisture and lubricates. Its lubricating properties let it seep into tiny cracks and reduce the friction causing the noise. When your floorboards rub against one another or the nails holding them in place, they create friction that squeaks, and the lubricant smooths these interactions. WD-40 stops the floorboards from swelling and creating squeaky pressure points by drying these spots.
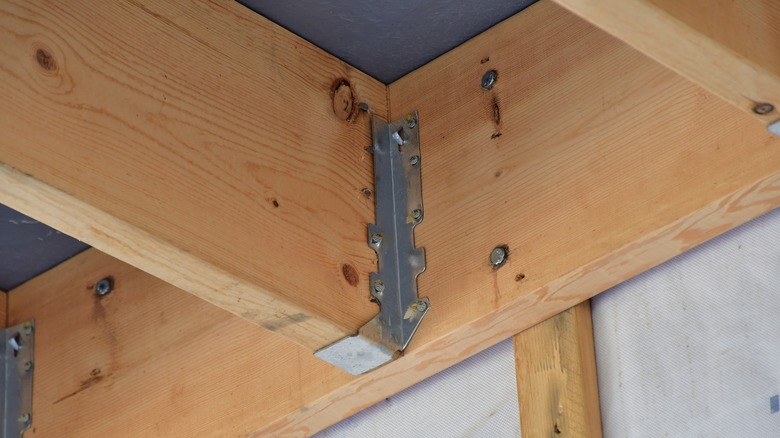
Install blocking between joists
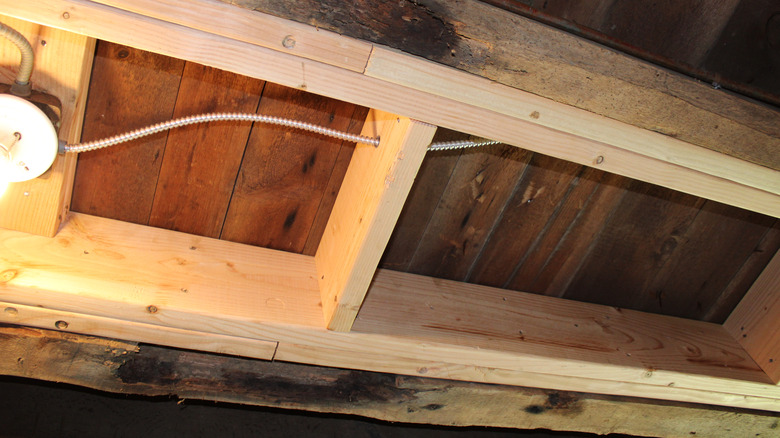
Blocking is the process of cutting and fitting small pieces of wood between the joists. This is a very effective solution to fix the squeak in areas where you notice movement. Concord Carpenter suggests measuring the distance from the joist to the squeaky areas of your floor and marking them before taking the blocks and using nails or screws to attach them to the adjacent joists to give the floor a bit more rigidity. This process will also limit the flex of the joists, reducing squeaks.
Adding blocks of wood between the joists strengthens the floor so it can't move (and squeak) as you walk on it. When you walk across the floor, the pressure makes the joists flex, making the subfloor and floorboards move and creating squeaky friction. By adding blocks, you stiffen the entire floor and make it more stable. It also helps distribute the weight as you walk to a larger area, reducing the chances of a specific part getting loose and making noise. If you live in an old home with a squeaky floor, blocking is excellent because your floor weakens as it ages, so this reinforces it.
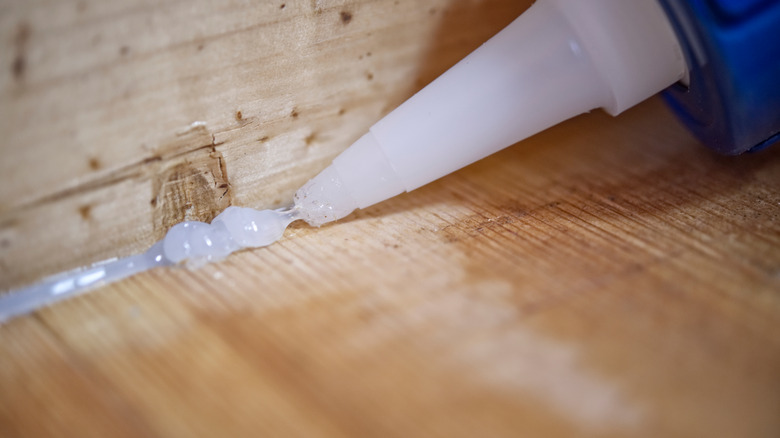
Caulking the gaps
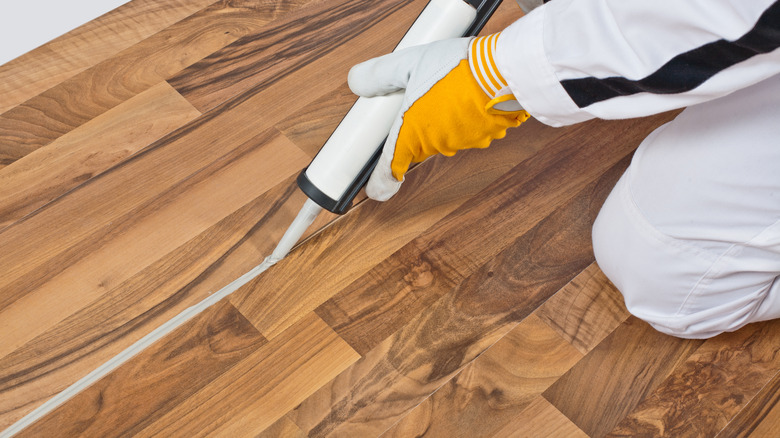
Putting a silicone-based caulk between any gaps in your floorboards helps them move less, thus reducing noise. Silicone caulk is very durable and flexible, making it a long-lasting fix. America's Floor Source suggests finding the gapped parts of your floors and cleaning them to ensure the caulk sticks. Pick a caulk that matches the color of the floor so it blends in nicely, and add a bead of silicone caulk with a caulking gun deep into any gaps. Carefully smooth the caulk with a caulking tool, or use a damp finger to ensure it settles. As it dries, the caulk fills the gaps and acts like a buffer to allow the boards to move slightly without noise. Make sure you don't overfill the gaps, as the caulk can seep into its surroundings and create an unsightly mess.
This method works well because the caulk stops friction that creates noise. When your wood floors get old, swell, or contract with humidity exposure, gaps can form that let the boards move. Silicone caulk fills these gaps and creates a flexible buffer that lets the floors shift slightly without rubbing right against one another and squeaking. It's flexible enough to allow the boards to expand and contract without damage.
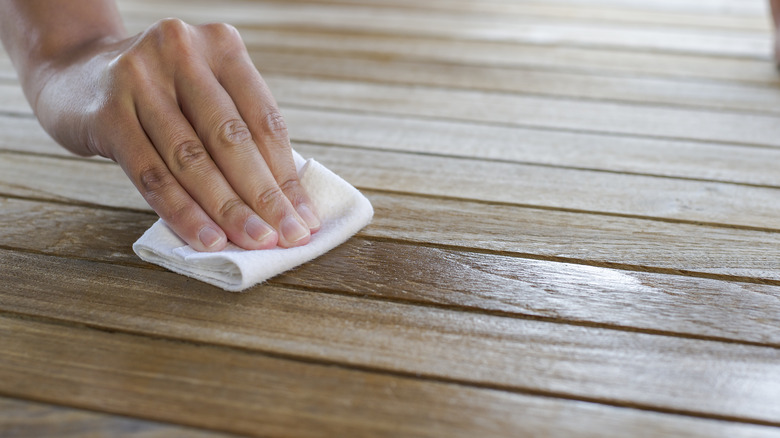
Reduce friction with soapy water
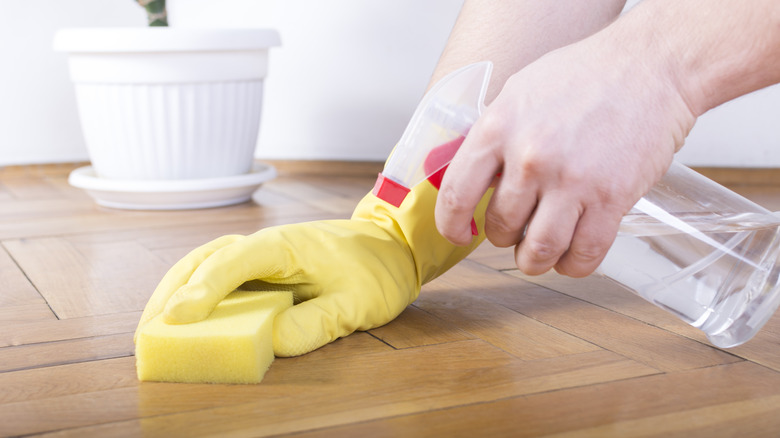
For a quick squeaky floor fix using a common household ingredient, mix a few drops of liquid dish soap and warm water in a bucket. Swish the water around to make suds and wipe a small amount into the joints where you hear the squeak, using a cloth or sponge. You want to target the loudest areas, letting the soapy water seep into the gaps and work like a lubricant. Encourage it to sink into the gaps, making sure you don't push too hard because this could damage the floor. Also, don't completely soak the floor because it can swell or warp the wood.
This is a temporary fix that will help reduce any friction in your floorboards once you get it in place. When your floorboards get loose, they move slightly under pressure, causing those oh-so-annoying squeaks. The soapy water fills these gaps, coats the sides of the floorboards, and lets them glide by one another instead of grinding. It works well as an immediate silencer but is not permanent, and works best for minor squeaks.
Sprinkle talcum powder
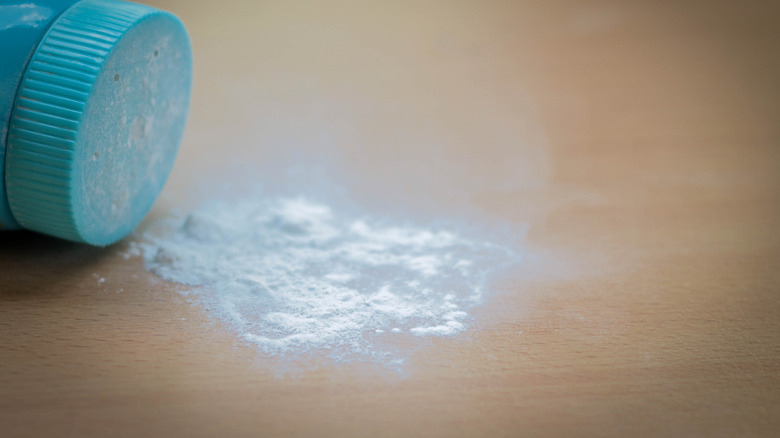
To address a squeaky floor, the American Hardwood Information Center suggests sprinkling talcum powder over the spots emitting the noise. Start by finding the squeaky sections of your floor and sprinkling a generous amount of talcum powder in these areas, sweeping it back and forth with a brush or broom, ensuring it slides into the cracks or crevices. That goal is to sweep the powder into spaces where your floorboards meet or interact with the subfloor below it. Also, clear the furniture or rugs out before applying the powder to avoid making a mess. After you spread the talc, walk over the treated area to push the powder deeper into the cracks, and you may have to repeat it two or three times for it to be effective. This treatment works best for minor squeaks but may not work on areas that squeak due to warping or structural issues.
Talcum powder has a silky, fine texture, making it an excellent lubricant for squeaky floorboards. The powder's ability to reduce friction is the key to why it works. When flooring squeaks, it's usually due to wood rubbing against wood or the nails holding it. Filling the crevices or gaps with talcum powder acts like a barrier that stops wood-to-to or wood-to-metal contact. In turn, this reduces the friction that causes it to squeak because the floorboards will glide smoothly against one another.
Prevent temperature fluctuations with a humidifier
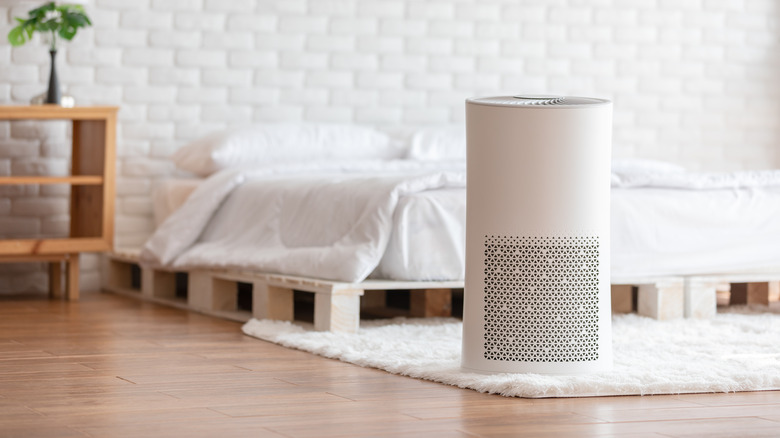
If you have an issue with dry air, using a humidifier to fix squeaky floors is a viable choice. This method is very useful during winter or in climates with drier indoor air. Pick a humidifier that is strong enough to work in the size of the room required and place it in a central location to ensure it distributes moisture evenly. Run the humidifier constantly to help keep a stable humidity level, ideally between 30% and 50%. This helps preserve the wood's natural expansion and contraction without damaging or stressing the flooring. Monitor the humidity levels with a hygrometer and adjust the humidifier's settings to keep within this range. Troy Flooring Center says regularly using a humidifier keeps the wood plants snug and reduces squeaking, but you do want to be careful; if the humidity levels are too high, this can lead to moisture-related issues like swelling, warping, and mold growth.
A humidifier combats squeaking by tackling the problem's root cause: wood movements in response to fluctuating humidity. Wood is hygroscopic, which releases and absorbs moisture from the air, causing it to contract and expand. With dry air, the wood floors shrink, creating gaps between the planks or loosening them to allow them to squeak. By keeping the humidity stable, the wood stays slightly expanded, filling the gaps and reducing friction.