The Simple Wood DIY You Need To Create Wraparound Shoe Storage For Your Closet

We may receive a commission on purchases made from links.
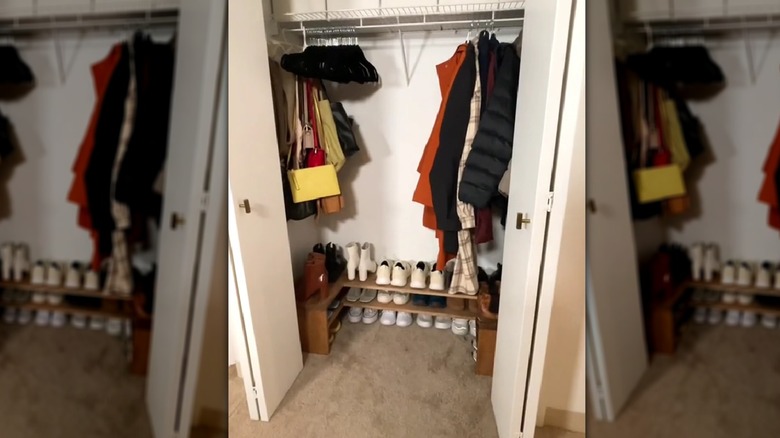
If you want to organize your wardrobe – in particular, your shoes — but don't know where to start, your first thought may jump to a shoe storage rack. However, rather than stretching your purse strings and buying any old product you see online or in-store, you could instead DIY your own, as shown by @emilyrayna on TikTok. By doing it yourself, you'll be able to craft something that fits better in your closet and, thus, gives you more value for your money. Even better, if you already have some scrap wood and upcycle it, you'll make even more cost savings, making this DIY project incredibly attractive for anyone looking to update their closet. Could it get any better than that?
As a result of implementing this DIY, you should no longer be struggling to find your shoes, and you'll be able to easily organize them into pairs. The additional shelf may leave room for your partners or other family members' footwear. Thankfully, making it shouldn't be too difficult. You'll need to purchase (or upcycle) some wood slabs, wood stain, saw, sealant, brackets, and have an electric drill, tape measure, and screws on hand. You can buy wood from Lowe's for $69.98 and some Minwax polycrylic sealant from Amazon for $12.98.
Slice your wood sections
To re-create this DIY wooden shoe shelf for yourself, start by taking your tape measure and noting down the dimensions for the depth and the width of your closet, including roughly how much you want it to come in at the sides. Altogether, you'll need two long pieces and eight shorter square pieces to make up the rest. Using your saw, slice two rectangular pieces the width of your closet with a depth of however deep you want the shelf to come out — preferably enough to fit your shoes on. For four of the shorter pieces, you will add these with your longer pieces to create a "U" shape, so they will need to cover the remaining depth. For example, if the depth of your closet is 24 inches and the depth of your longer rectangular piece is 12 inches, the depth of your shorter piece should be around 10 inches, leaving some room for maneuverability.
The other four shorter pieces will be used on the front and sides of the unit to connect everything, so slice those to size appropriately. Next, you can connect it all in the shape of a rack with your drill, screws, and brackets, starting with the first layer before connecting up the second. The shorter pieces should be going to the front and sides. Now, all that's left to do is slot it into your wardrobe and stack your footwear.
Finishing touches for your wraparound shoe storage
Once you've crafted your wraparound shoe storage, you'll want to add some finishing touches. You have several options, with the first being to apply your wood stain and sealant, which you can do either before or after securing your shelf together. However, if you want to go for a more modern look, you could either paint it black, white, or navy, which you can again let dry, and then add an appropriate sealant product, such as the Minwax you have for this project. Likewise, depending on the dimensions of your closet, you could even add a few extra shelves for additional space, but keep in mind that you would need more wood to do this. For some extra organization, add some hooks or wicker baskets and use them to arrange shoes and other miscellaneous items.
This hack works so well because the rack's shape fits snugly with the layout of your wardrobe, allowing you to free up space in the middle. However, one thing to keep in mind is that the wraparound design may only work in certain types of closets and may not work in wardrobes with less depth. If you have one of these wardrobes, you may find it easier to stick to a simple shelf design rather than the "U" shape of the wraparound. Either way, you should be able to keep your shoe closet neat and organized as a result.