TikTok's Handy Tip Makes Installing Cabinet Drawers Slides A Breeze
Installing drawer slides in DIY cabinets, or installing upgraded slides in your existing cabinets, can be a confounding experience. Luckily, TikTok DIYer @pineandpoplardiy has a nifty solution that makes installing drawers in frameless cabinets almost painless: Use a few spacers, just the right thickness in just the right places. And with a little ingenuity, her approach can be adapted for face frame cabinets as well. You can even use the same tricks to easily upgrade your base cabinets with sliding shelves.
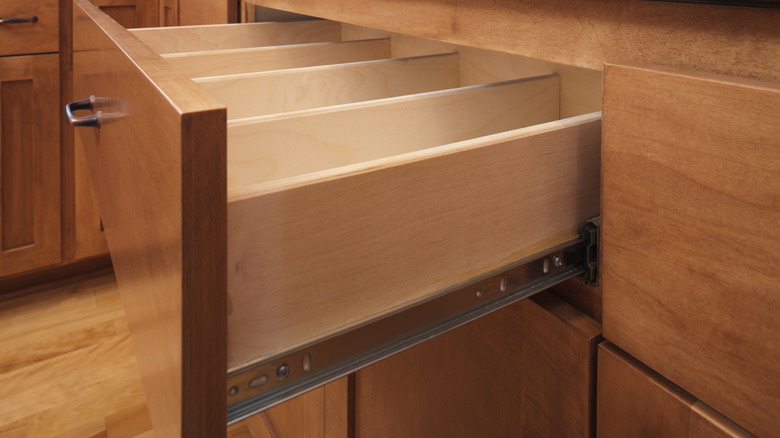
The difference is simple to grasp but a bit difficult to work with. Framed cabinets have a face frame of rails and stiles between the cabinet carcass (the framework of the furniture) and the doors and drawer fronts. The frame is located at the front of the cabinet and runs perpendicular to the sides of the carcass. The simpler frameless cabinets might be right for you if your home has clean design lines. They do not have the front face frames, and as a result drawer slides can be mounted directly to the sides of the cabinet itself. Slides installed in framed cabinets are usually mounted to the face frame and the back of the carcass, which introduces some complexity. If you've installed modern cabinet hinges, you've confronted this difference before. (If you haven't, do yourself a favor and check out an expert cabinet maker's explanation on when to use different types of hinges.) Let's look at the simple case first.
Installing drawer slides in frameless cabinets
The basic idea of @pineandpoplardiy's spacers is to extend a board from a horizontal drawer support beam at the front of the cabinet to a ledge at the same height on the back of the carcass. The board should be the correct thickness to position the bottom of the slide, which varies from model to model. In @pineandpoplardiy's case it's ½ inch. The vertical placement won't matter for some slides. For others, including older-style slides that support the drawer from below, spacing is critical. Once the spacer is in place, you can rest the slide on it and attach it to the carcass. As you do this, use a ¼-inch plywood spacer to temporarily support the drawer so it doesn't rub against the drawer support beam below.
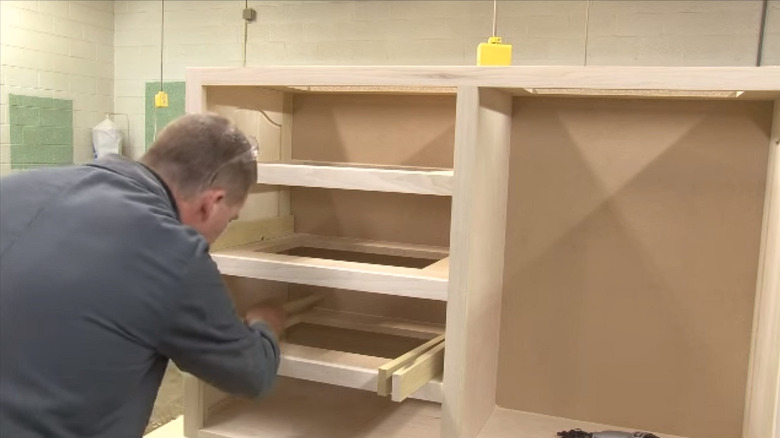
Note the ledge at the back of her cabinet — this probably won't exist in yours. In this case, the best approach is to attach temporary cleats to the sides of the cabinet for the slides to rest on. Make them flush with the top of the drawer support, and use a level to make sure the backs are at the same height. Using a level is a good practice, since cabinets are sometimes out of level, and your drawer slides should never be. Another issue is that your spacers must take into account the shape of your slides and only touch parts of the slide that are straight and parallel to the bottom of the cabinet. Slides with zones that drop at the front and back require spacers that only rest between those zones.
Installing drawer slides in face frame cabinets
Framed cabinets don't have to be that different. Remember that your slides can't be installed directly to the sides of the carcass. Given that, there are a few ways to align and install drawer slides for face frame cabinets. The simplest is to cut a piece of wood that fills the gap created by the face frame's lip, effectively making the installation match the simpler frameless cabinet process. YouTube channel "Rough Cut Woodworking" has a video explaining the complexities of this method. The main thing is to get the width of the board you're adding perfectly flush with the inside of the face frame stile (the vertical pieces of wood on the frame). Positioning the slide front to back varies from model to model. Just remember to adjust the position backward if you're installing drawers with inset drawer fronts.
If you expect to do a lot of framed cabinets from different manufacturers, the approach of YouTube channel "Shop Tales and Lore" might be best for you. They don't attach a board to bring the cabinet sides inward, but instead use gauge blocks planed to match the gap behind the face frame. The video is slightly confusing because he's installing the slide with the cabinet on its side, but basically the gauge blocks are used to temporarily space the slides properly away from the sides during installation. They use a machinist's square to make sure the slides are square to the cabinet front, and a homemade jack to make sure the back of the slide is level with the front.