Repurpose An Old Window Into A Unique Bathroom Storage Solution
Ample bathroom storage can be essential, particularly for those things that you want to keep tucked away but still within easy reach. Bathroom storage cabinets run the gamut from large and deep to shallow medicine cabinets and are available at all price points. However, the perfect solution to your bathroom storage needs may already be in your house. With an old window, you can create a stylish and simple DIY cabinet that mounts on the wall and offers both storage and display space with rustic antique flair.
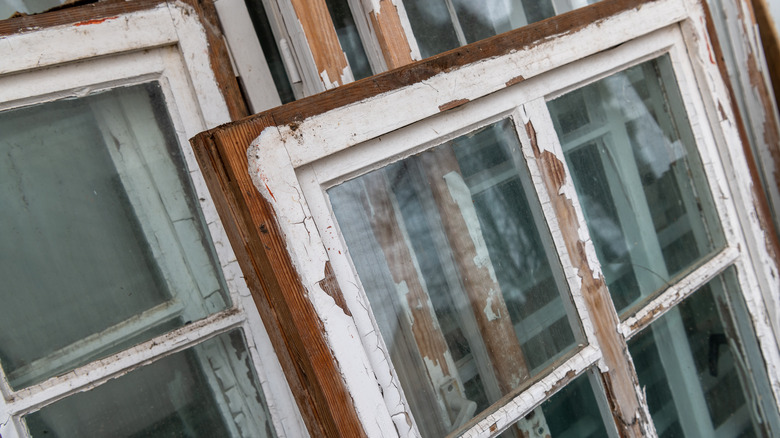
Older windows often have a time-worn charm and beautiful design compared to those found in new buildings, often sporting intricate mullions, small plates of glass, and carved details not found today. You may have some old windows you can repurpose lingering in a basement or garage or may spot one you love at an estate sale or architectural salvage shop. They can make perfect cabinet doors that allow you easy visibility of the contents behind the glass. The only things you need to create an upcycled window cabinet are an old wood-framed window of any size, hinges, and some scrap plywood to build out the frame for the cabinet.
Building a cabinet from an old window
To build a DIY window cabinet, begin by measuring your window to determine how large your cabinet needs to be. Allow about a ½ inch larger than the window itself, which lets the door rest flush inside the cabinet. You will also want to account for the thickness of the window in your measurements to ensure a firm close. Cut down plywood to the depth of your cabinet on both the vertical sides and the top and bottom, attaching them with a pocket jig and screws to form a simple wood box. Use a router to dig out a groove where the shelves will meet the sides of the frame and rest inside. You could also mount shelves with wood pegs supporting them, side brackets, or pocket-hole joints. Back the cabinet with another piece of thin plywood by attaching it with nails or heavy-duty staples along the perimeter.
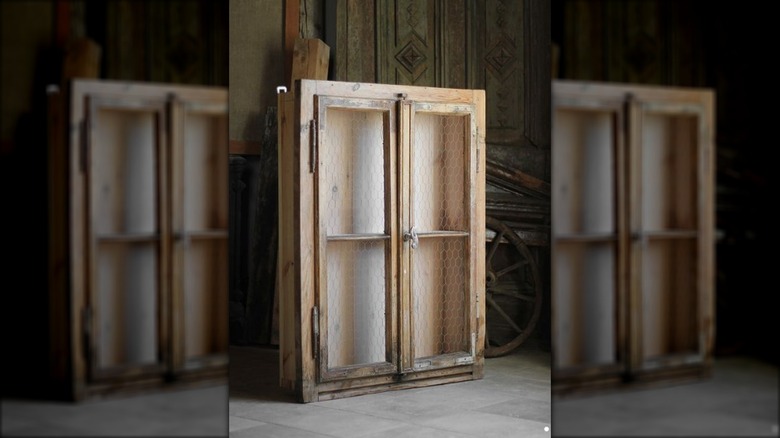
Attach the window as a door to the front of the cabinet with hinges. You could alternatively build your box to the exact size of the window and mount the window hinges on the side so the glass overlaps the cabinet front instead of resting inside. You can alter this basic design with other elements, such as the towel rack extension created in this YouTube tutorial, which uses a jig or scroll saw to carve out an ornamental detail on the bottom of each extra-long side piece that holds the towel bar.
Customizing your DIY window cabinet
To hang your cabinet, use another piece of scrap wood to form a support at the top that can be screwed directly into wall studs or add a French cleat along the back. This cabinet can be scaled up or down to the size of the window you are working with simply by adjusting the measurements. You can also customize the cabinet to fit your decor, including sanding and staining the window and frame, or painting the entire cabinet in a single shade. To add some lights to see what's inside, use some LED puck or bar lights at the top or under the shelves.
If you'd like more discreet storage, you can also add decorative window film to the panes of glass that will hide the contents or swap out the panes of original glass for mirrors to use as a vintage-inspired medicine cabinet. Other variations on this design use wood planks as backing instead of plywood (you can also get a similar look by using plywood that looks like paneling). To add a touch of color and pattern to the interior. add decorative shelf liner or peel-and-stick wallpaper to the back surface. If your window is missing the glass, you can also use other stylish materials to cover the front of the cabinet, including chicken wire or rattan caning.