Hate Your Popcorn Ceilings? Cover Them With A Chic Shiplap-Inspired DIY
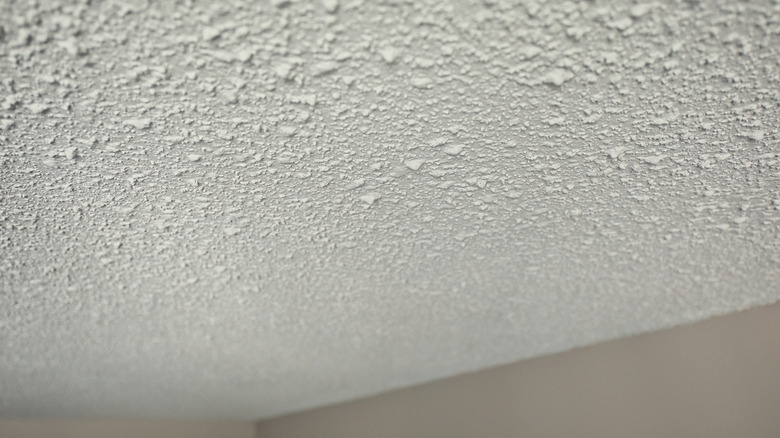
Nothing dates a home quite like popcorn ceilings. Mostly popular from the 1950s to the 1980s, the texture of popcorn ceilings usually feels shabby rather than unique. Plus, given their lack of popularity in recent years, most of the existing ones are now quite old and have seen better days. There are also some major hidden downsides of popcorn ceilings, such as potentially containing the harmful material asbestos or being prone to water damage. If you dislike your popcorn ceilings but want to avoid the hassle of removal, then covering them may be a better option. Stylish, easy-to-install options exist that can elevate the whole room.
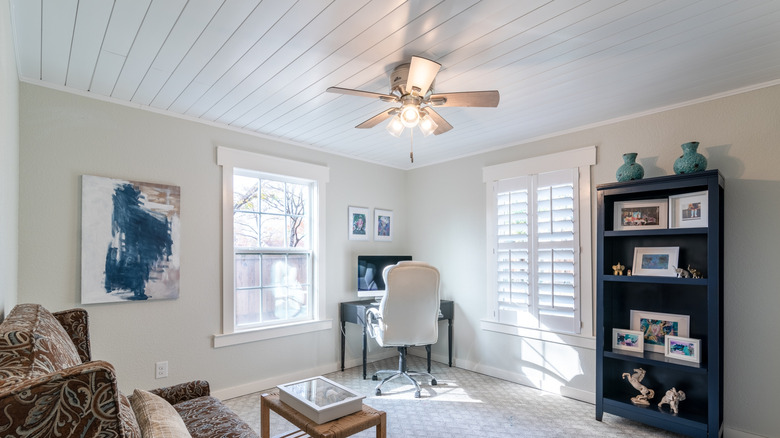
A quick and simple way to conceal popcorn ceilings is by covering them using shiplap boards. They keep the ceiling visually interesting, but also feel warm and more modern. Shiplap is durable, insulating, and easy to install, making it ideal for a DIY upgrade project. It's an especially practical solution since it can be installed directly onto the textured ceiling without requiring scraping or excessive preparation. Add in the ability to customize your result with different colors, sizes of boards, and patterns, and this DIY becomes a versatile way to upgrade your ceiling. Before you begin, though, you should better understand the process and necessary safety precautions.
How to safely cover popcorn ceilings with shiplap
The first step of the process is to gather your materials and make sure your project can be completed safely. Along with your shiplap, you will need a miter saw, tape measure, speed square, and level. Many manufacturers' instructions recommend using brad nails and a nailer, but this isn't always safe when working with popcorn ceilings, especially if your ceiling is suspected to contain asbestos. Homes built before the mid-1980s may contain asbestos, and its presence can be confirmed by tests from professionals.
These ceilings are generally safe when undisturbed, but nails can release asbestos fibers, creating a hazard. If you have or suspect asbestos, you can use adhesive materials like wood glue, construction adhesive, and mounting tape to secure your shiplap boards without damaging the ceiling. Peel-and-stick boards are another option. No matter which method you use, make sure you work carefully and in a well-ventilated space.
Once you have decided how to safely proceed, measure your space and cut the boards to size. Make sure to measure the ceiling in multiple places to account for any imperfections. Start with one board, confirm its length, and use a level to keep it straight so the following boards align properly. If you are happy with the way it fits, you can secure it in place.
Should you try this DIY project?

Apply an adhesive to the back of the plank, following instructions and holding it in place until it's secured. If it is safe for your ceiling, use the brad nailer to reinforce the attachment at the ceiling joists. Then, apply adhesive and slot the next board into place, continuing the process until everything is covered. When your ceiling is done, you can add a layer of paint if it is necessary to complete the look you want. A new coat of paint can complete the shiplap look and enhance the room's updated style. If you'd rather not paint, you can purchase shiplap planks pre-finished in various colors.
When choosing shiplap planks for your DIY, consider the material. If you are only relying on an adhesive, look for lightweight materials. Real wood is classic, but vinyl and faux wood paneling can also be effective. To get the perfect result, you can also use different sizes and patterns. Figure out if you want your shiplap planks to run lengthwise or crosswise, and keep in mind that longer planks may be pricier. Overall, expect the project to cost $500 to $800, depending on materials and room size. Compared to a popcorn ceiling removal, which can cost thousands of dollars, this project is a more affordable way to refresh your ceilings while keeping character and texture.