Easily Close Gaps In Mitered Edges With A Smart Screwdriver Hack
Perhaps you are a homeowner who just discovered a gap in the pointed corner of your baseboard or a DIY woodworker who finds a separation between two joined corner boards. Either way, it may seem like closing this gap in an outside corner joint would be complicated, considering the precise way in which these things are cut, called a miter, is not a beginner concept. However, thankfully, the solution is novice-friendly and only requires a simple tool that every homeowner should have in their toolbox: a screwdriver. By rolling the screwdriver over the mitered corner edges, it bends the wood fibers enough to cover the gap.
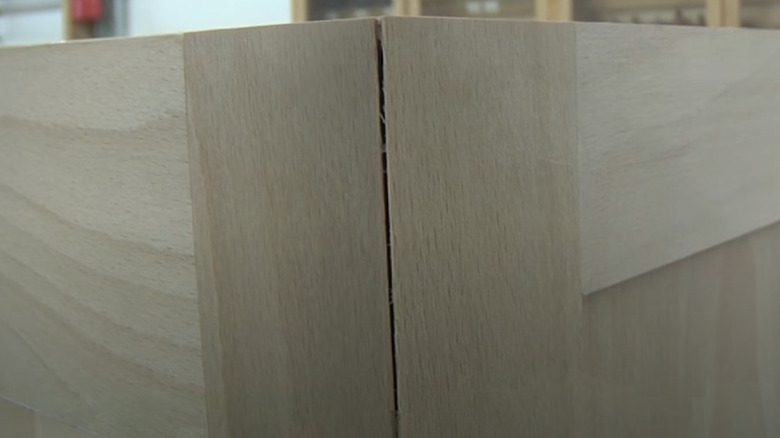
A mitered joint is created when two pieces of wood are cut at a 45-degree angle and fitted together to form a square 90-degree corner. If you are a DIY woodworker, to avoid getting outside corner miter gaps on your next project, follow these genius tips for the perfect miter cut and this TikTok wood cutting hack for marking, cutting, and fitting corners easily. Cut your outside miters a tiny bit sharper than 45 degrees so the outside edges always touch. This creates a small gap at the inside corners so they do not force the miter to separate. But what happens when, despite your best efforts, you end up with a gap anyway? The screwdriver hack is here to save the day – it is a process called burnishing, which is a common practice among woodworkers for fixing this exact issue.
How to perform the screwdriver hack on your outside mitered corners
To perform this simple fix, grab a screwdriver or similar tool with a round metal shaft. There are a few methods for burnishing your outside mitered corners, depending on the size of the gap. For really small gaps, it may suffice to simply wet the surface of the wood on both sides of the corner to make the wood fibers more pliable and then, applying light pressure, slowly roll the edges of the wood with the shaft of the screwdriver to bend the wood fibers, closing the gap. Finish the process with some light sanding to even out the surface.
For larger gaps, first run a bead of wood glue along the mitered corner, using your fingers or a flat file to press the glue inside the gap, a technique more commonly used by professional woodworkers versus the TikTok hack. Some woodworkers also add sawdust to further fill the gap as needed. Alternatively, giving your piece a quick sand after glue, but before burnishing, will mix a bit of the wood's sawdust into the glue for you (which may actually sometimes close the separation entirely with no need for burnishing!). After adding your choice of glue, sawdust, and/or filler, follow this with your burnishing technique to tighten the gap and sand with 100-grit sandpaper for a smooth finish.