When To Use A Palm Sander Vs An Orbital Sander, According To Our Tools Insider

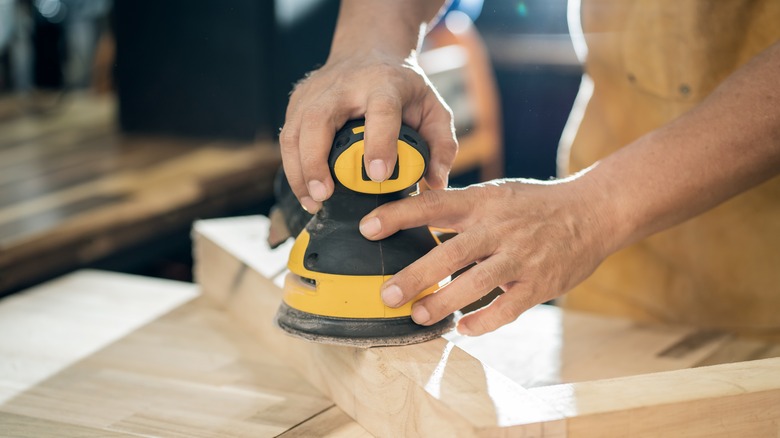
With so many tools on the market, it might get overwhelming to know when to use a specific device while working on a project. When it comes to sanding, you might be stuck for choice between an orbital or a palm sander. Similar in size (and sometimes even shape) these gadgets are meant to help clean, smooth, and polish surfaces. But, which one should you use and when? During a recent exclusive interview with Robert "Tools with SoAlz" Alcorn, the host of Tools with SoAlz, House Digest got the inside scoop on which one of these appliances you need during different stages of a project. According to Alcorn, "A palm sander is typically smaller and lighter than a random orbit sander [and] used for smaller detail work because its square or triangular head allows for work in areas where there is less space. You'll use a random orbit sander when you have larger surfaces to prepare."
Knowing the difference and what each tool can do will help you differentiate when it comes time to use them. Alcorn explained that the build to each appliance varies. "The head [of a palm sander] also moves much less than the random orbit sander ... [and] works in a small side to side or back and forth motion in small but quick strokes," he said. "A random orbit sander has a rounded face, works in a circular motion, and is often heavier than a palm sander."
Pre-plan your project to know which sander you need
So, when should you pick up a palm sander over an orbital sander? Robert Alcorn exclusively told House Digest the secret to determining when you need a palm sander. "Any delicate work should be done with a palm sander without question," he said. "Palm sanders are great to use on finished materials, in wood boxes, or in areas where you have small imperfections to remove within finished areas where the random orbit sander cannot reach. You are most likely to use them when your project is finished, put together, or you have sharp angles." He noted that you should think of this gadget as your go-to for light jobs "where precision and control need to be required." Apparently, palm sanders can even help clean your carpet – making them the go-to for small jobs.
For bigger DIY's and projects, you will likely need an orbital sander. Alcorn explained these are great for building furniture "or projects from scratch; meaning from raw material to finished project." This tool helps with everything from walls and doors to floors and table tops. He added, "I just used one to make finish a coffee table we took from rough sawn lumber to completely finished. We even made it out of Locust Wood and that wood has deep divots from worms having lived in the wood." Orbital sanders are best for wood projects, but they can be used on plastic and rough metal, too.
Trust your tool
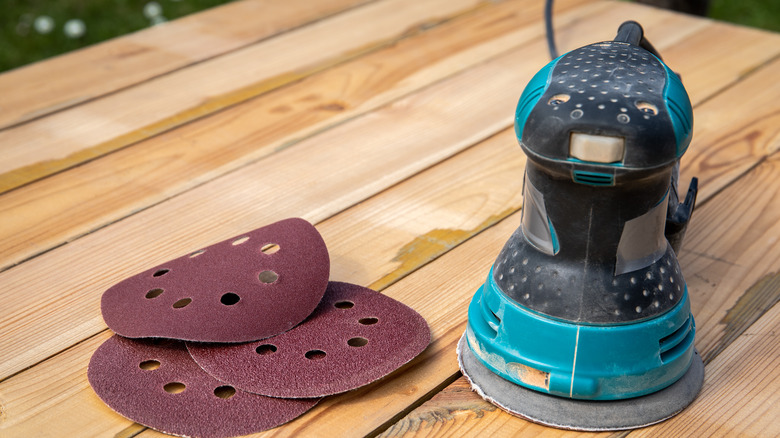
Knowing the difference between these sanders is important to accomplish your DIY projects, but Robert Alcorn noted it's about more than using the correct tool. Choosing the right grit to how you wield your sander will affect the outcome. For orbital tools, he recommends using 60 or 80 grit sandpaper before swapping over to a finer option. Alcorn said to use the rule of 1 ½ — every time you switch, you will want to use 1 ½ times the grit you used before. He suggested, "Use a pencil to mark the surface of your material between switching from one grit sandpaper to another. Make large zig-zag patterns all over the surface of your project and your sanding is done, with that grit, when the pencil marks are gone."
Alcorn also warned against leaving either sander stationary for too long to prevent deep gouges or burns. "When using either a palm or random orbit sander the best thing you can do to avoid disaster is to keep it moving," he said. You don't need to put a lot of force into your sanding, either. In his exclusive interview with House Digest, Alcorn recommended letting the tool do all the work. "You only need enough force to keep the head of the sander on the material. Not only will this leave you with a better, more finished, project but you won't use as much sandpaper either. The weight of the sander is going to be enough to complete the task."
Maintenance is key

Maintenance is vital, and Robert Alcorn said you should change out your sandpaper to prevent scratches. "Depending on the size of the project you may need to change your sandpaper two or three times before moving up to the next grit," he added. Make sure to always wear protection, too! He noted that you should wear a mask when sanding wood, suggesting an A95 with a vacuum cleaner attached as a bare minimum option. He also suggests that you break up the work for better results. "When working on large pieces, work in sections and overlap each section just a little bit to ensure even surfaces and avoid visible lines or marks. Also, brush off any dust between sanding and look for any uneven areas."
Alcorn left House Digest with one more exclusive piece of advice: "Here's a trick my grandfather taught me about sandpaper. Use an old shoe to remove the debris and waste from a sheet of sandpaper. Simply put the shoe on one hand and use the sander on the rubber bottom. This means you'll buy less sandpaper and save a little cash."