DIY The Perfect Outdoor Bench To Declutter Your Patio

We may receive a commission on purchases made from links.
Your patio may have been designed as a leisure space, but there's a good chance it also gets to be a workspace, hobby space, kindergarten, potting area, and more. Unfortunately, it can soon become a bit of a mess, and the last thing you want after investing time and effort on patio ideas to turn your backyard into an oasis is for it to be ankle deep in day-to-day clutter.
One solution is to buy a deck box, but while they can be very useful, they aren't always the most attractive objects. Another answer is an outdoor storage bench, which is one of several cheap and clever ways to perk up your patio. What's more, while there are a host of models you can buy at the store, it's relatively straightforward to DIY the perfect bench to declutter your space.
A short TikTok video by @studio_adash takes us through the process they used to create a custom bench. We're going to look at how they did it, add a little more detail, and suggest a couple of alternatives for those people who don't have a tool kit that's quite as impressive as this creator's.
Building the perfect outdoor bench for patio storage
You can build this outdoor bench almost any size you like, using plywood and lumber from the local hardware store. A standard sheet of plywood is 8 feet by 4 feet, so that gives a practical maximum length, but it could be much shorter. The thickness of the sheet probably needs to be ¾ inch or 1 inch to give enough rigidity.
TikToker @studio_adash has a neat saw attachment that improves accuracy, but you can achieve the same with a thick metal straight edge and a couple of clamps. The main structure is then put together with quick and easy pocket-hole joinery using a jig to create screw holes at the optimum angle for strength. The one the TikToker uses is a high-quality tool but costs around $150.00. There are numerous less expensive options, and Amazon has pocket hole jig kits starting at around $35.00. Wood glue strengthens these joints, and then wood filler can be used to conceal the holes.
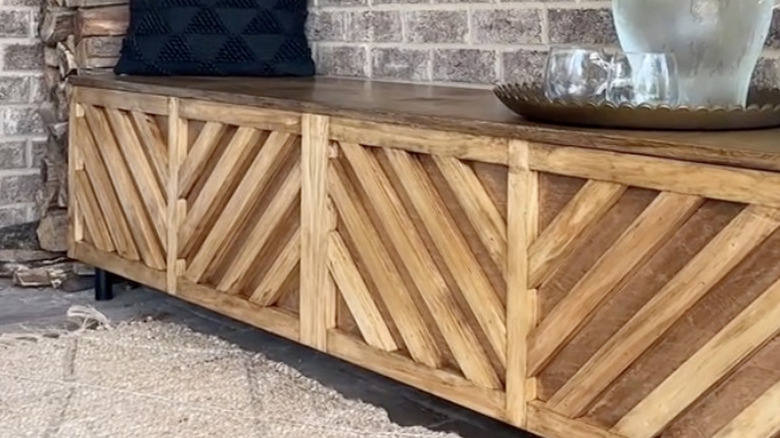
The creator cuts a number of decorative elements for the front using store-bought lumber that is glued and nailed in place. You can nail it by hand if you don't have an electric nailer, or these pieces could be omitted. Another idea is to cut some garden trellis to fit, especially if you've used it elsewhere on or near the patio. We don't see how the bottom is attached, but a thinner piece of plywood could be used, also glued and nailed.
Finishing touches for your outdoor storage bench
As many internal partitions as you need can be measured, cut, and nailed in place. The nail heads are small, so they'll hardly be noticeable, although you could knock them below the surface and cover them with wood filler. Short legs have been attached at some point. The bench will be quite heavy, so these need to be reasonably substantial. There are lots of options available, including those that are height adjustable for patios that are a little uneven.
The top is a single piece of plywood, held on with simple hinged brackets. Be careful when fitting these so that they line up properly. Always drill pilot holes for the screws rather than trying to drive the screws without. It's a good idea to have someone's help because the lid will be difficult for one person to manage. The TikToker uses iron-on edge banding to conceal the edges of the plywood boards, but again, that's a personal choice.
Sand any filler until smooth and any rough edges so there's no danger of splinters. The finished bench can be stained, varnished, or painted to suit your patio decor. There are lots of ways to DIY a garden bench, and with a little care and patience, this one will be as attractive as it is functional.