Repurpose Glass Yogurt Jars Into The Coolest Storage Essential For Your Home
At minimum, glass yogurt jars can be used to house leftovers once the cup is emptied of its colorful cultures. However, for some crafters, these storage containers are items that deserve to be upleveled into pretty faux vintage storage containers. Perfect for storing cotton balls in your bathroom, batteries in your living room, or spices in your kitchen, this DIY basically elevates the room while keeping your daily essentials neatly tucked away. Such a task requires just a few items to make the jars look like they've been aging for decades. A complete version of this craft also rectifies missing lids and pretties the jar up in the process, turning the DIY into everything from storage to decoupaged candle holders.
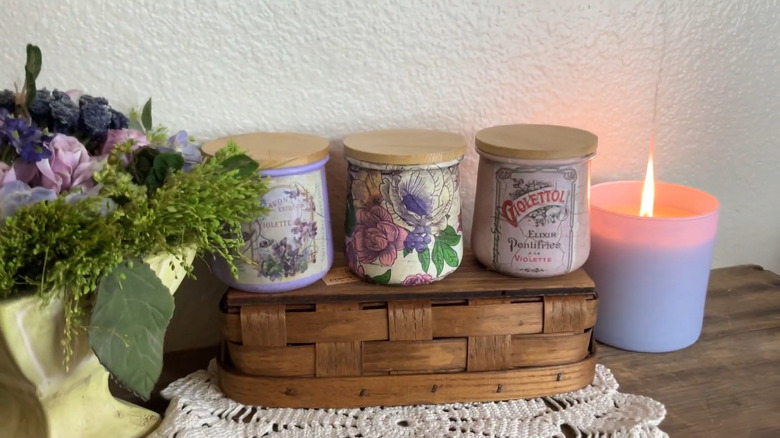
Aside from a couple of empty yogurt jars, you'll need some lids for this. If yours don't already come with one, a whole passel of Amazon sellers offer a variety of them — including options for Yoplait's famous Oui yogurts, such as the Super and Simple Tree of Life Bamboo Oui Lids. The advantage of this decorating technique is that it allows you to add a lot of life to your designs and offers a creative way to use decoupage in your home decor. This you'll get from the finished jars' faux vintage look, which comes from decoupaging some paper napkins with pretty patterns, like the Gudvilla Wildflower Paper Napkins. Because you're going to allow the napkins' design to inspire the DIY's paint colors, choose something that matches your room's decor. Mod Podge, paint brushes, bonding primer, Fine Line Crackle Varnish from Pentart, some brown Dixie Bell's Best Dang Wax, 1000-grit sandpaper, and a couple of old rags are also necessary for this DIY.
Tips for upleveling your yogurt jar
For the paint and decoupage to stick to the jars, you'll need to add a coat of bonding primer and sand the dried primer. This requires a couple of coats. However, before you even do that, you'll want to prep the jars for the coming stages by washing them thoroughly and ridding them of their manufacturer's labels.
Drawing inspiration from Simply Made Unique By Jill, you'll decoupage a napkin to the jar(s) you're decorating. You have two options with this. You can add a decoupaged design to one jar and then decorate the others with matching paint and decorative decals. Or, you can mix and match napkin designs, covering all of the repurposed jars with a slightly different pattern. And here's a pro tip: If you choose a common color scheme between the different napkins, you can practice a little pattern drenching in your decorating scheme.
Regardless of what kind of designs you decide on, all painted and/or decoupaged jars get a treatment of the crackle varnish and the furniture wax to age them. The secret to really making the jar appear aged is to use a heat gun to dry the crackle varnish before you rub on the wax. If you only have a few jars to finish, a hair dryer may work in place of a heat gun. However, for bigger projects, you'll want to invest in the heat gun because it's designed to sustain longer periods of heat than the average blow dryer.