The Secret Bathroom DIY That's Perfect For Storing (And Hiding) Toilet Paper

Let's face it: Toilet paper rolls are a necessity, but they are often bulky and unattractive. No one wants to sit on the porcelain throne staring at a large pile or tower of looming rolls, cringing at this sore spot in their design. Worse, storing them isn't always easy. And if you run out of toilet paper while doing your business but the rolls are across the room, what do you do?
Luckily, there is a neat DIY project that can resolve many of these issues. Adding a hidden compartment beside the toilet can create a more seamless appearance in your bathroom design. You can create hidden storage in the bathroom wainscoting or your drywall using built-ins to stash extra rolls close by. This DIY project is a wonderful hidden storage idea perfect for adding space to your bathroom and keeping toilet paper rolls within easy reach.
However, this is not a renter-friendly solution and may require a professional if you aren't tool-savvy. Additionally, space limitations could render this project less useful, as you want to be able to open the hidden door comfortably while sitting on the loo. Furthermore, a smaller compartment would store fewer rolls. Still, this can be a creative way to combat ugly toilet paper holders in your bathroom. And, if you don't have a need to hide toilet paper using this method, it can still be an unexpected bathroom storage hack that keeps small essentials organized. Here's how to do it.
How to DIY your own hidden storage compartment for toilet paper
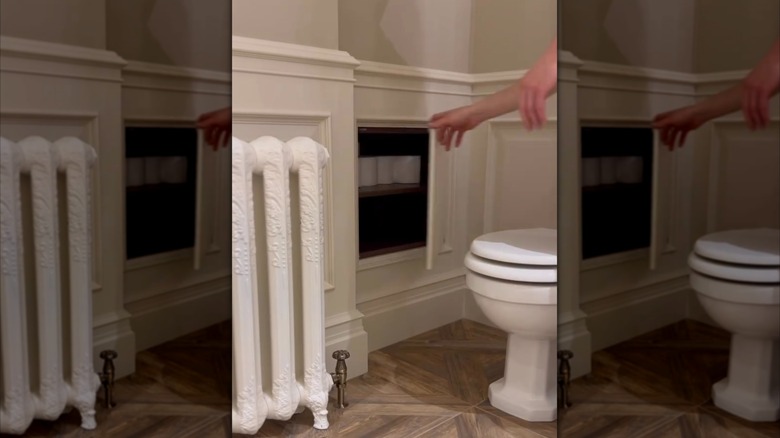
To DIY your own hidden toilet paper storage, you'll need some 2x4s, a small piece of plywood, a drywall saw, nails or screws, a nail gun or screw driver, decorative trim, caulk, and some paint. First, build your shelf to the dimensions you desire. Do this prior to cutting the drywall. You'll want to measure the space and use your toilet rolls as a guide for shelf spacing and sizing. A shelf depth of at least 4 ½ inches and a height of 5 inches should be enough for a standard roll. The length of your shelf will depend on the number of rolls you wish to store.
Once built, paint the shelf and add decorative trim on the front edges. Then, hold up the completed shelf to the wall and trace it with a pencil for an outline. Next, begin sawing, following the outline. Do this carefully to avoid damaging plumbing or electrical work behind the wall. Knowing how to remove drywall without making a mess and doing so safely is key.
With the drywall removed, insert your wood shelf, sliding it into place. Once it's in position, nail it in or use screws to secure it. Caulk any gaps around the edges to seal them. Finally, add a door that matches the surrounding wall in texture and color, then add hinges and a magnet latch for easy opening and closing. And, voilà!