Make Customizable Wooden Wall Decor With A Simple Dollar Tree DIY

Busy crafters have got to love a project that gives them the equivalent of several products with one project's-worth of effort. And what crafter doesn't want to try easy and affordable Dollar Tree DIYs? Thrifty TikToker Marla W from @mwahl_89 cobbled together a satisfyingly simple wooden "super frame" with affordable Dollar Tree bounty. The piece consists of a broad, stained wooden background overset with a faux-hanging picture frame that allows you to slip images in and out to evolve with the seasons or moods.
Make this ultra adaptable ornamental frame with almost entirely Dollar Tree products. Grab a basket and fill it with four Crafter's Square Wood Plank Hanging Signs, a 5-pack of Crafter's Square Wooden Peg Dolls, one pack each of wood dowels and craft sticks, a roll of lace ribbon, and some wood glue if you don't have any at home. Also purchase a large pack of square dowels like these Coowayze Square Wooden Dowels on Amazon, brown wood stain, and hanging hardware like two D-hooks or one or two sawtooth hooks.
You'll also need a wooden picture frame with an opening that's between 6 and 8 inches square; the wood background will be roughly 18 inches by 18 inches, so you'll want a frame that's large enough so that the image won't be dwarfed by its surroundings. If you can't find a square option that you like, a rectangular one could give you an appealing alternative look with a minor tweak that requires only three hanging signs.
Assemble the wooden background
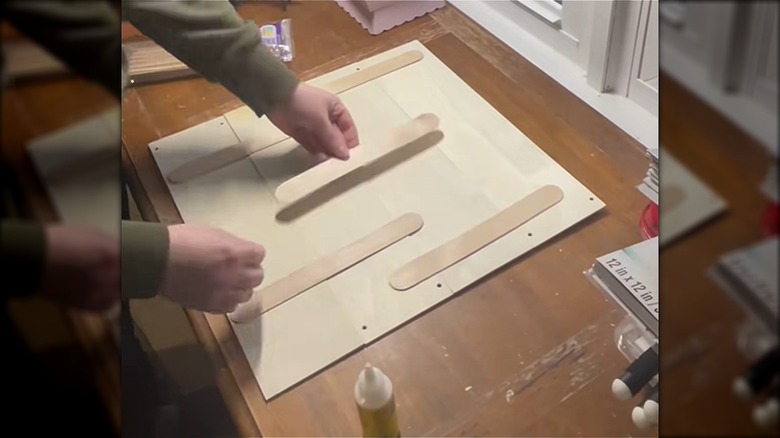
Gather up your supplies along with a pair of scissors, a paintbrush, and a saw or a serrated knife for cutting the dowels. Snip the hanging cords off of the signs, line them up one above the other, and attach them together by gluing on two sets of craft sticks overlapping each sign. If you opted for a rectangular picture frame, only connect three signs so that the background will also be rectangular.
You'll be adding wood trim made from square dowels to the other side after the glue dries (This is a crucial tenet of Wood Glue 101!). However, the dowels might not cover the hanging holes in the wood signs. If that's going to bother you, there's an easy DIY wood filler you can make at home. For this, you'll need some sawdust, so maximize efficiency by pre-cutting your square dowels for the frame.
Lay them out around the perimeter of the connected signs and cut pieces to fit any gaps. Do this over some paper so that it's easy to collect the sawdust. Stir a small amount of wood glue and sawdust into a thick paste, smooth it over the hanging holes on the side you'll be staining, and let it dry before painting the surface with wood stain. Glue the square dowel trim around the edges of the connected signs, and give it plenty of drying and curing time. Before adding any of the fixtures on the front of the sign, attach the hanging hardware along the upper edge of its back.
Framing up the finishing touches
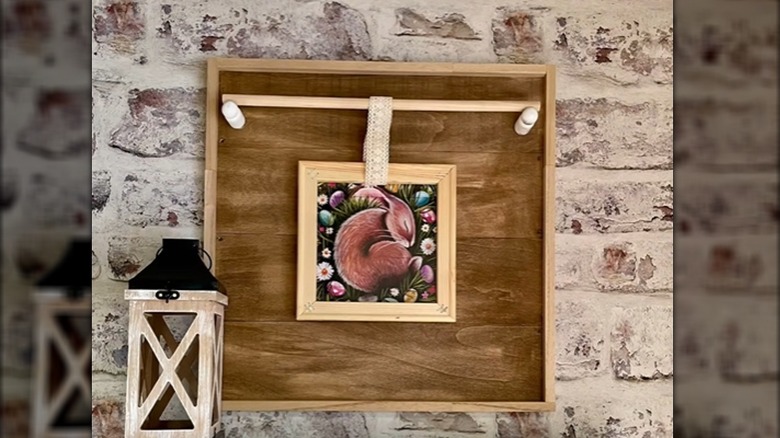
Now it's time to pretty-up the face of your piece. Glue two wooden peg dolls about 3 inches below the trim on the top edge and 1 inch in from each side trim. Let the glue dry and cure fully before moving onto the next step. Set your round wooden dowel atop the dolls, and glue it in place; it might be helpful to stand the sign against a wall at a slight angle during the drying time. While the glue hardens up, gather the leftover scraps you cut from the square wood dowels and the picture frame. Remove the backing and glass from the frame, and glue the wood scraps along the back bottom and side edges of the frame. This will make the frame project from the background so you can slide images in and out.
Center your picture frame on the background and glue it in place, making sure that the edges are parallel to the main piece. Unroll a length of ribbon, loop it over the dowel rod, and extend it to the top center of the picture frame. Cut a section that's long enough for a tab to make the picture frame appear suspended from the dowel.
Glue the ribbon's cut edges to the front of the frame. To hide the raw edges, fold the topmost end under and glue the folded edge atop the other cut. You can also conceal the edges by gluing on a decorative element. Using the frame's backing as a template, trace it over any image you'd like to display. Cut it out, and slip it behind the frame.