DIY A Sparkly Backsplash That Elevates Kitchens And Bathrooms
We may receive a commission on purchases made from links.
A backsplash in a kitchen or bathroom does more than just protect the wall from splashes of marinara sauce or the remnants of your kid's motocross activities. The right one adds sparkles, and in the best case scenario, it's also pretty cheap to put in. The key to getting "sparkles" and "cheap" in the same DIY activity comes down to being savvy about sourcing the materials for the back splash. In this case, there's nothing like a few cheap floral marbles from the Dollar Tree and other craftsy marketplaces to add a little twinkle to your sinkle.
You're going to have to dust off your grouting skills for this one, though. To warm up, get out your favorite version of tile adhesive, like AcrylPro from Custom Building Products, while bags of assorted flat colored marbles from your local dollar store provide the sparkle. You'll also need to have some blue painter's tape on hand to tape off any areas you don't want to get slimed by the adhesives or grout. And speaking of grout, you'll need some of that, too, along with a concrete trowel or putty knife. Plus, the job requires some caulk to seal the space between the backsplash and the countertop.
The marbles or stones need to be cleaned before they're applied to the wall. You'll make them shine if you use a colander and dish soap to wash them with. This will rid the stones of the oils from your skin as well as any dust. Have a large towel on hand to dry the wet stones on. And finally, you'll need a carpenter's pencil and a ruler to mark the wall.
Putting the backsplash together
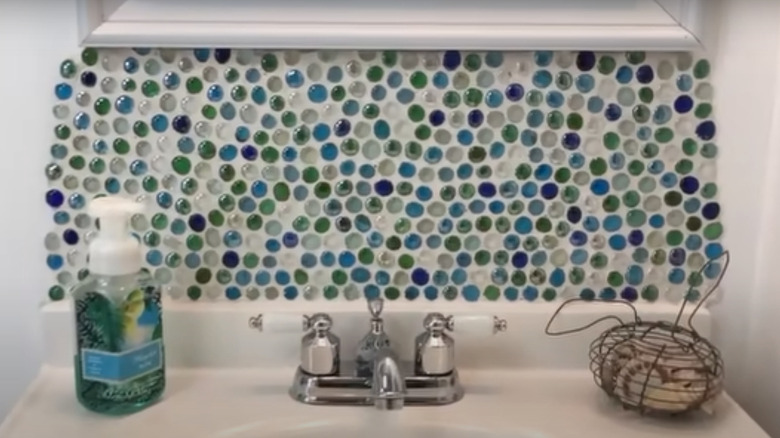
To get this creative back splash idea going, cut the floral marbles out of their mesh bags and give them a good wash with some Dawn soap. You'll have an easier time of it if you put them into a colander to rinse the soap off. This allows you to move your fingers through the marbles to ensure that the water touches all of them. Allow them to dry on a towel that you've spread out next to the sink.
While you're waiting for the marbles to dry, mark the area of the wall you're going to cover with the floral marbles with a pencil. Although you can use any kind of pencil for this job, a nifty flat-head carpenter's pencil doesn't roll around on the surface you're drawing on. This makes for a more precise line. Once the wall is marked off, you'll spread the tile adhesive on it with your trowel. Tape off the sink and other places near where you'll spread the adhesive to protect countertops, cabinets, and other features.
The glass stones get pressed into the adhesive. Try to space them out evenly, and work quickly and in small chunks of space so that you get maximum coverage on the adhesive without it drying out. Grout goes on top of this. You can spread it over the stones with a rag. To properly grout your stones, you'll push the grout into the cracks and crevices between the stones. Scrub the extra grout off using a sponge that you've dipped into water and then, finish the area off with caulk.
Personalizing your back splash
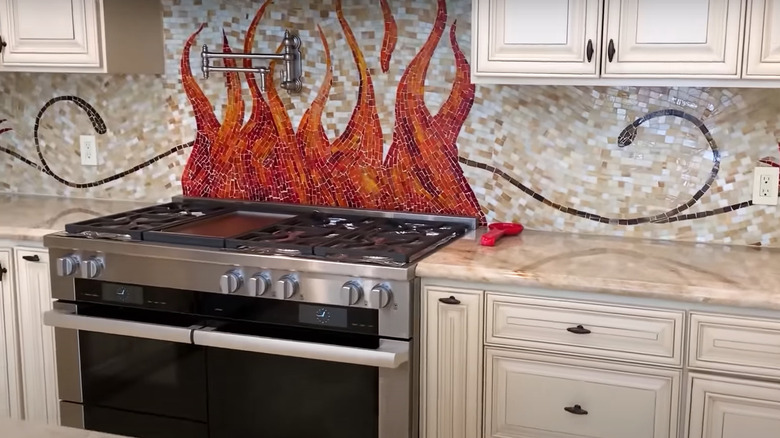
This project has a lot of potential for personalization, depending on the size of the area you're covering and the types of colored glass marbles you use. While it is possible to cover just the area behind your bathroom or kitchen sink with the stones, you're not limited to this. If you get enough stones, you can extend the reach of the back splash to the space above and around the commode or under the kitchen counters and around the stove, depending on which room you're remodeling.
Crafting patterns with the stones gives you additional options for creative expression. For example, if you've purchased some blue and green bags of stones from the dollar store, you could embed solid patches of colors in key spots to create solid blue stripes or round green bubbles. If you're feeling more creative still, get some pink and red flat floral stones from FUTUREPLUSX Store to "draw" koi fish onto the bathroom wall with the flat glass marbles. Use blue or black marbles to give the fish eyes and bodily stripes. Other shapes like dragonflies, a large sun, or fruits and vegetables count among the other types of imagery you could make from arranging the stones into pictures or patterns. The decorated back splash then becomes a cheap way to augment the room's decor theme and makes a viable alternative to the bathroom tile ideas you've been kicking around.