This DIY Pool Noodle Planter Turns Succulents Into A Fairy Wonderland

We may receive a commission on purchases made from links.
Pool noodles don't just add buoyancy to your swim experience. They can lift up — albeit secretly — your fairy garden, too. Those foamy tubes of red, green, and blue are like magic wands, turning your toy-sized village greens into succulent-filled wonderlands in terracotta pots, complete with fairy houses and babbling brooks.
Much of what makes this magical DIY fairy garden tick happens underneath the foundations of the fairy houses. You'll create a home for it inside the medium to large terracotta pot of your choice. Assorted items go inside of the pot: Aside from those over-sized foam noodles, which will help with drainage, your fairy garden pot also requires a couple of bags of YISZM Store Succulent and Cactus Gravel Pebbles and some Miracle-Gro Cactus, Palm and Citrus Potting Mix. This step of the process additionally requires a sharp serrated-edge knife, a small cup or shovel, and a small lidded plastic container. A cottage cheese carton would work well for this because it's just the right size.
Once the foundations are laid in your fairy village, you'll need items to fill the rolling hills and walkways of the fairy garden. Fairy gardens are usually built of homey items cast in resin. You can buy individual pieces, like cobblestone homes, lampposts, park benches, little red mushrooms, and tiny bridges, to fill the streets in front of your fairy house, or you can simplify things by purchasing RFSRZ Store Fairy Garden Accessories. You'll need succulents to put the green in your fairies' village and flat floral marbles for the water feature. A fish tank bubbler finishes off your fairy garden supplies list.
Building the fairy garden from pool noodles on up

This pool noodle project begins with you filling the bottom of the terracotta pot with pool noodle pieces. These you'll trim down with the help of the serrated-edge knife. How many pool noodles you'll need rests largely upon the size of the terracotta pot. The larger the pot, the more pieces you require to fill the bottom. To give you a rough estimate, you'll need enough pieces to fill about one-third of the pot. The pool noodles assist with drainage by pushing the excess water down through the bottom of the pot and out the drainage hole. They also pad the bottom of the pot so that you don't need as much soil and as many rocks.
@jackyhasfun Magical Garden DIY ✨ #fairygarden #crafty #diy #diyproject #diycraft #craftymom #garden #gardenproject #gardendesign #fairy #beautifullife #diygarden produced by JackyHasFun
♬ Positive background music such as play and games(1251730) – earbrojp
On top of the pool noodles go the drainage rocks. These fill about the middle third of the pot. Next, you'll place the cottage cheese container (with its lid on) in among the rocks. You'll want to nestle it in place so that you can drop in some of the gardening soil around it. Some big heaping sprinkles of the potting soil come after the drainage rocks. The soil may bury the top of the cottage cheese container, so be sure to keep the lid on until you're done adding the dirt to the pot.
Build the fairy garden's water feature by taking the lid off the plastic container and filling the cup with the fish tank bubbler, some water, and some FUTUREPLUSX Flat Blue Floral Marbles. After that comes the decorative elements. Add fairy houses, lampposts, mushrooms, and more until the tiny garden twinkles with happy magic.
Giving the garden your own twist
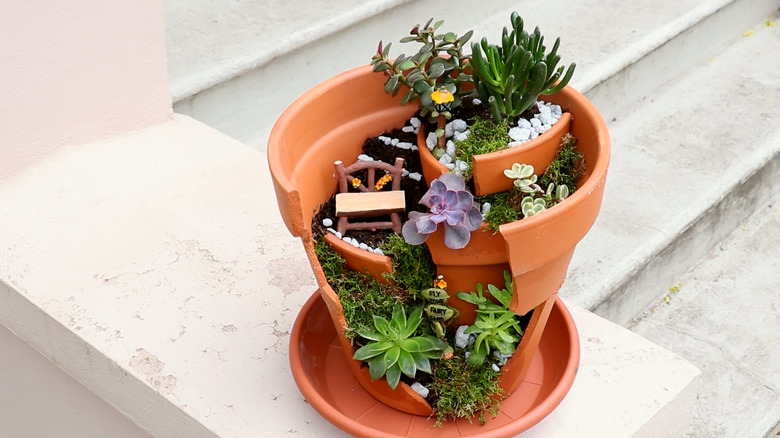
Few things are as magical as the thought of an enchanted fairy village, and you can turn your single fairy garden in a pot into a whole town by adding some layers of landscaping. If your main pot is large enough, you can put another terracotta pot into your succulent garden display to create a stair-step effect. This is a particularly fun option if you've always wanted to try to make a broken pot succulent garden. These tabletop oases make gardens from the shards of your broken pottery.
To incorporate this element into the existing fairy garden, you'll fill the larger bottom pot as usual, except you're going to leave space in the dirt that's large enough to fit the base of the broken planter. Following that, you'll construct a broken pot fairy garden on top of the soil in the bigger pot in the place where you left some space. The cascading soils in the broken pot, plus a few plants, create a transition area in the miniature landscape, optimizing the space and making the soil hills in the broken pot blend seamlessly into the soils of the bottom pot.
Finally, it's not really a fairy garden without a bit of sparkle. The water feature will help with this, but you can take things one step further by adding Oubest Store Glow-in-the-dark Gardening Pebbles to some of the areas that have no plants or fairy garden features. These pebbles will become the walkways for the fairies to play on once the moon rises high in the sky.